
Staff Manual
For housing staff — properties, repairs, materials, maintenance, work orders and costs.
Version 2026-09-25 · tumbletracker.ca
Staff Manual
For housing staff — properties, repairs, materials, maintenance, work orders and costs. · Updated 2026-09-25
1.Welcome
TumbleTracker keeps one record of every house your community looks after: who lives there, what needs fixing, what materials the job needs, which appliances are under warranty, and what it all cost. Everything is in one place, so nothing lives only in someone's truck or memory.
As staff you work with the houses day to day: log repairs, note materials, keep the maintenance schedule current, build work orders and record costs. This manual walks through each of those jobs.
How this manual is organised
Each chapter is one kind of job. Inside a chapter, every task is a short numbered list with a picture of the screen beside it. Button names are shown in bold, exactly as they appear on screen. A blue box is a tip; an amber box is a warning.
Who can do what
Every person in your community has one of three roles. The role decides what they can change, and it is shown, spelled exactly as in the table, on a badge at the bottom of the menu beside their name.
| Role | Can | Cannot |
|---|---|---|
| Admin | Everything below, plus invite and remove users, change roles, delete a property, change the community name | — |
| Staff (Full) | Add and edit properties, tenants, photos, repairs, materials, appliances, maintenance, work orders and costs; import data; print reports | Delete a property, manage users or account settings |
| Staff (Read Only) | See every screen and print every report | Add, edit, delete or import anything |
Need help? Email [email protected].
2.Signing in
Accepting your invitation
You do not create your own TumbleTracker account. You are invited by email, and the invitation is what sets your password the first time.
- Open the email titled You've been invited to TumbleTracker and click Accept Invitation. The link works for 10 days; if yours has expired, ask your administrator to invite you again.
- Type your name in Your Name, then a password of at least 12 characters in Password, and the same password again in Confirm Password.
- Click Activate Account. TumbleTracker confirms the account is active and shows a Sign In button — click it to sign in for the first time.
Signing in
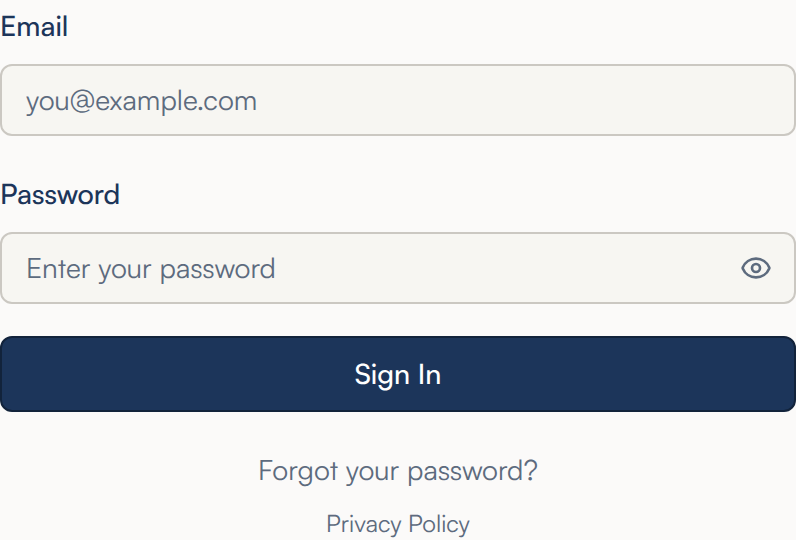
- Go to tumbletracker.ca and click Sign In.
- Enter your email address and your password.
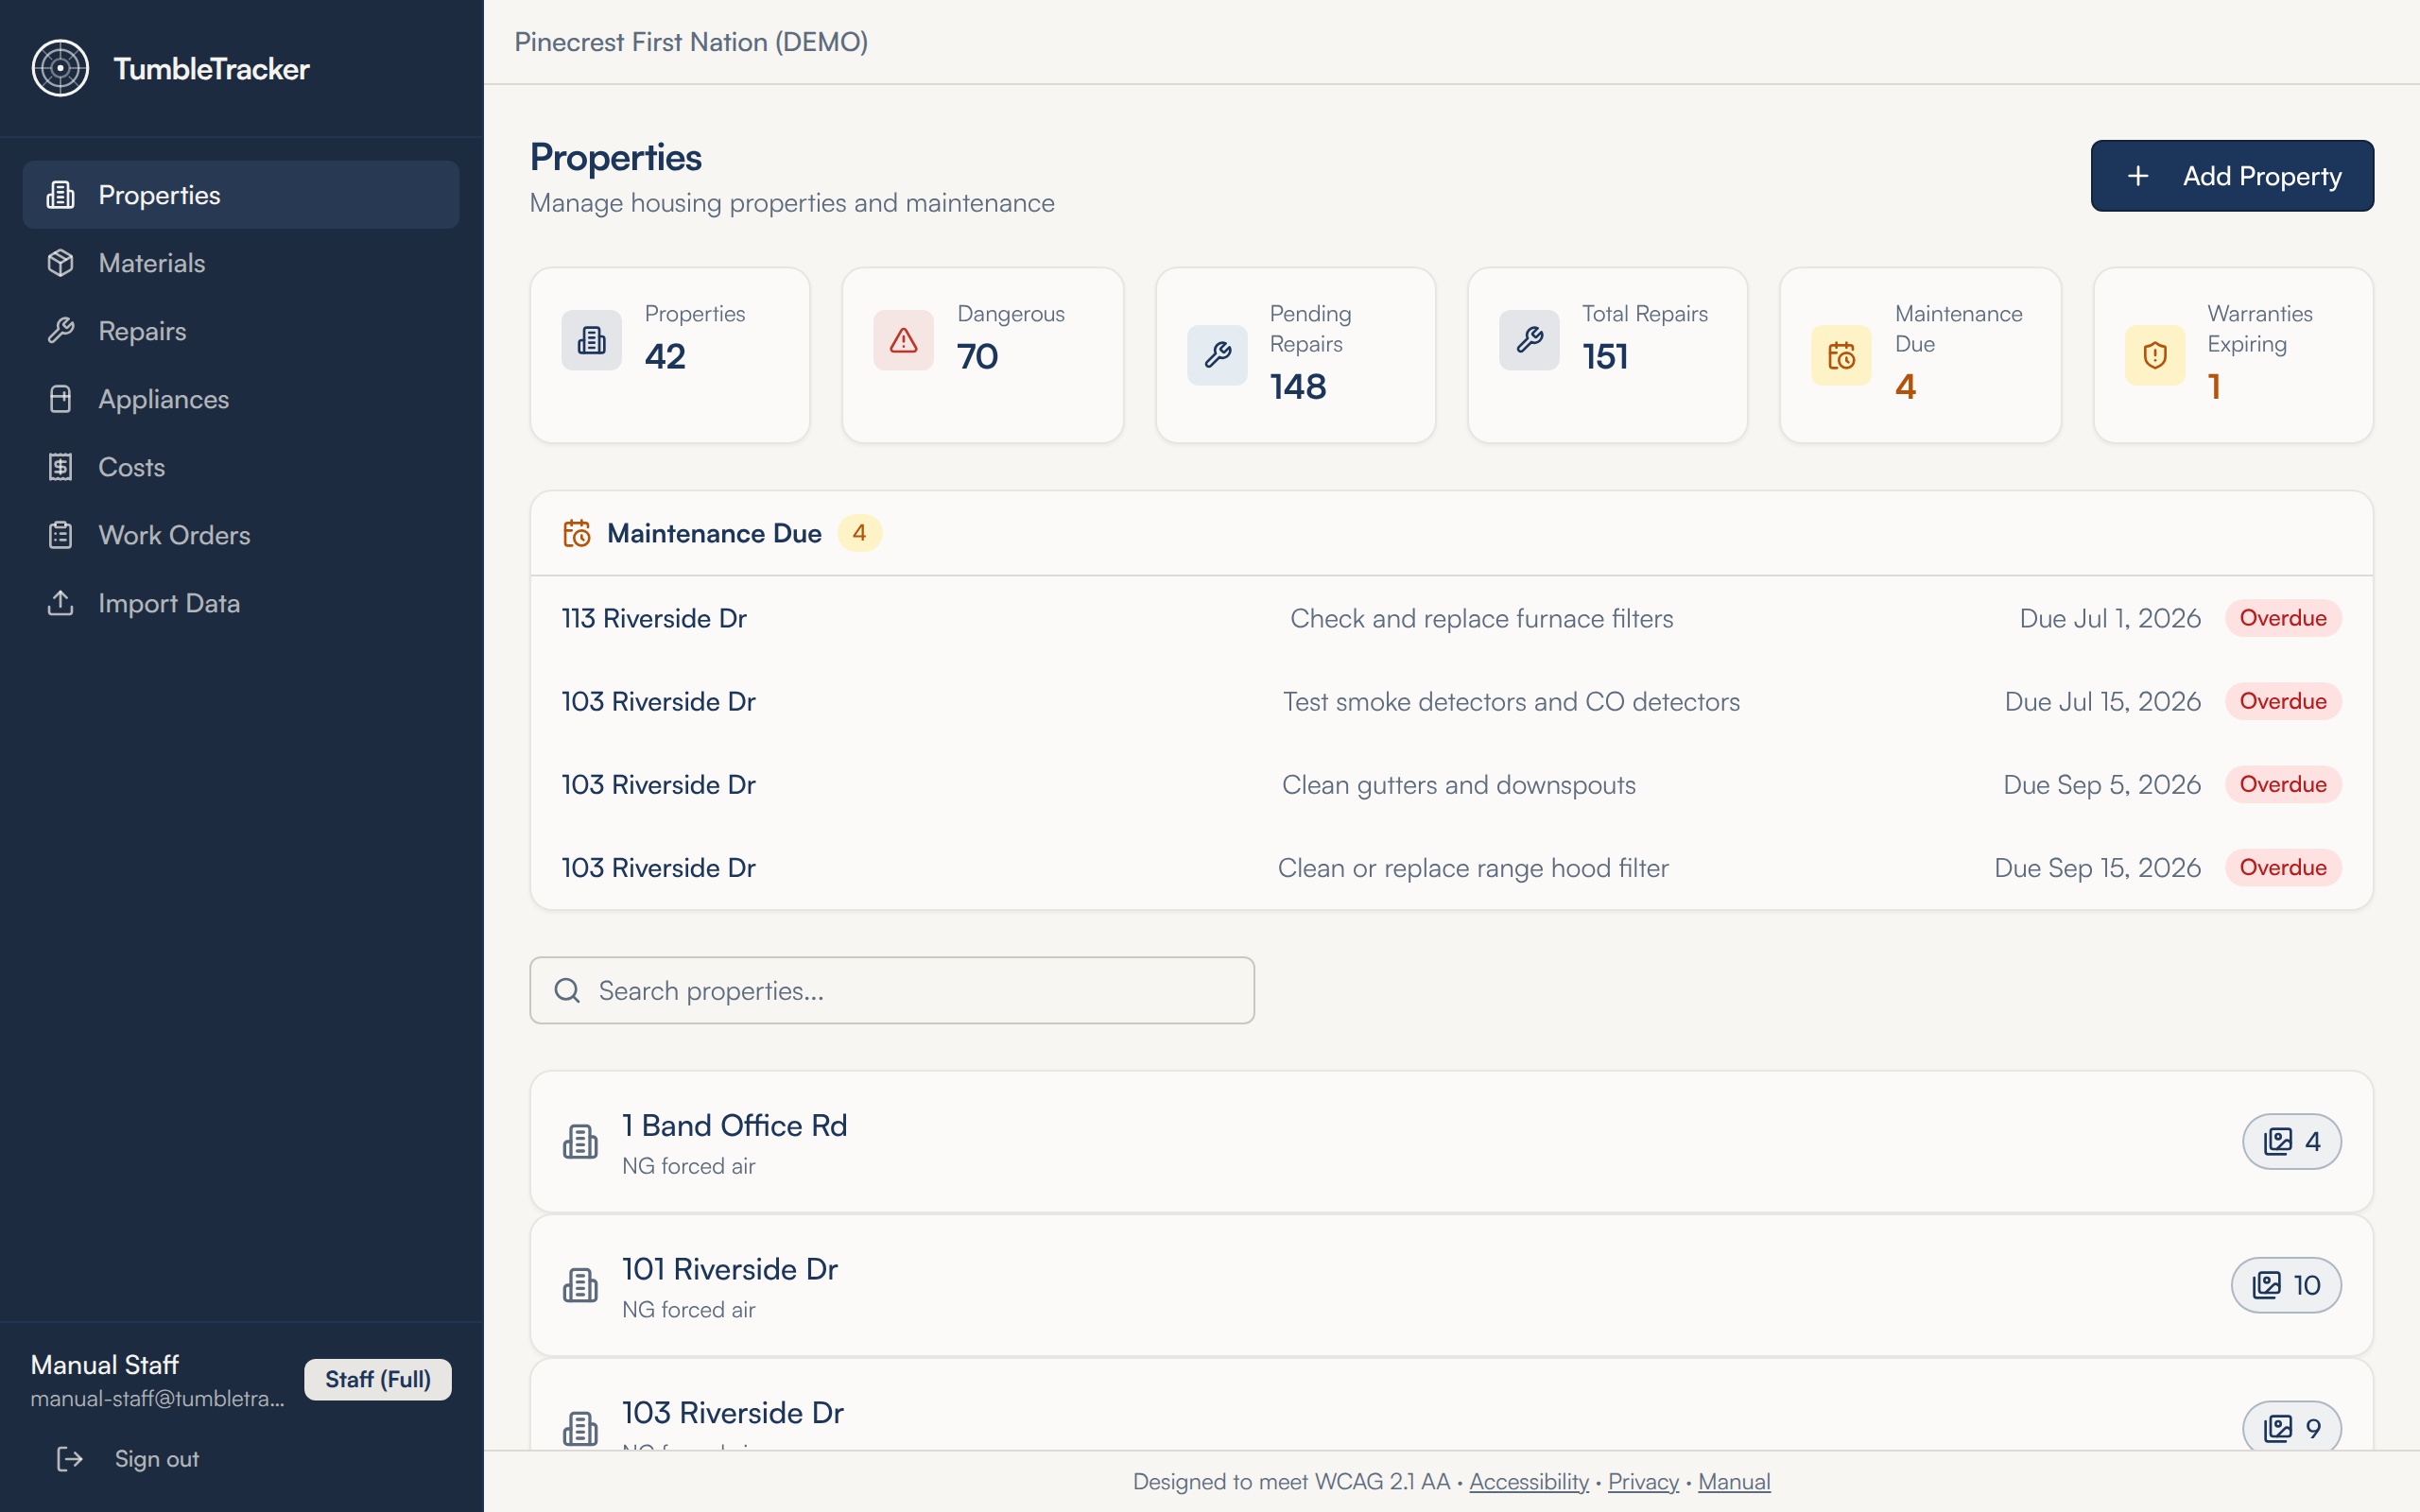
- Click Sign In. You land on Properties, which lists every house in your community.
If you cannot sign in
When the sign-in does not go through, a red line under the form says why:
| The message | What it means |
|---|---|
| Incorrect email or password. | Check both and try again. TumbleTracker does not say which one is wrong. If you have forgotten your password, reset it (below). |
| Your account is not active. Ask your administrator, or write to [email protected] for help. | Your login has been suspended, or your invitation has not been accepted yet. |
| Your community's account is suspended. Write to [email protected] for help. | The whole community is paused, not only you. |
| Your demo has ended. Write to [email protected] to keep using TumbleTracker. | A trial community has reached its end date. |
| Too many attempts. Please wait a few minutes and try again. | Several tries in a row were refused. Wait, then try once more carefully. |
If you forget your password
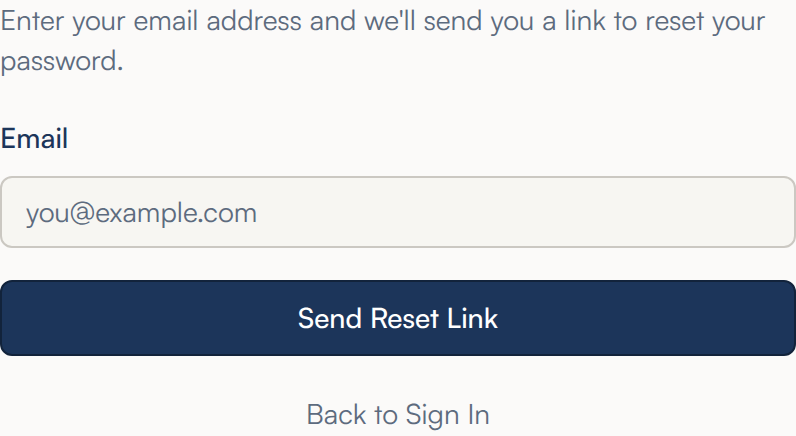
- On the sign-in screen click Forgot your password?
- Enter your email address and click Send Reset Link. TumbleTracker emails you a link that works for one hour.
- Open the email and click Reset Password. Type a new password of at least 12 characters in New Password, repeat it in Confirm Password, and click Reset Password.
- Click Sign In and sign in with your new password.
Finding your way around
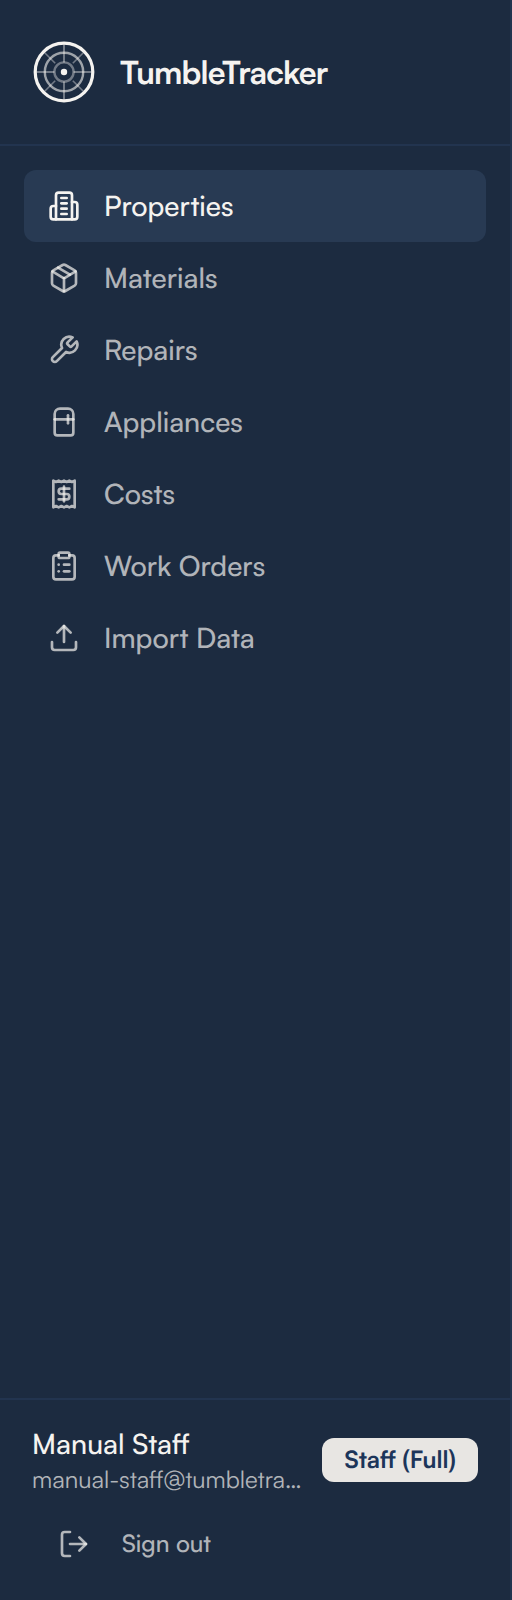
- The menu on the left lists the main screens: Properties, Materials, Repairs, Appliances, Costs, Work Orders and Import Data.
- Your name and your role badge are at the bottom of the menu. Admin, Staff (Full) or Staff (Read Only) tells you what you can change.
- Click Sign out when you are done on a shared computer.
Where to find it: tumbletracker.ca → Sign In.
3.Your properties
Every house your community looks after is one property in TumbleTracker. The property is where everything else hangs: its repairs, its materials, its appliances, its photos, its costs and the people who live in it. Properties is the screen you land on when you sign in.
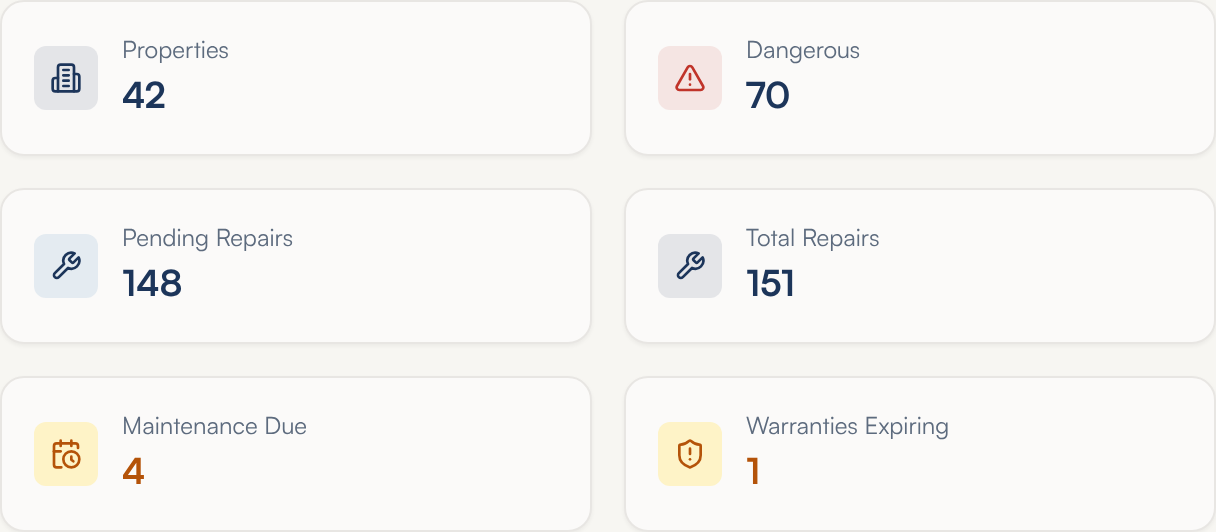
Reading the Properties screen
- Six cards across the top count the whole community. Properties is how many houses are on your list.
- Dangerous counts repair items ticked as dangerous that are not yet Completed — finishing the work takes an item off this card. Pending Repairs counts repairs still marked Pending; Total Repairs counts every repair ever logged, finished or not. Click any of the three and the Repairs screen opens already filtered to those items.
- Maintenance Due counts scheduled tasks that are overdue or due in the next 14 days. The list under the cards names them; click a line to open that house's maintenance schedule. When nothing is due the strip reads ✓ All maintenance on track.
- Warranties Expiring counts appliances whose warranty runs out within 90 days. Click it to open the Appliances screen showing just those.
- Below that, Search properties... filters the list by address as you type, and each house shows its heating type, a Wood Stove badge if it has one, and — on the right — how many photos it has.
Adding a property
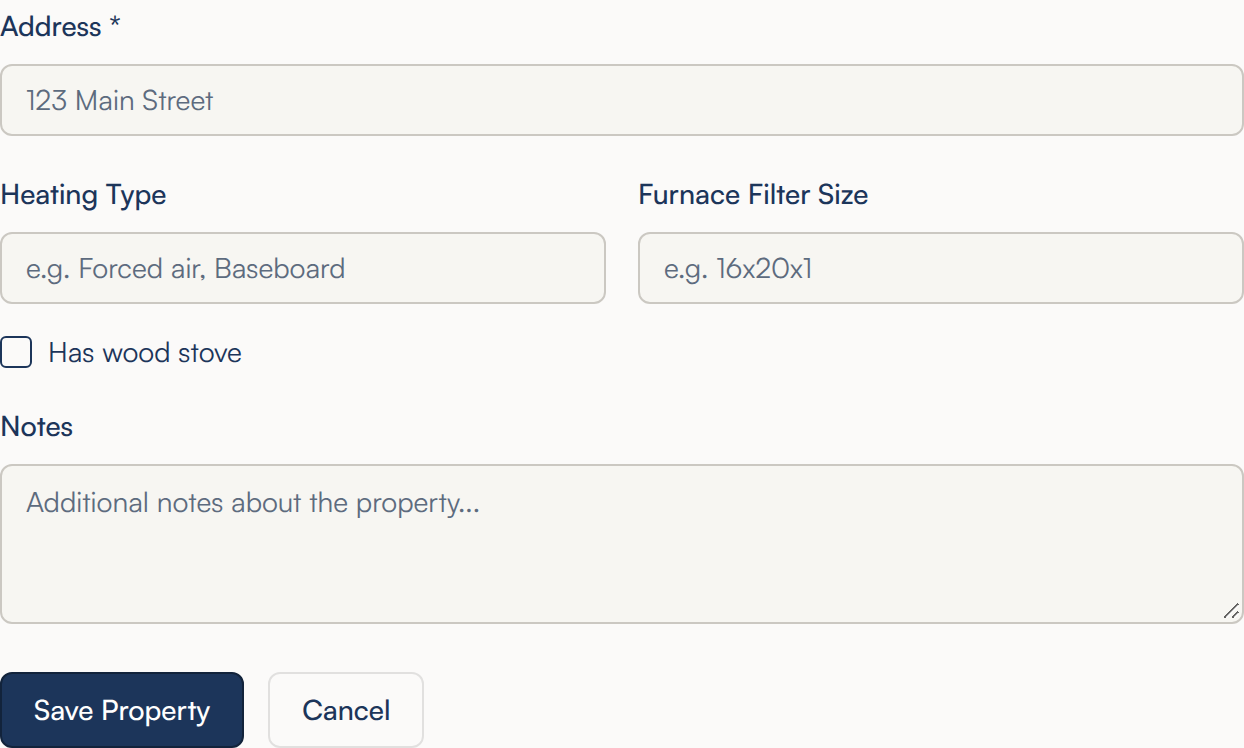
- On Properties, click Add Property at the top right.
- Type the street address in Address. It is the only thing TumbleTracker insists on, and it is how the house is named on every other screen and report. Each house needs its own address: if another house in your community already has it, TumbleTracker says A house with this address already exists in this community. and saves nothing.
- Fill in Heating Type (for example NG forced air) and Furnace Filter Size (for example 16x25x1) if you know them. Tick Has wood stove if there is one.
- Add anything else worth knowing in Notes. It shows in a box just under the address.
- Click Save Property. TumbleTracker opens the new house's page, ready for its repairs and photos.
Editing a property
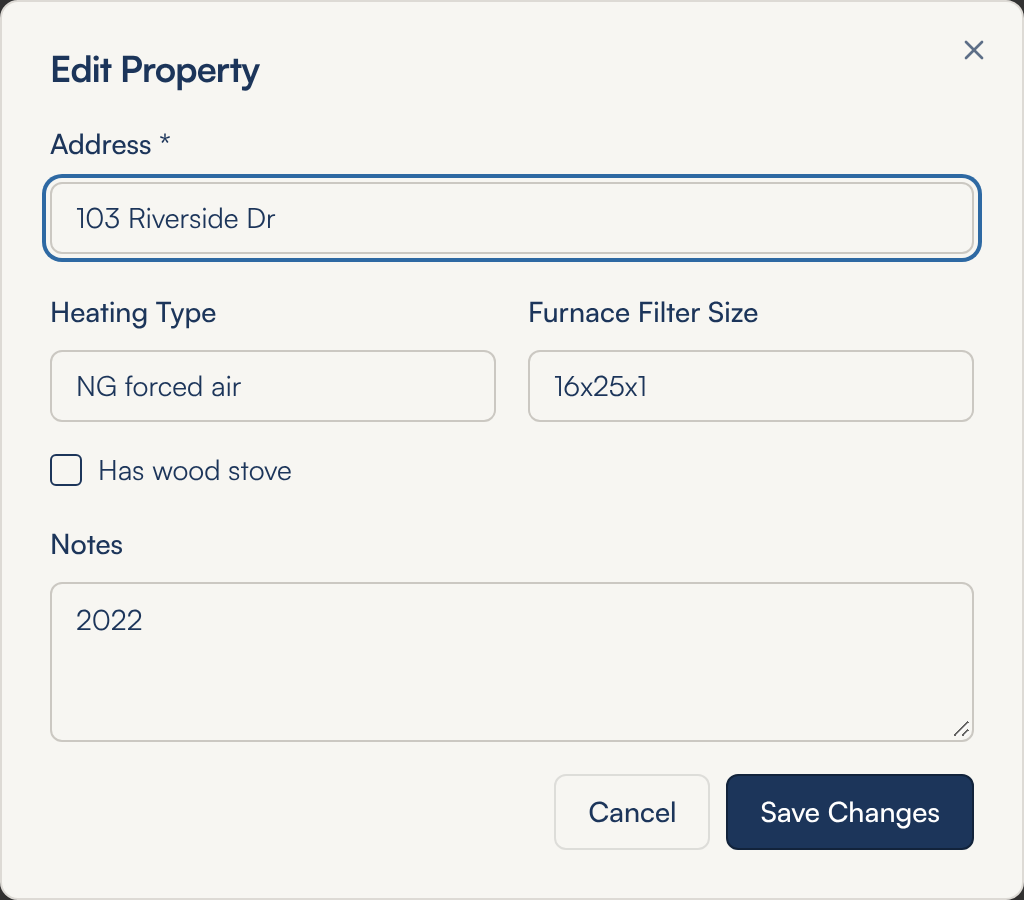
- Open the house and click Edit in the row of buttons beside the address.
- The Edit Property window opens with the five details already filled in: Address, Heating Type, Furnace Filter Size, Has wood stove and Notes. Change what needs changing.
- Click Save Changes. The heading and the notes box update at once; Cancel keeps what was there. Everything else recorded against the house — repairs, photos, costs — stays exactly as it was. An address another house already has is refused with the same sentence as when adding a house.
Opening a property
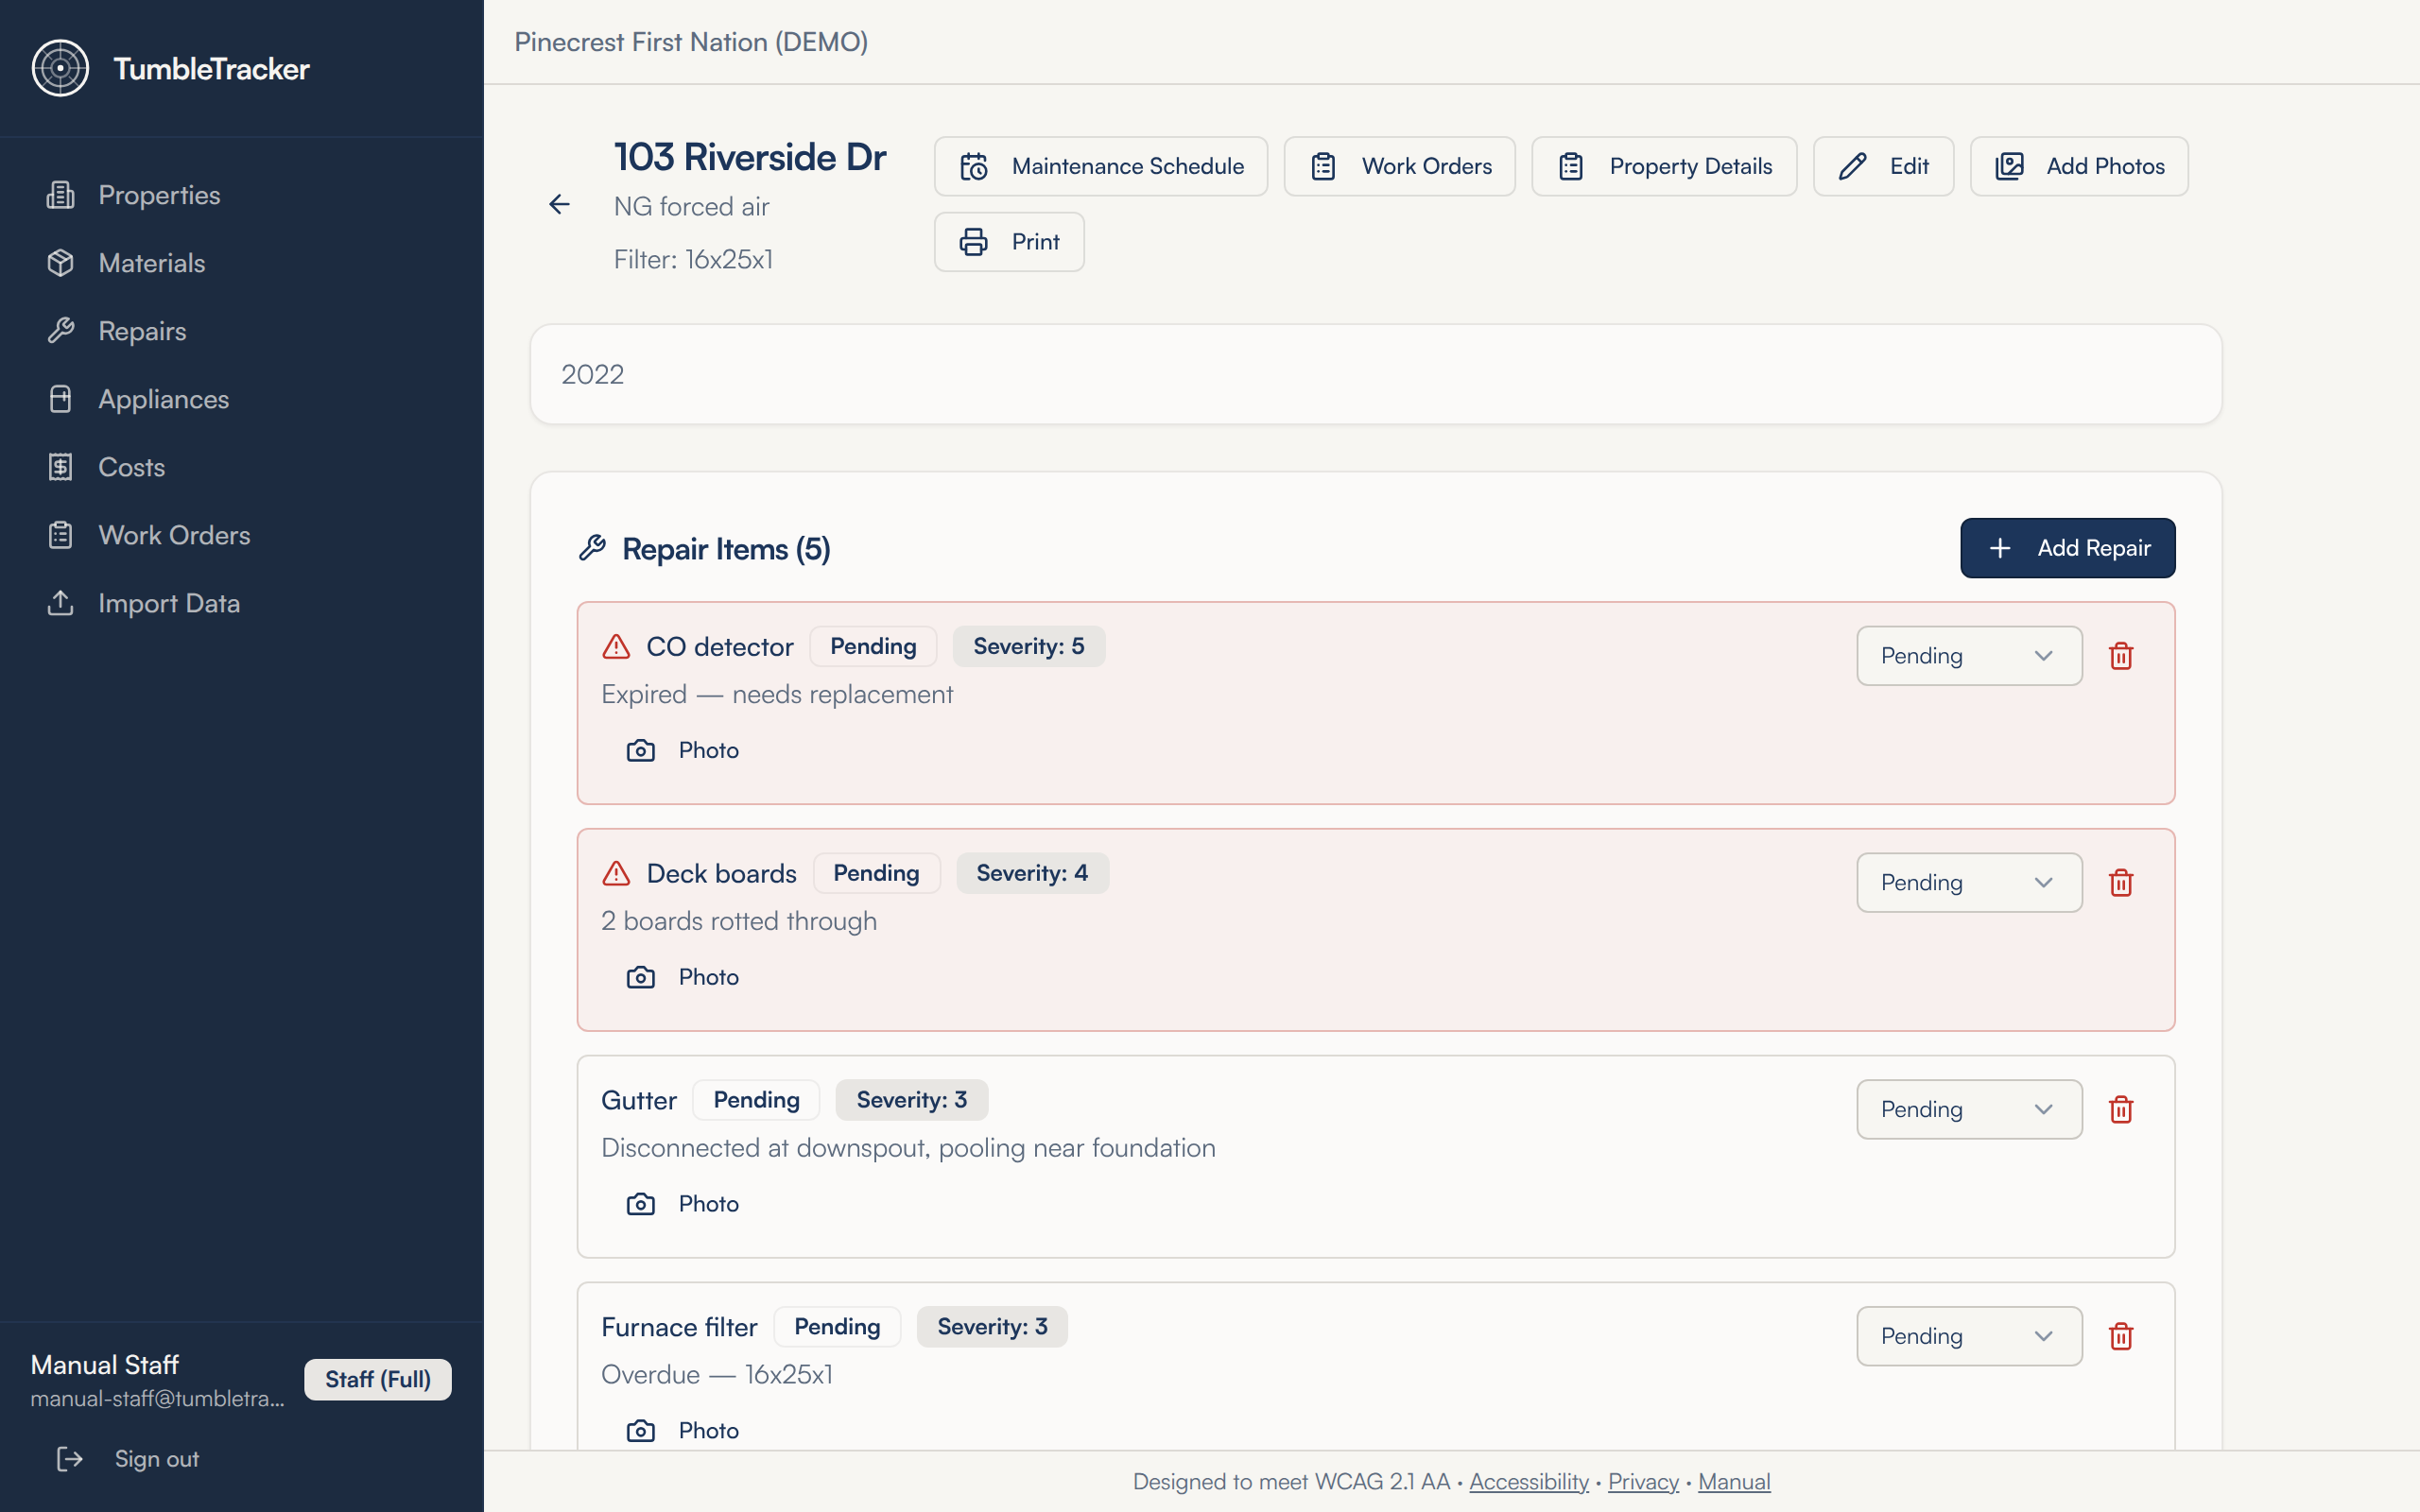
- On Properties, click the house. Its address is the heading, with the heating type and filter size under it.
- The row of buttons beside the address opens the rest of the house: Maintenance Schedule, Work Orders, Property Details, Edit, Add Photos and Print.
- Down the page come the sections, each one a card with its own count: Repair Items, Materials, Appliances, Costs, Photos and Tenants / Residents. Each has its own chapter in this manual.
- The back arrow beside the address returns you to Properties.
The building record
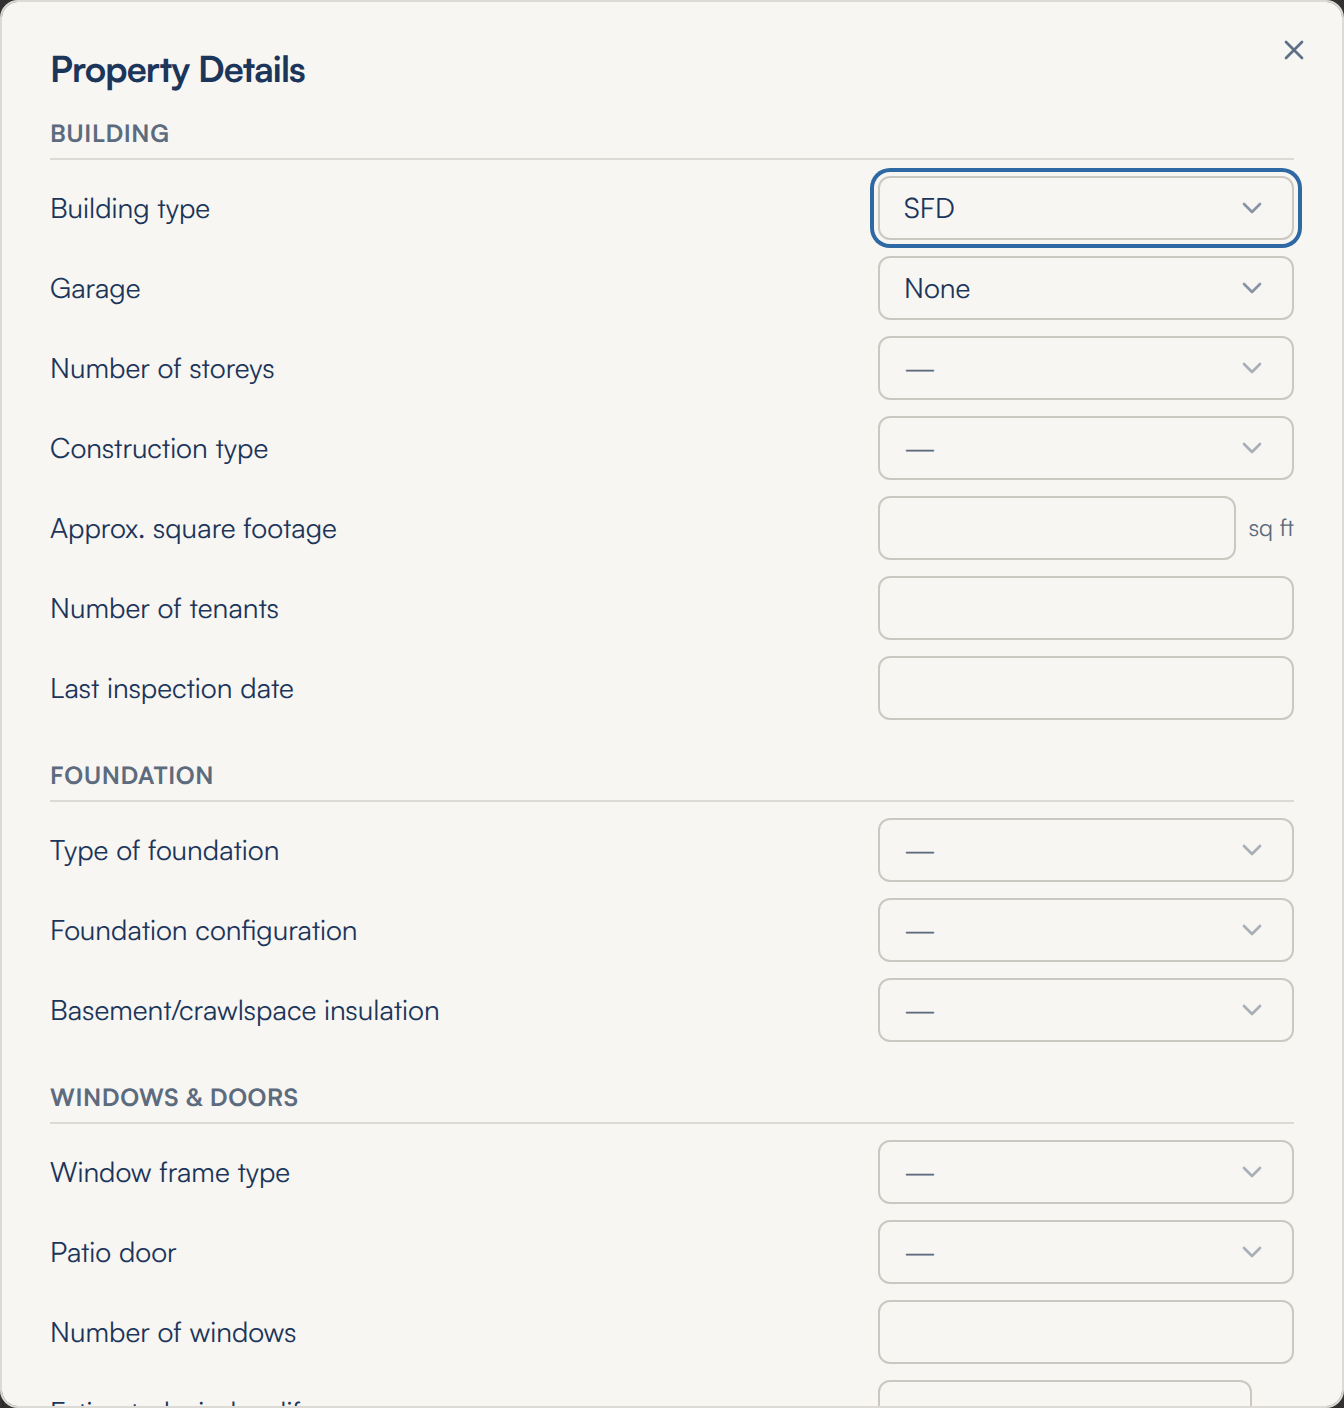
- On the house's page, click Property Details. This is the building's own record — what it is made of, not what is wrong with it. The window reads what is saved first; for a moment it may say Loading the saved details… before the sections appear.
- Work down the eight sections: Building, Foundation, Windows & Doors, Exterior / Walls, Roof, Water & Plumbing, Interior, and Heating, Ventilation & Safety.
- Each row is a dropdown, a number, or Yes / No; Last inspection date is a plain text box, so a date written any way (March 6, 2025) can be kept as it is. Flooring present and Type of heating let you tick more than one answer. A dropdown also shows a value already on file that is not one of its choices, so nothing recorded earlier is hidden.
- Click Save. Cancel closes the window and keeps what was there before.
- If the saved details cannot be read, the window says so and offers no Save — close it and try again in a moment. If someone else saved this house's details while you had the window open, your save is refused with These details were changed after you opened them, so nothing was saved. Close the window, open it again to see their changes, and make yours.
Tenants
- Scroll to Tenants / Residents at the bottom of the house's page and click Add Tenant.
- Type the Name — the only thing required — then Phone, Email and Notes if you have them.
- Click Add Tenant. The person appears on a card with their phone and email under the name.
- To change something, click the pencil on their card, edit, and click Update. To take someone off, click the red bin, then Delete when TumbleTracker asks Remove this tenant?

Where to find it: Properties in the menu → a house. New houses: Properties → Add Property.
4.Photos
A photo settles an argument that a paragraph cannot. TumbleTracker keeps photos in two places: on the house, sorted into categories, and on a single repair item (that one is in the Repairs chapter). This chapter is the house gallery.
Adding photos
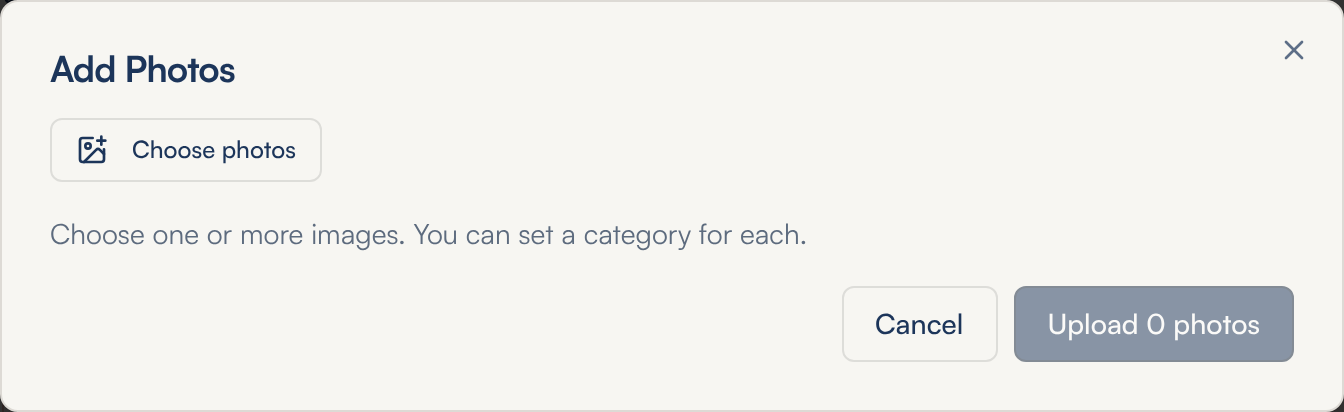
- Open the house and click Add Photos — either the button beside the address or the one on the Photos card. Both open the same window.
- Click Choose photos and pick one or more pictures. Any image file is accepted, up to 20 MB each.
- Each picture you chose gets a row with a Category dropdown and a box for an optional caption. If you chose several, Set all to: gives them all the same category in one go. The bin on a row drops that picture before anything is sent.
- Click Upload. The button counts what it is about to send — Upload 3 photos — and tells you how far it has got while it works.
Opening a photo full size
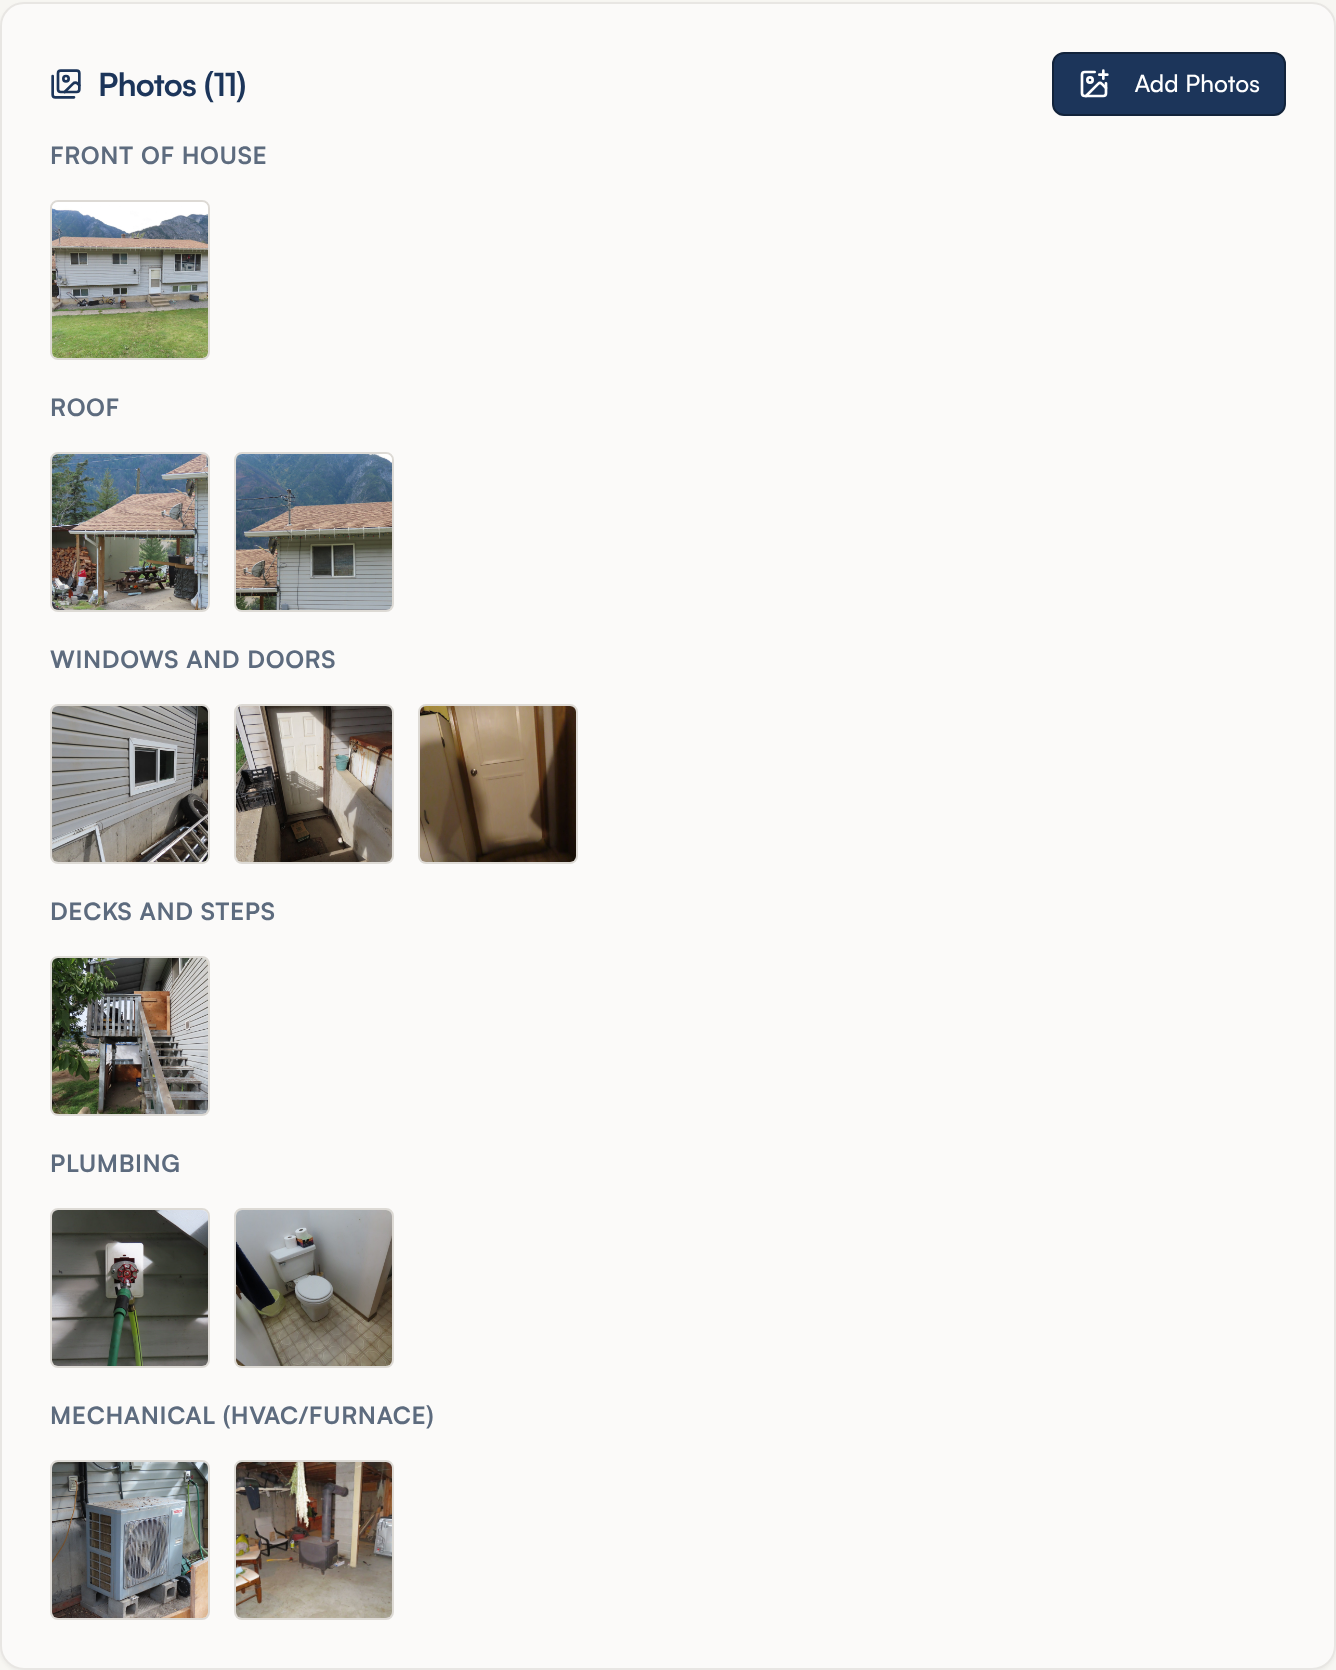
- On the house's page, scroll to Photos. The gallery is grouped under the category headings, in the order above.
- Click any thumbnail. The picture fills the screen over a dark background.
- Close it with the × at the top right, by pressing Esc, or by clicking the dark background.
Removing a photo
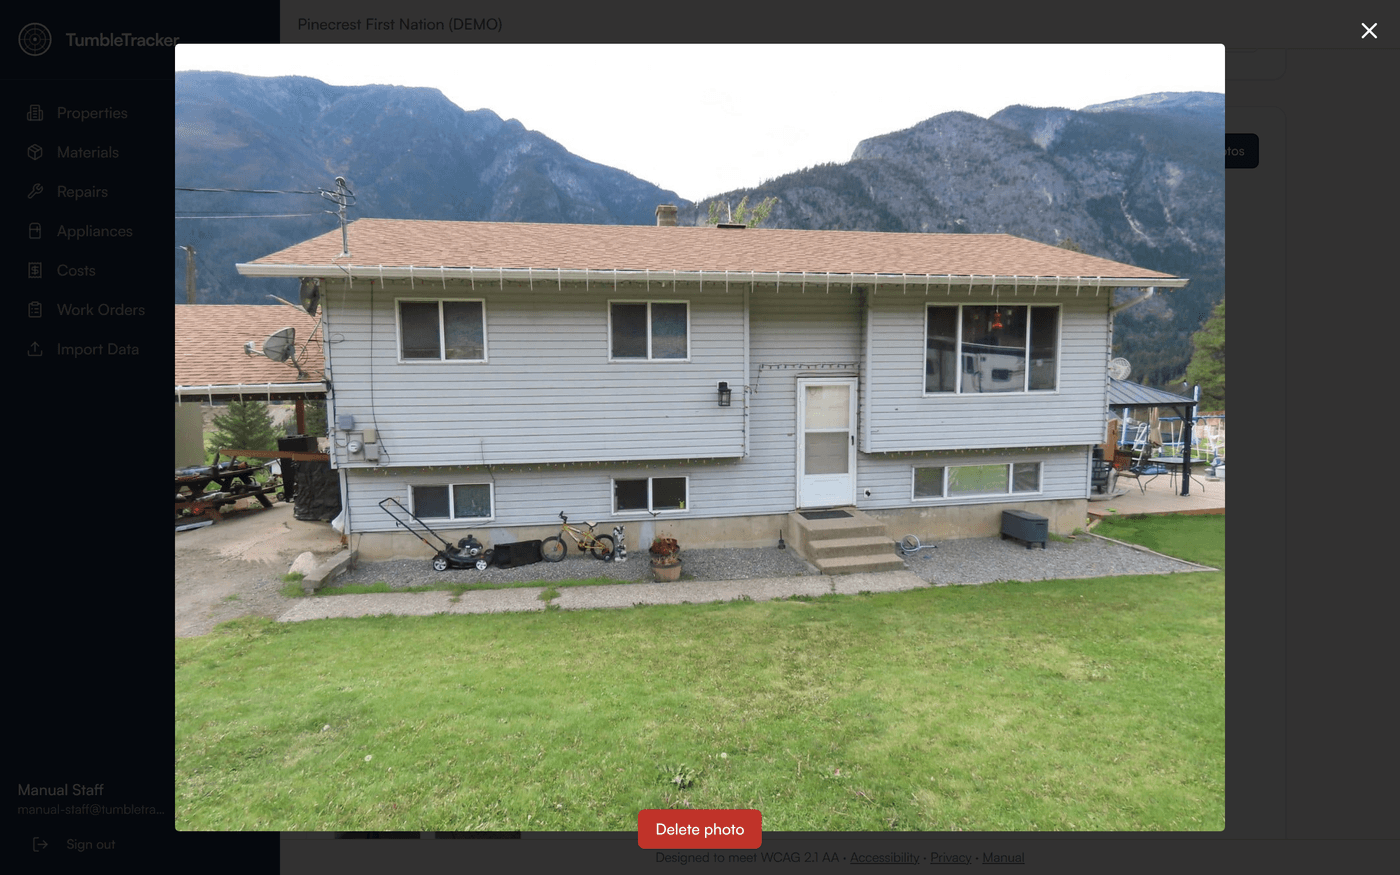
- In the Photos gallery, click (or tap) the photo you want gone. It opens full size. The thumbnails themselves carry no delete button, so a slip of the finger in the gallery never starts a delete.
- Below the picture, click the red Delete photo button. With a keyboard, Tab reaches it; a screen reader announces it as Delete photo followed by the photo's caption, or its file name when it has no caption. A read-only user does not see it.
- TumbleTracker asks Delete this photo? Click Delete to remove it, or Cancel to keep it. Nothing is deleted until you click Delete.
- If the delete cannot be done, a red Delete failed message says why and the gallery is read again — a photo someone else has already removed simply disappears.
Where to find it: Properties → a house → Photos, or Add Photos beside the address.
5.Repairs
A repair item is one thing wrong with one house. It is logged once, it carries a severity and a status, and it stays on the house until someone marks it done. The counts on Properties are built from these items, so a repair that is never logged is a repair nobody can see.
Logging a repair
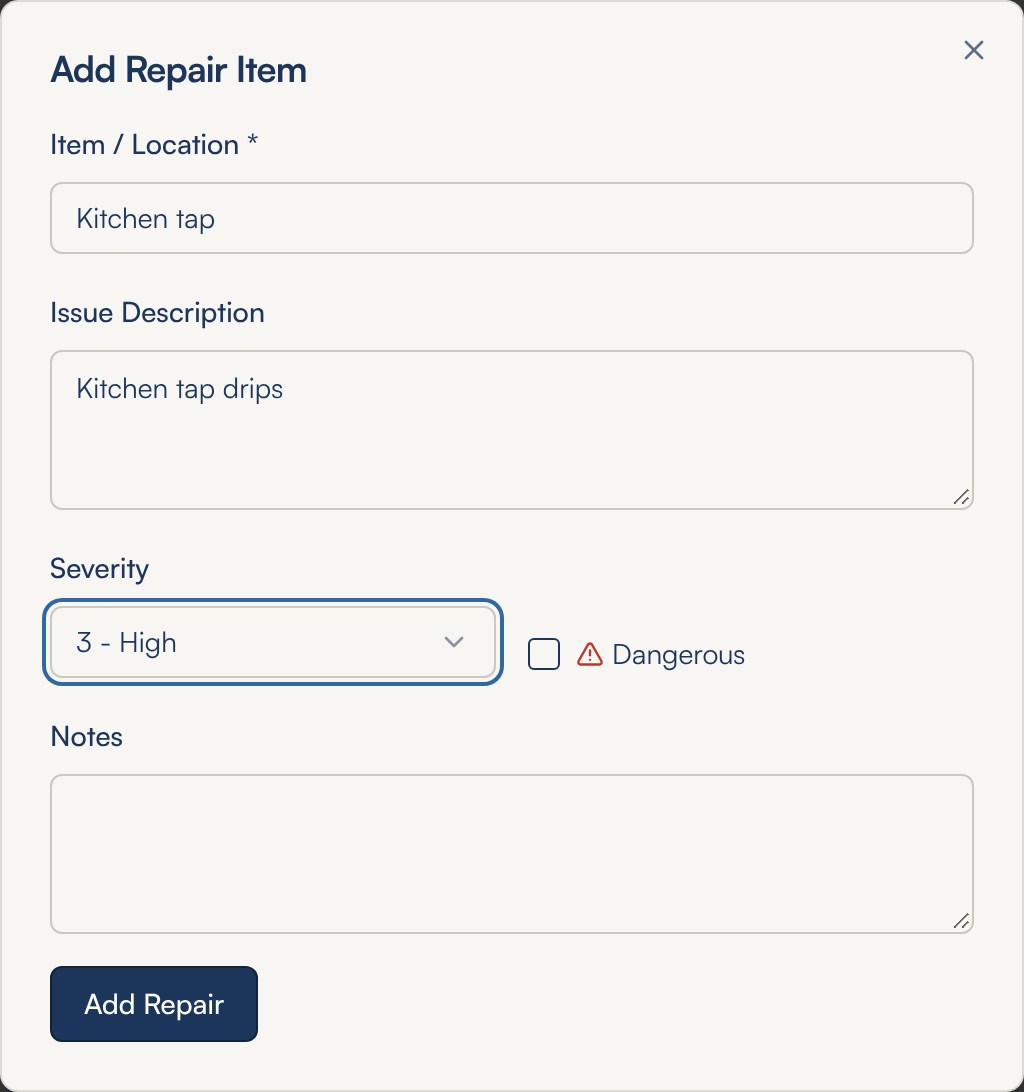
- Open the house and click Add Repair on the Repair Items card.
- Fill in Item / Location — what and where, such as Kitchen sink or Front door. It is the only field TumbleTracker insists on.
- Describe what is wrong in Issue Description, and pick a Severity. New items start at 1 - Low.
- Tick Dangerous if the fault could hurt someone. Add anything else in Notes.
- Click Add Repair. The item is added to Repair Items marked Pending — TumbleTracker sorts the list by Dangerous first and Severity next, so a new item lands wherever its flag and severity put it, not necessarily at the top. The × at the top right (or Esc) closes the window without saving anything.
Severity, and what Dangerous does
Severity is how bad the fault is. It sorts your work; it does not change anything else in TumbleTracker.
| Severity | Use it for |
|---|---|
| 1 - Low | Cosmetic, or it can wait for the next visit |
| 2 - Medium | Should be fixed, but the house is fine meanwhile |
| 3 - High | Getting worse, or the tenant is without something they need |
| 4 - Urgent | Book it now — damage is spreading |
| 5 - Critical | The house is not fit to live in until this is done |
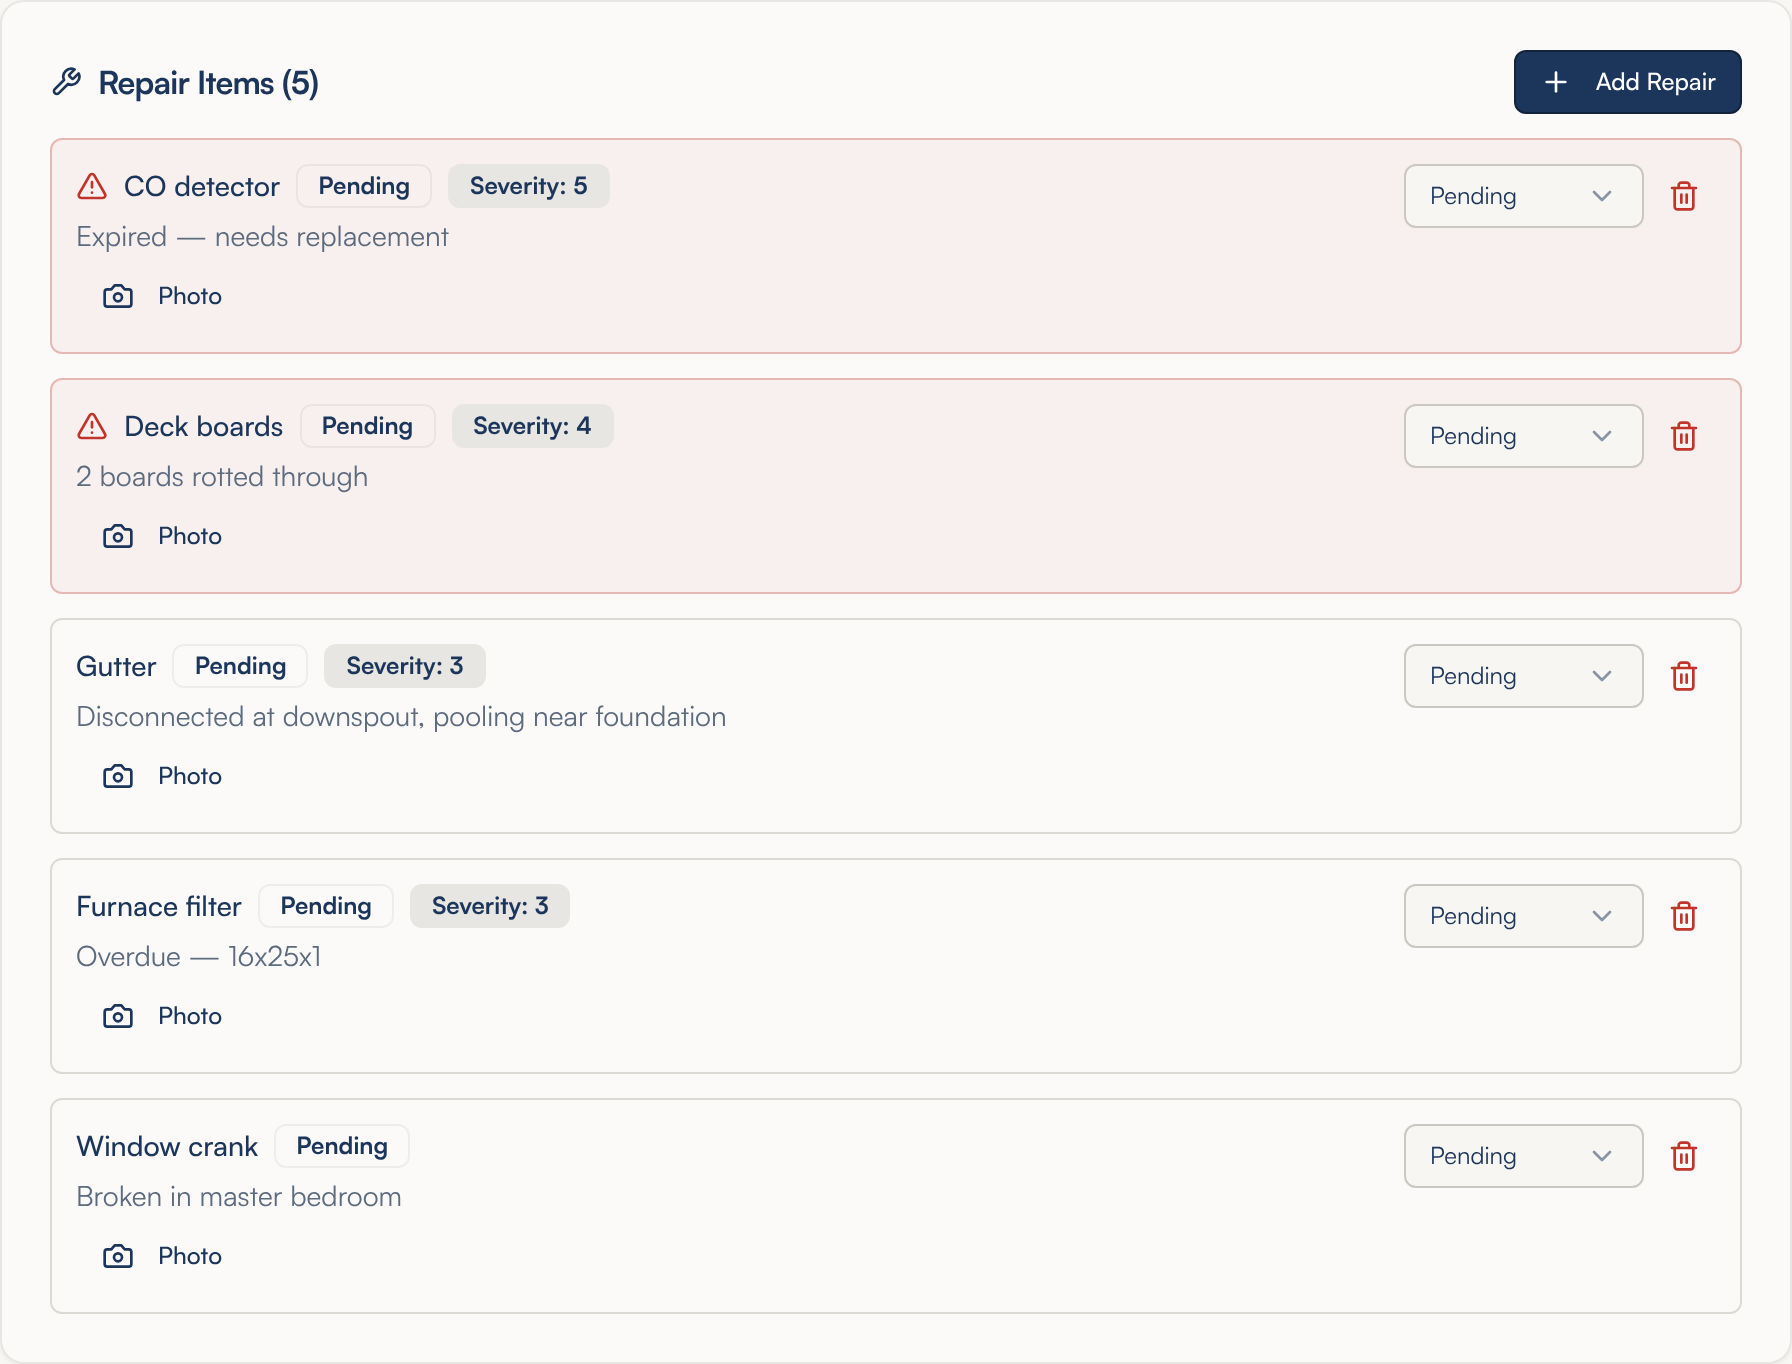
From 3 - High upward the item carries a Severity: 3 badge on its row, so the bad ones stand out in a long list.
Dangerous is a separate tick, and it is the one that shows on the front screen. A dangerous item gets a red warning triangle, its row is tinted red, and it is counted on the Dangerous card on Properties.
Moving a repair along
- Find the item on the house's Repair Items card. The dropdown on the right of the row is its status.
- Change it to In Progress when the work starts, and Completed when it is done. Deferred is for work you have decided to put off: it stays open — it can still go on a work order, and a dangerous deferred item stays on the Dangerous card. There is no Save button — the change is stored the moment you pick it, and TumbleTracker records the date you marked it Completed. Moving a Completed item back to another status clears that date.
- The counts on Properties follow along: Pending Repairs drops as soon as an item leaves Pending, while Total Repairs stays the same.
- To remove an item entirely, click the red bin beside the dropdown and confirm with Delete.

Attaching photos to a repair
- Under the repair's description, click Photo.
- Pick one image. It is sent as soon as you choose it — there is no separate upload step — and appears as a thumbnail under that repair. Repeat for more.
- Click a thumbnail to see it full size; Esc closes it.
- To remove one, open it full size, click the red Delete photo button below the picture and confirm with Delete. If a photo cannot be added or removed, a red message says why.
Every repair in the community
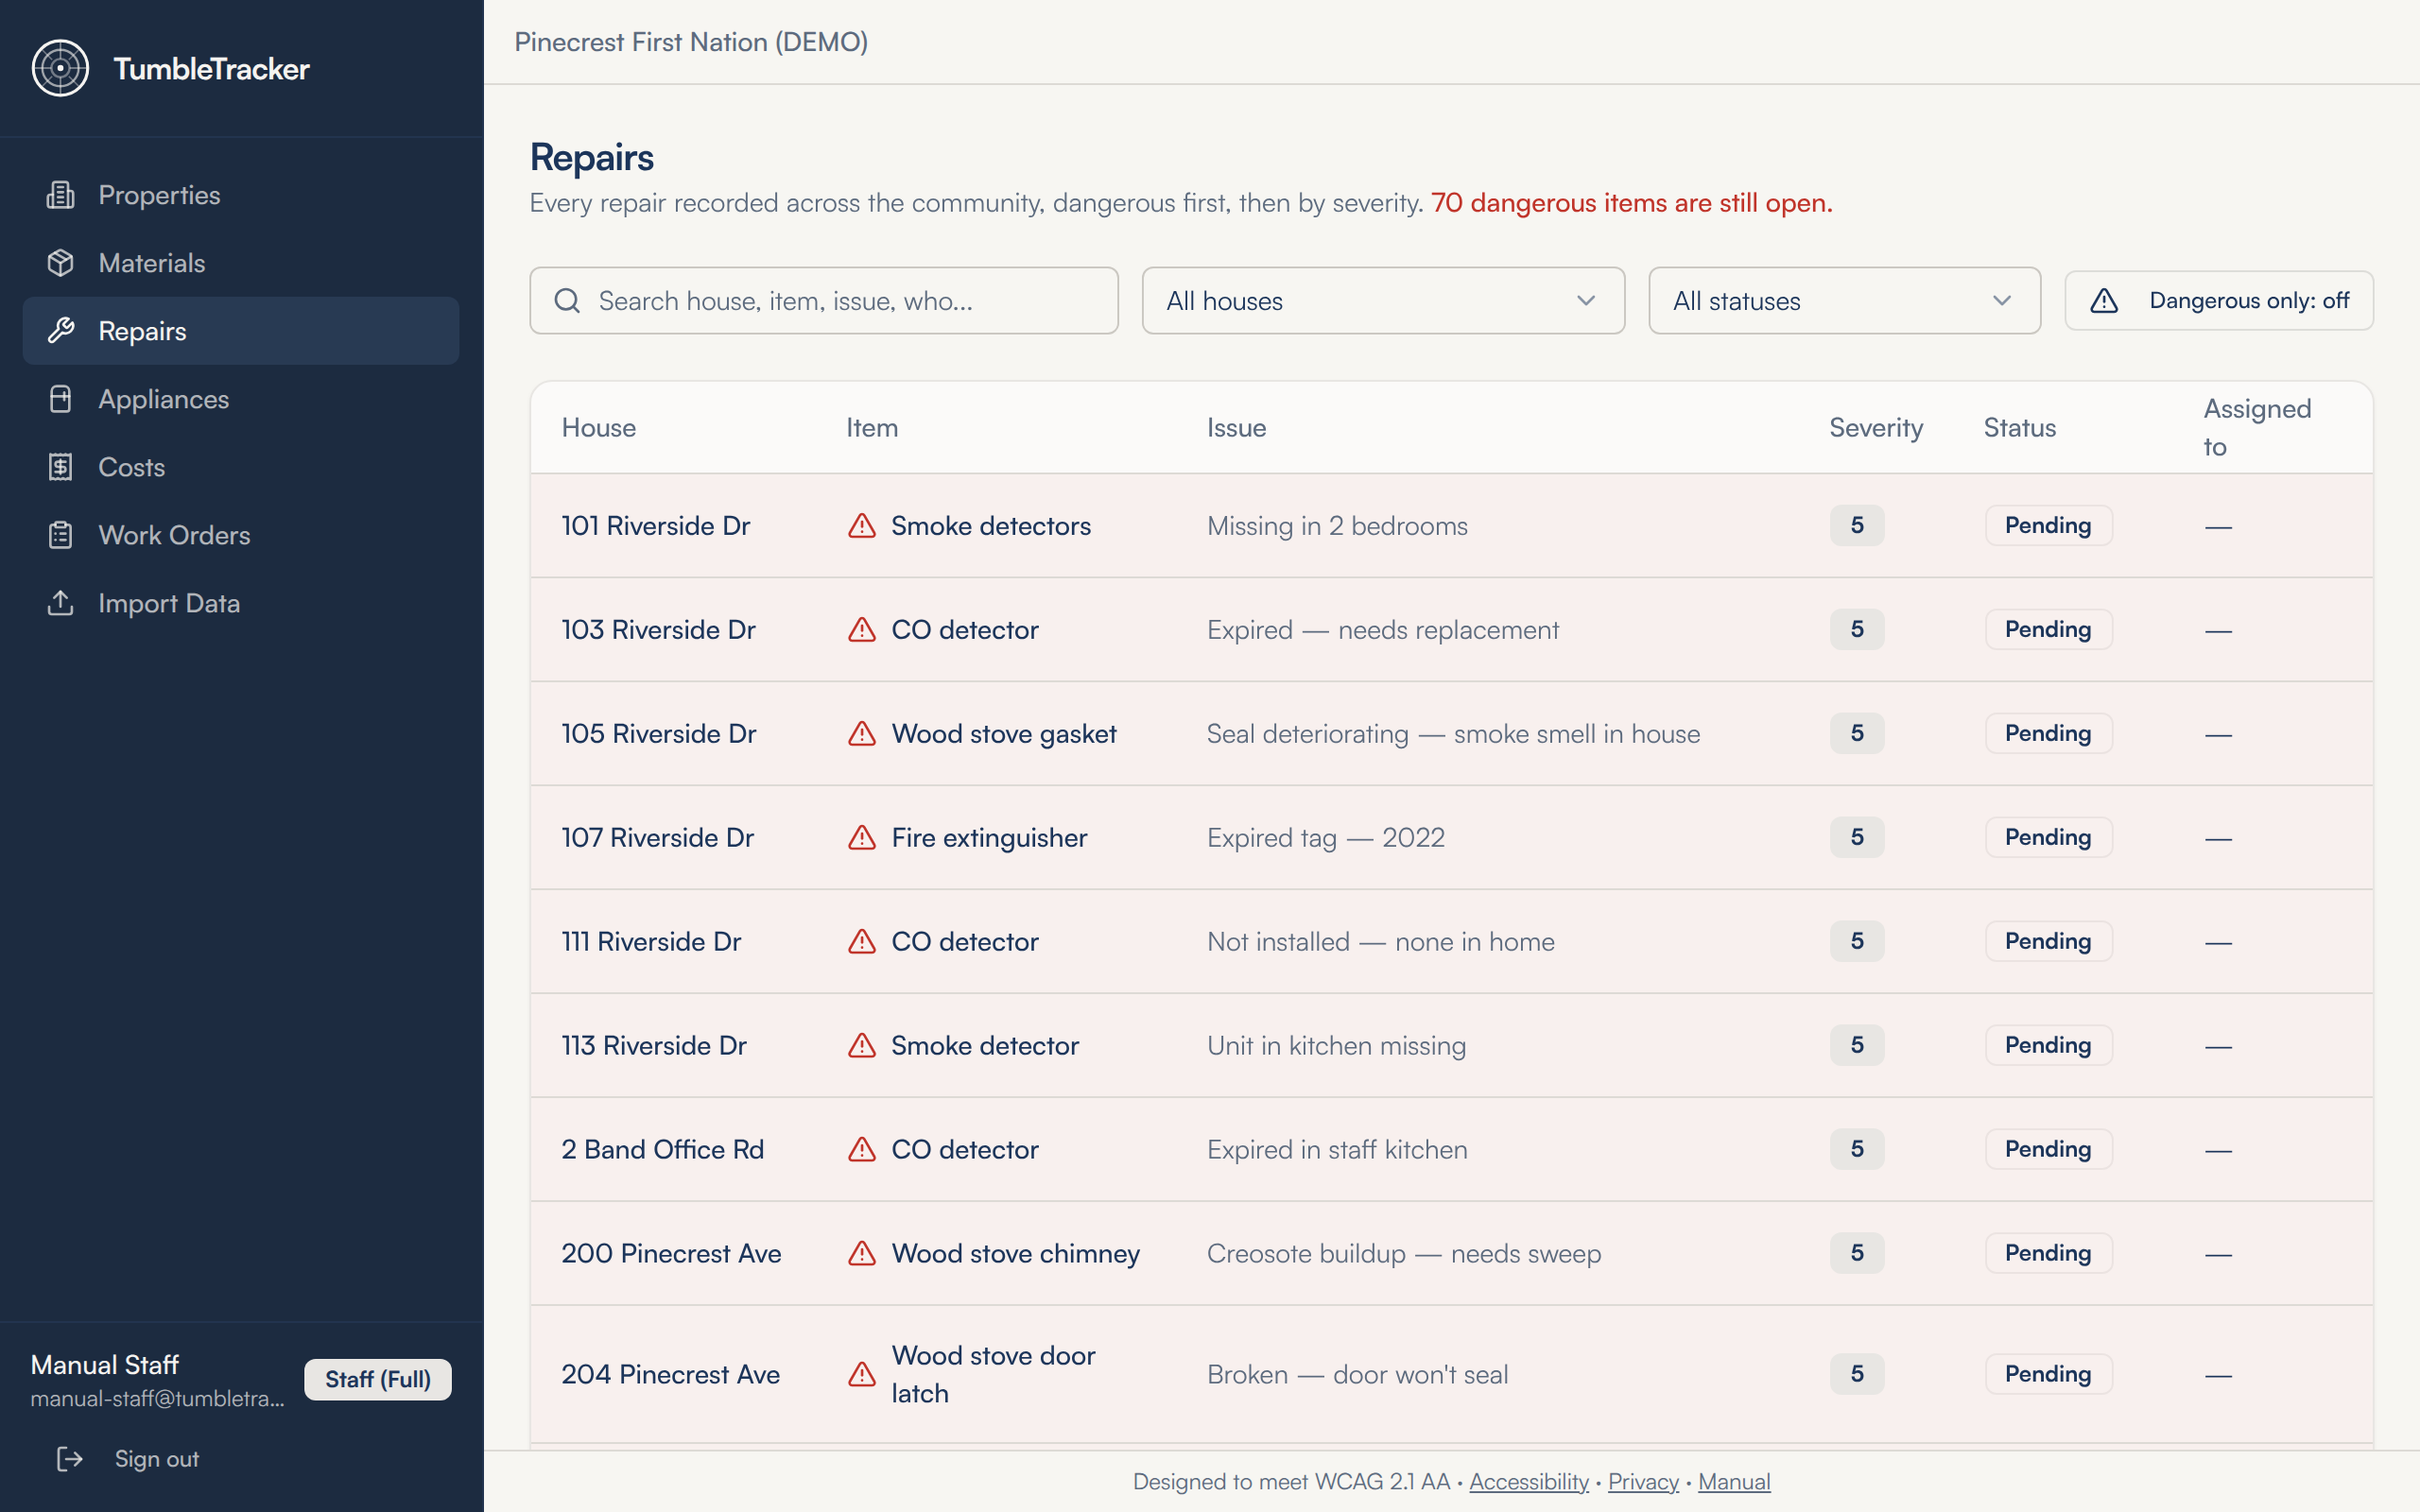
- Click Repairs in the menu. Every repair item across all of your houses is listed, with the house it belongs to, dangerous items first and then by severity.
- Narrow the list with the search box, the house dropdown, the status dropdown (Open is everything not yet Completed) and the Dangerous only button.
- The three repair cards on Properties open this same screen with the matching filter already set. Click a house name in the list to open that house — status changes and edits are made there, on the house's own Repair Items card.
Where to find it: Properties → a house → Repair Items, or Repairs in the menu.
6.Materials
Materials is the list of what each house needs bought. You record it on the house while you are standing in it, and TumbleTracker adds it up across the whole community so one person can do one supply run instead of five.
Recording what a house needs
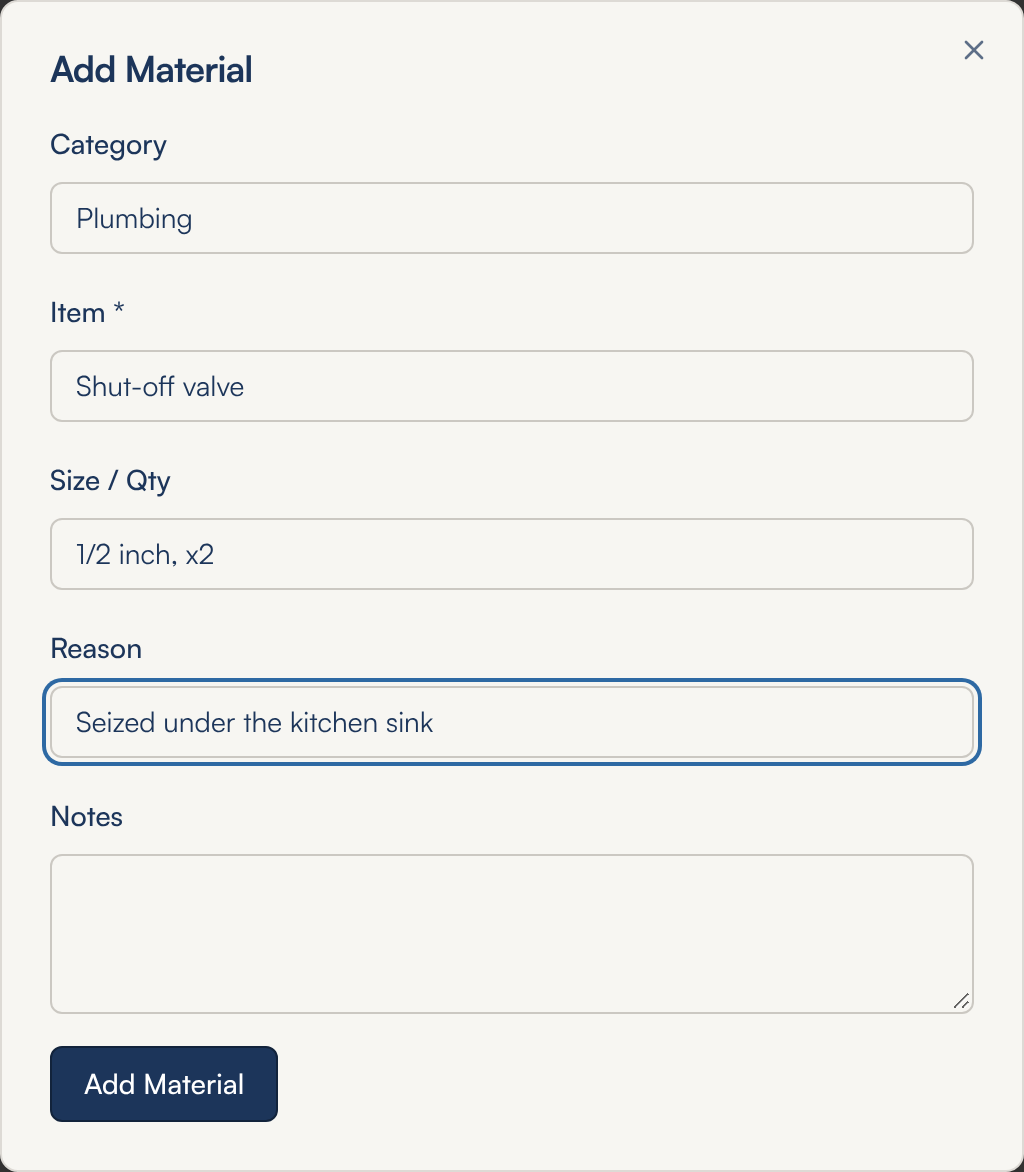
- Open the house and click Add Material on the Materials card.
- Put the kind of thing in Category — Plumbing, Electrical, Furnace Filter. This is what the community list groups by, so use the same wording every time.
- Name the thing itself in Item. It is the only field TumbleTracker insists on.
- Put either a size or a count in Size / Qty — 16x25x1 for a filter, 10 for ten outlet covers.
- Say why in Reason, add anything else in Notes, and click Add Material. The × at the top right (or Esc) closes the window without saving.
Marking a material purchased
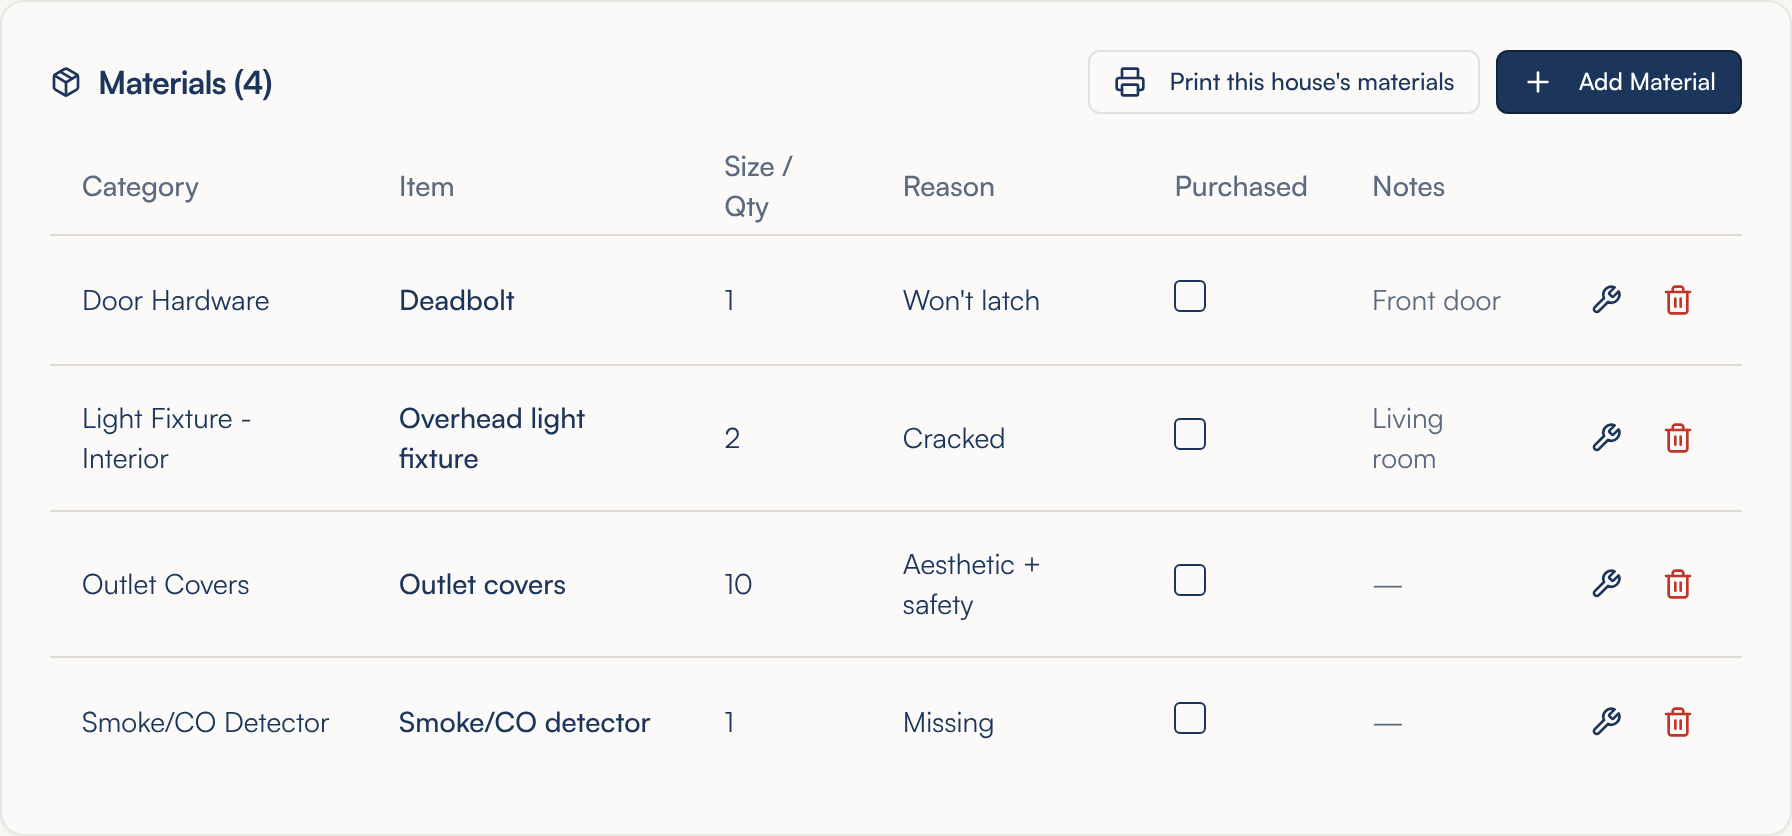
- Open the house's Materials card. Each row shows Category, Item, Size / Qty, Reason, Purchased and Notes.
- Tick the box in the Purchased column once the thing has been bought. It is saved the moment you tick it. Untick it to put the item back on the outstanding list.
- To correct a row, click the wrench, change what is wrong, and click Save Changes.
- To drop a row, click the red bin and confirm with Delete when TumbleTracker asks Delete this material?
The community materials list
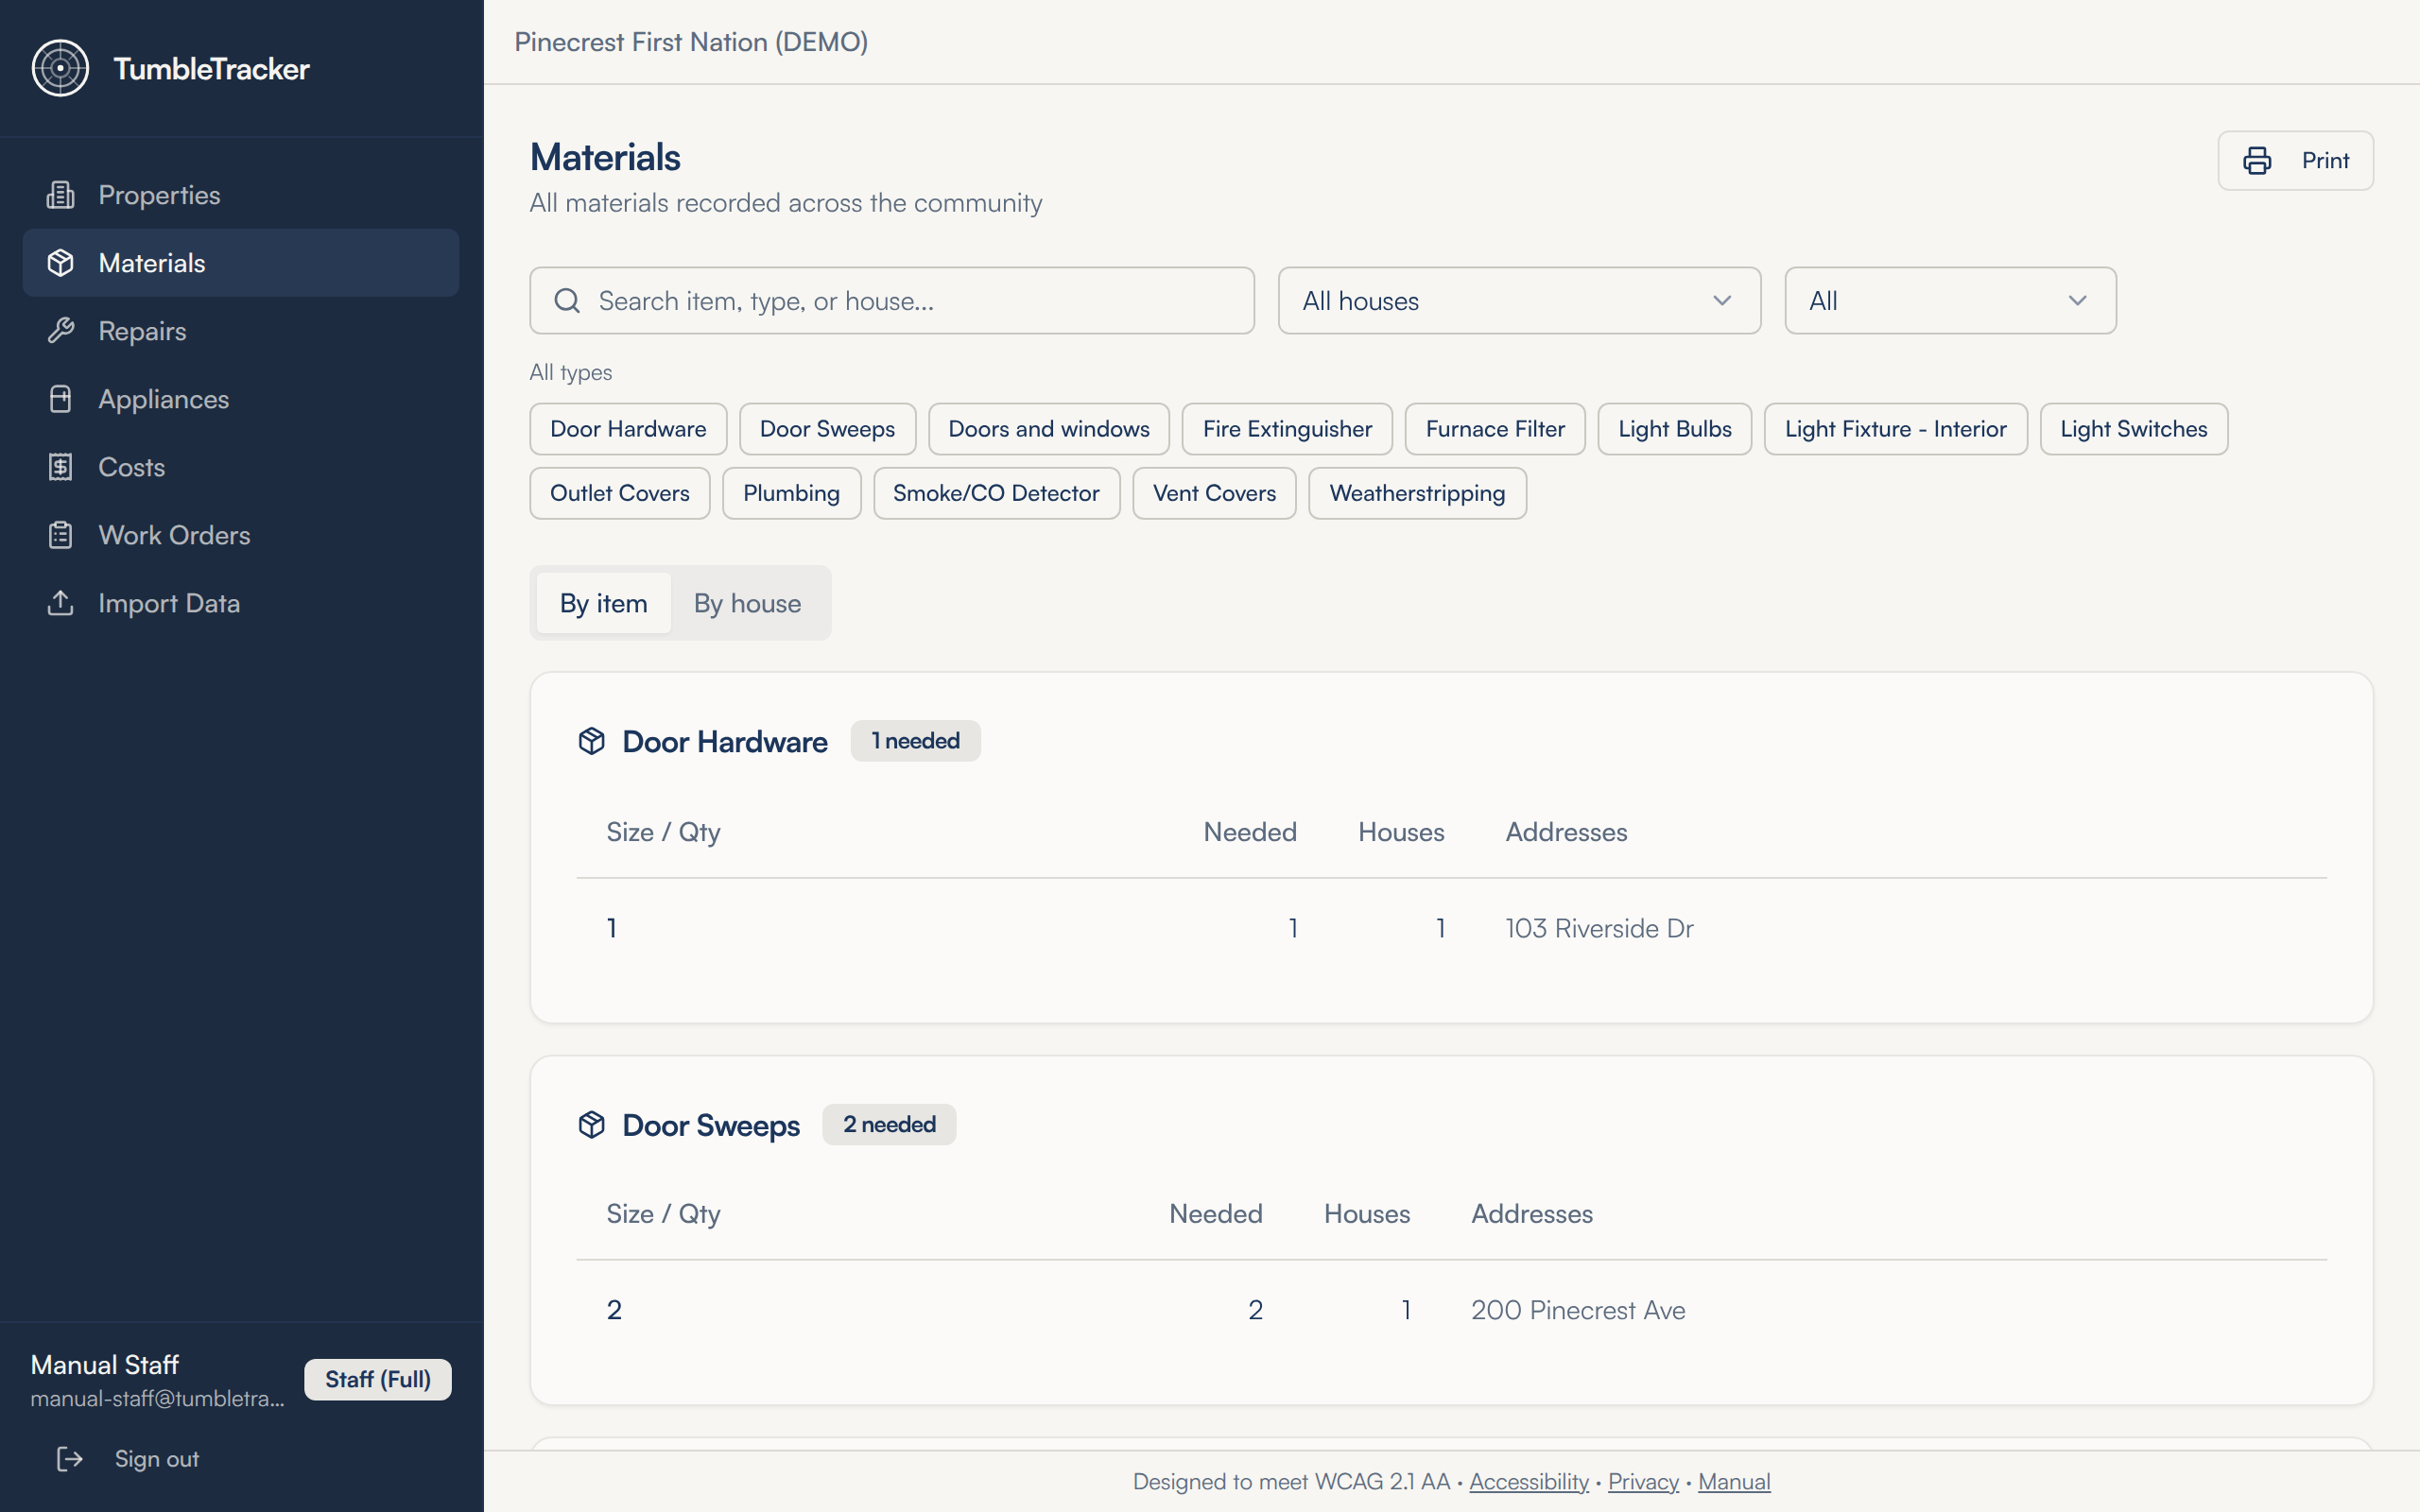
- Click Materials in the menu. This is every material from every house in one place.
- Narrow it with the three controls at the top: Search item, type, or house..., the All houses dropdown, and the purchase filter — All, Outstanding or Purchased. The chips under them switch single item types on and off.
- By item groups everything by kind, with a needed count on each heading and a table of the sizes, how many of each, and which houses they are for. This is your shopping list.
- By house groups the same rows by address instead — what to drop off where, once the shopping is done.
Printing a materials sheet
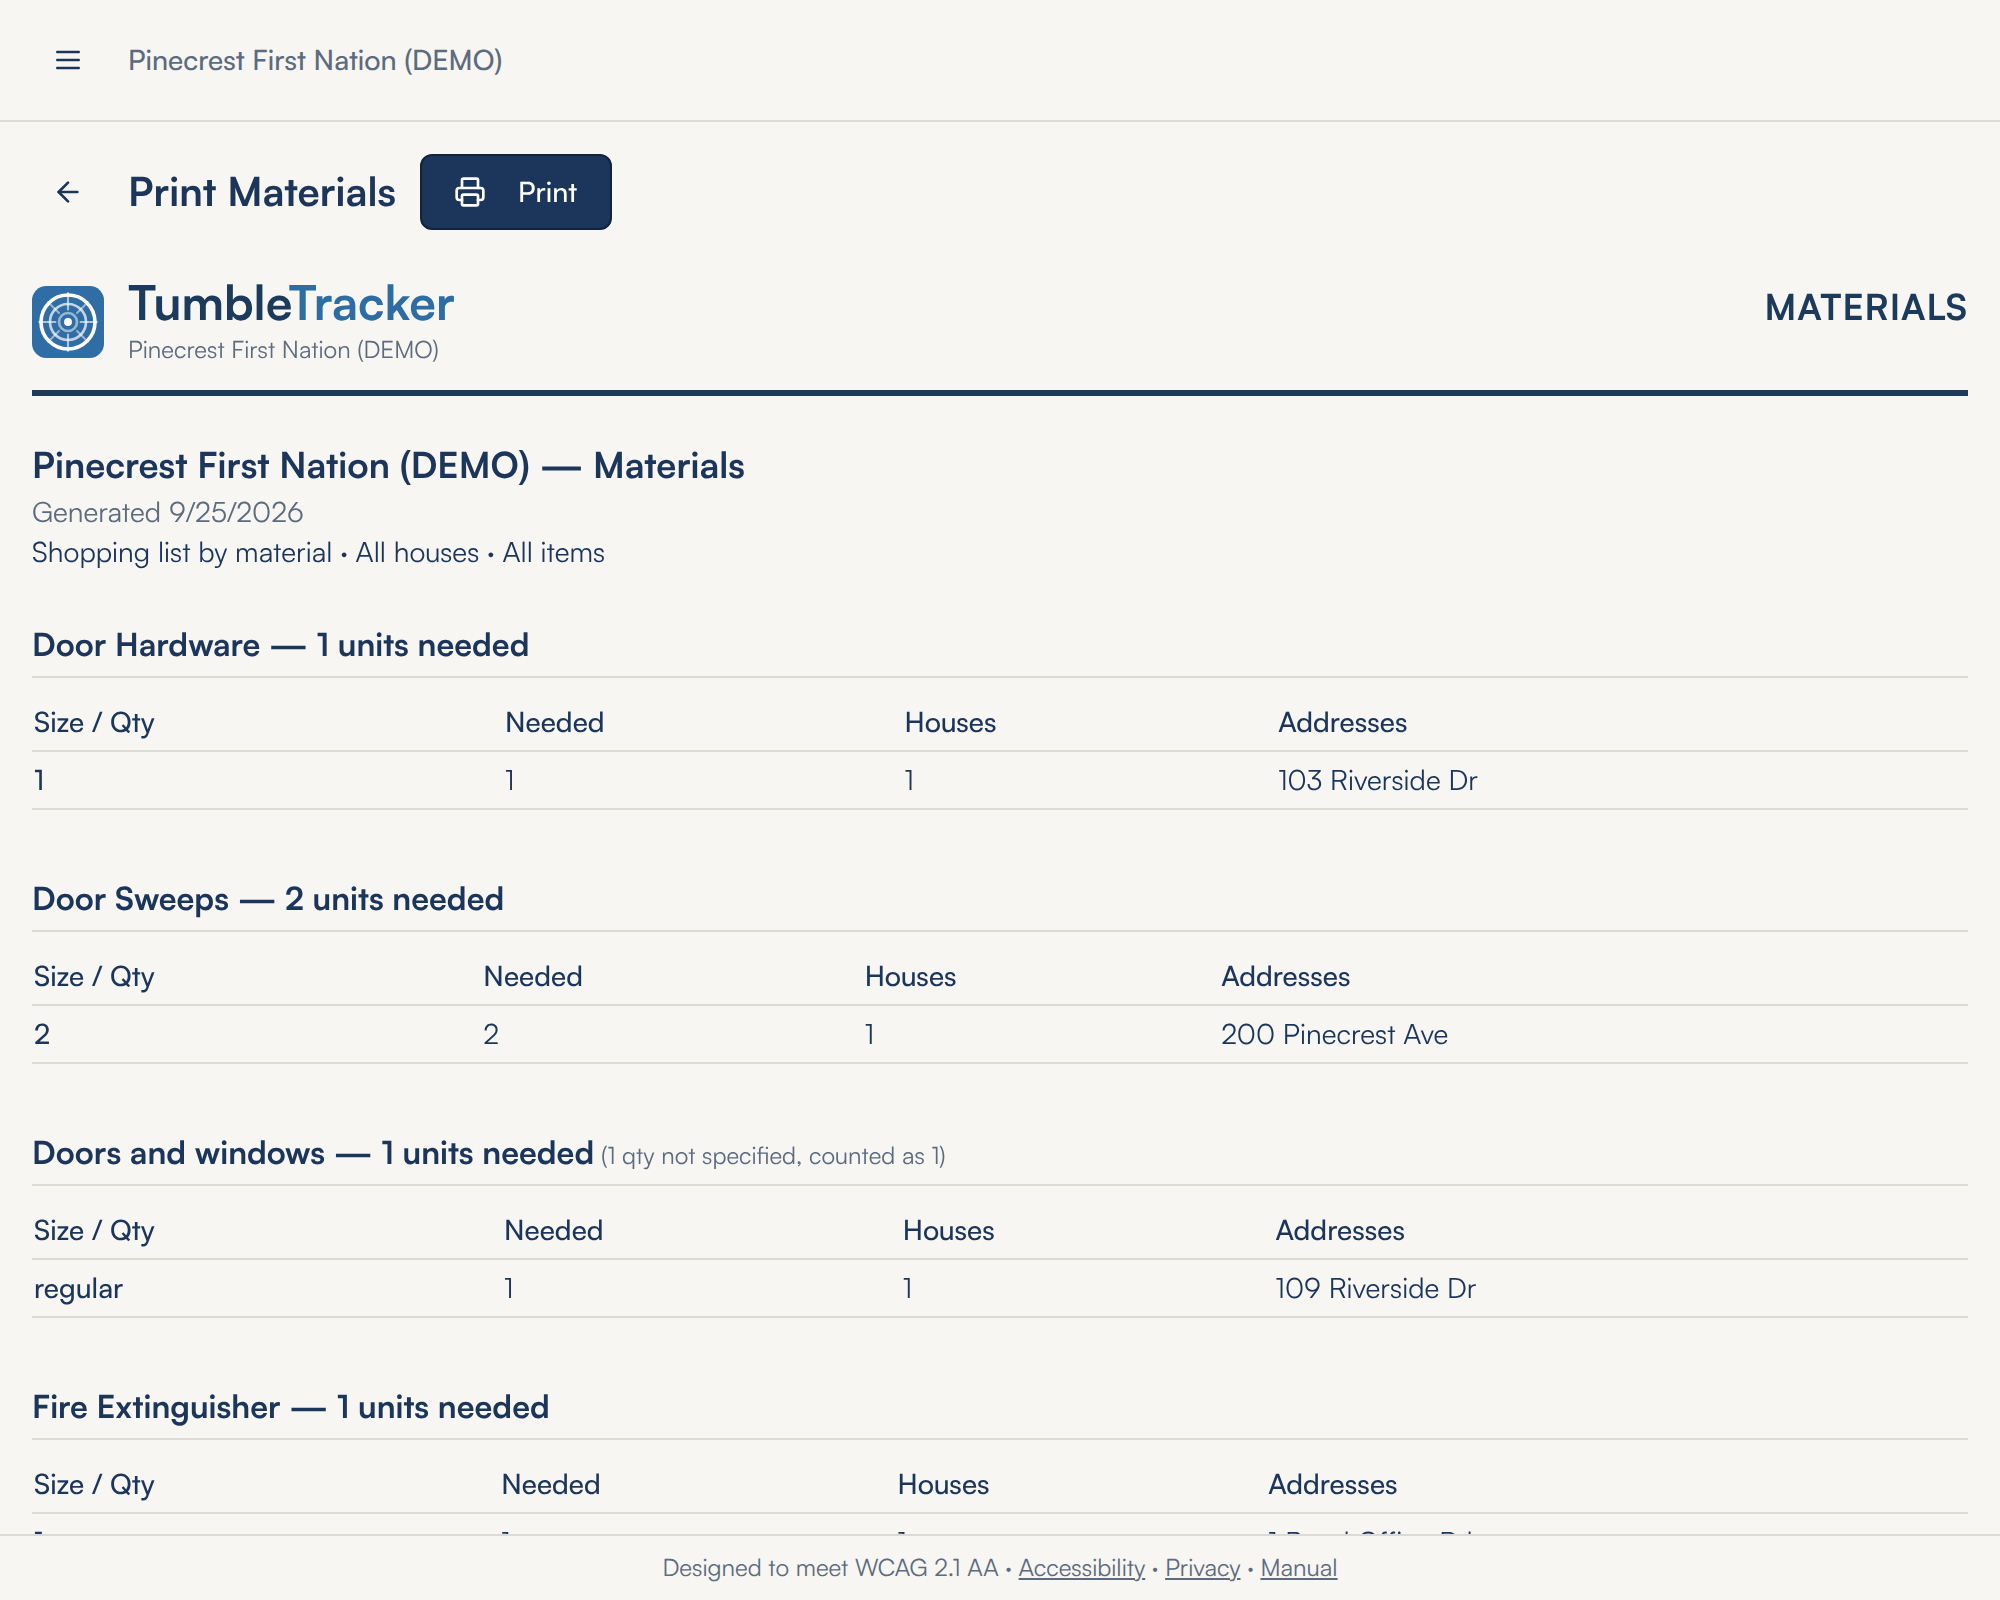
- For one house: open it and click Print this house's materials on the Materials card.
- For the whole community: go to Materials, set the filters you want, and click Print at the top right. With item types selected the button reads Print shopping list.
- Either way you land on Print Materials. The line under the heading says exactly what is on the sheet — for example Shopping list by material · All houses · All items.
- Click Print to send it to a printer, or save it as a PDF from your browser's print window.
Where to find it: Materials in the menu for the whole community; Properties → a house → Materials for one house.
7.Appliances and warranties
Each house has an Appliances card for the furnace, the water heater, the stove and the rest. Record the warranty when the appliance goes in, and TumbleTracker watches the date for you: it labels the warranties that are running out and emails a reminder before they do.
Recording an appliance
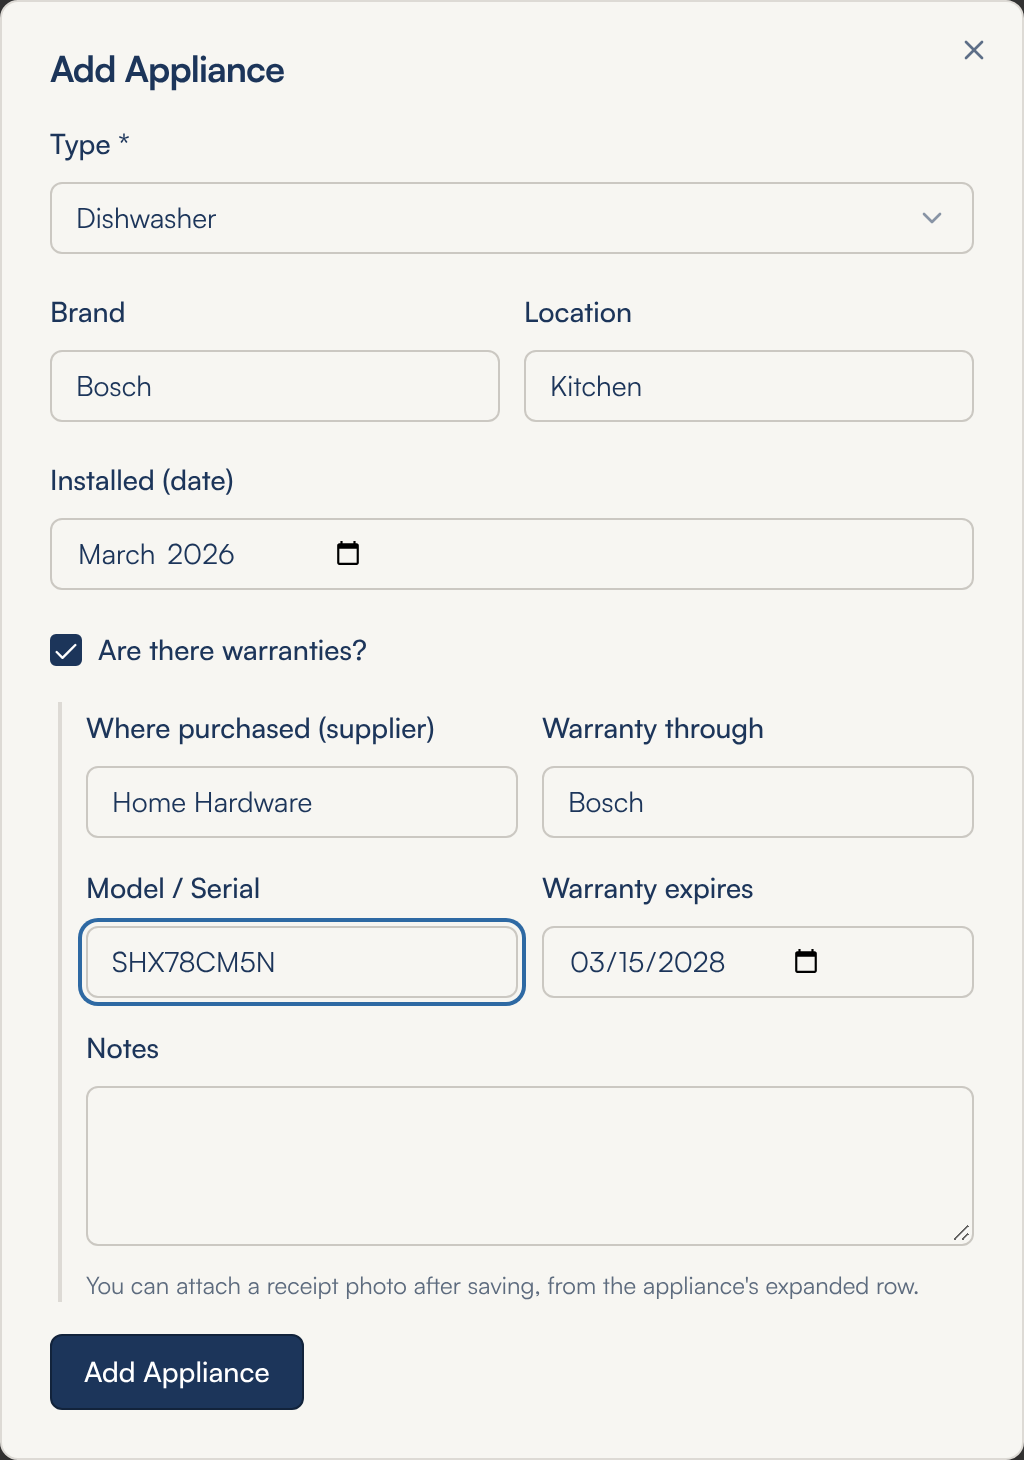
- Open the house and click Add Appliance on the Appliances card.
- Pick the Type — Furnace, Water Heater, Dishwasher and so on. If it is not in the list, pick Other and a Name box appears for you to say what it is.
- Fill in Brand and Location (Kitchen, Basement), and the month and year it went in under Installed (date).
- If it has a warranty, tick Are there warranties?. Five more boxes open: Where purchased (supplier), Warranty through (the manufacturer or the dealer), Model / Serial, Warranty expires and Notes.
- Click Add Appliance. The × at the top right (or Esc) closes the window without saving.
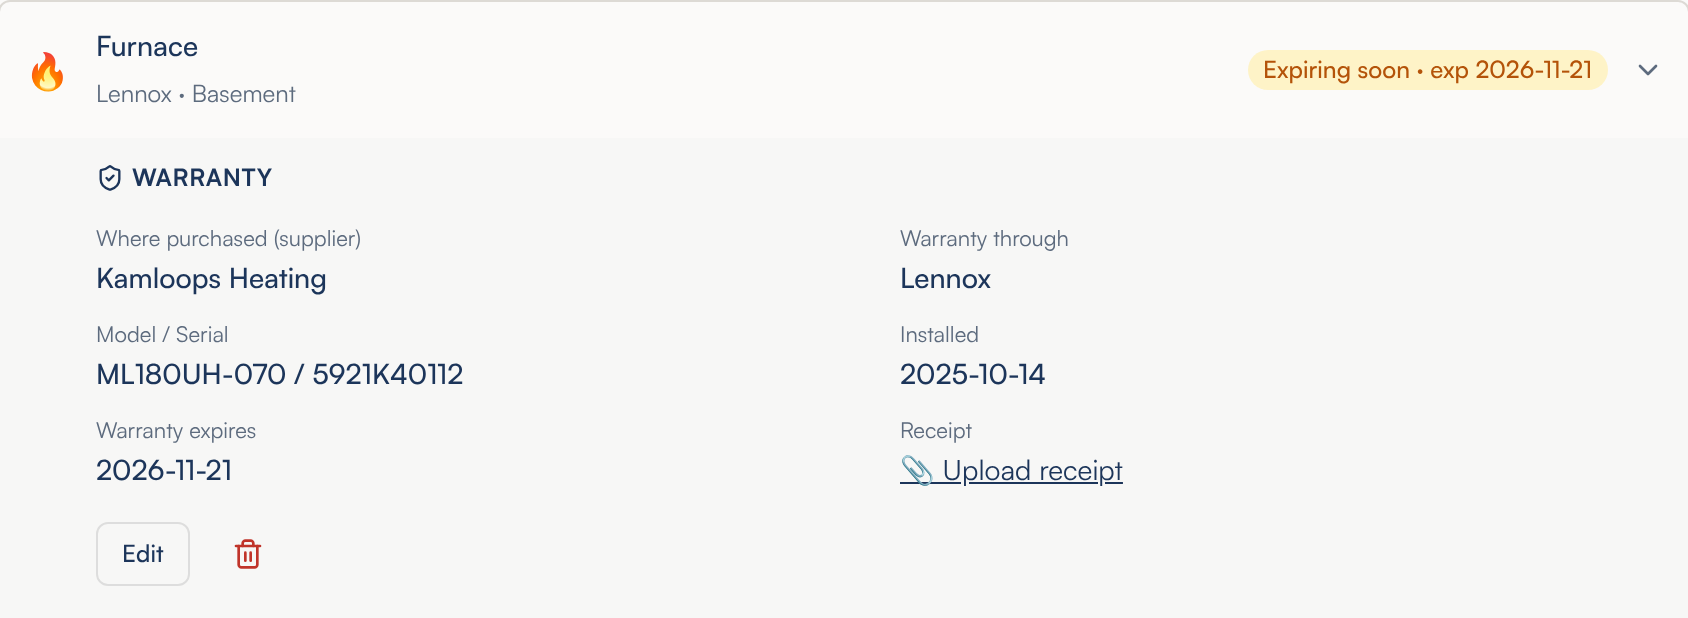
Attaching the receipt
- Save the appliance first — the receipt is added afterwards, and only to an appliance with a warranty recorded. On the Appliances card, click the appliance's row to open it.
- Beside Receipt, click the underlined Upload receipt link and pick a photo of the receipt. It is sent as soon as you choose it.
- Click View receipt to see it again, or remove to take it off.
Warranty labels
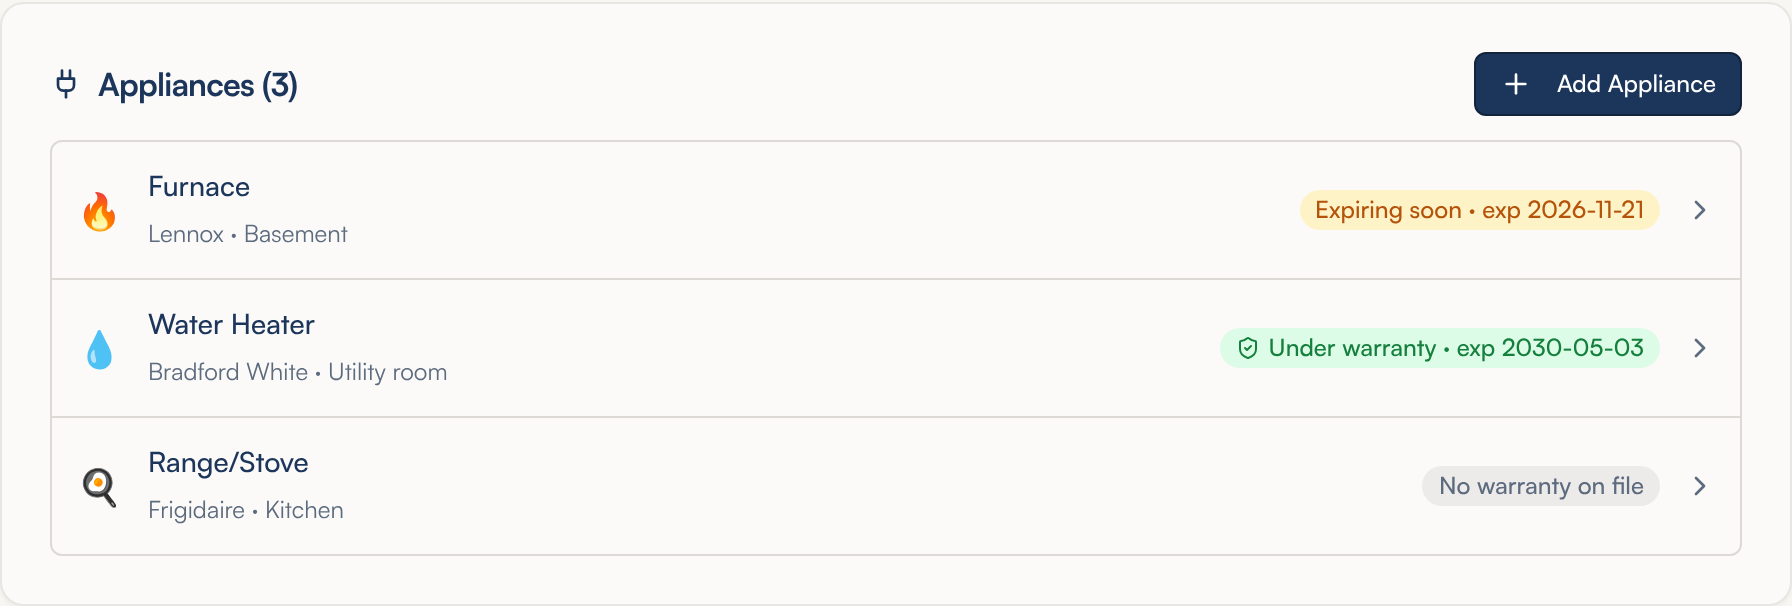
Every appliance row carries a label on the right, with the expiry date after it when there is one.
Expiring soon (amber) means the warranty runs out within the next 90 days. Expired warranty (also amber) means the date has passed.
Under warranty (green) means more than 90 days are left, or the warranty is recorded with no expiry date. No warranty on file (grey) means the warranty box was never ticked.
Warranty reminder emails
TumbleTracker checks the warranty dates once a day. When a warranty is 90 days from running out it sends a reminder, and it sends a second one at 30 days. Each goes once. If a warranty is already inside 30 days when it is first recorded, you get one reminder, not two. An expired warranty gets no email.
The reminders go to every active user in your community with the Receive reminder emails (maintenance and warranties) box ticked — the same people who get the maintenance reminders in the next chapter.
Editing or removing an appliance
- Click the appliance's row on the house's Appliances card to open it.
- Click Edit to change it. On an appliance with no warranty recorded, the same button reads + Are there warranties?, and opens the window ready to add one. Click Save Changes when you are done.
- To remove the appliance, click the red bin beside that button and confirm with Delete.
Every appliance in the community
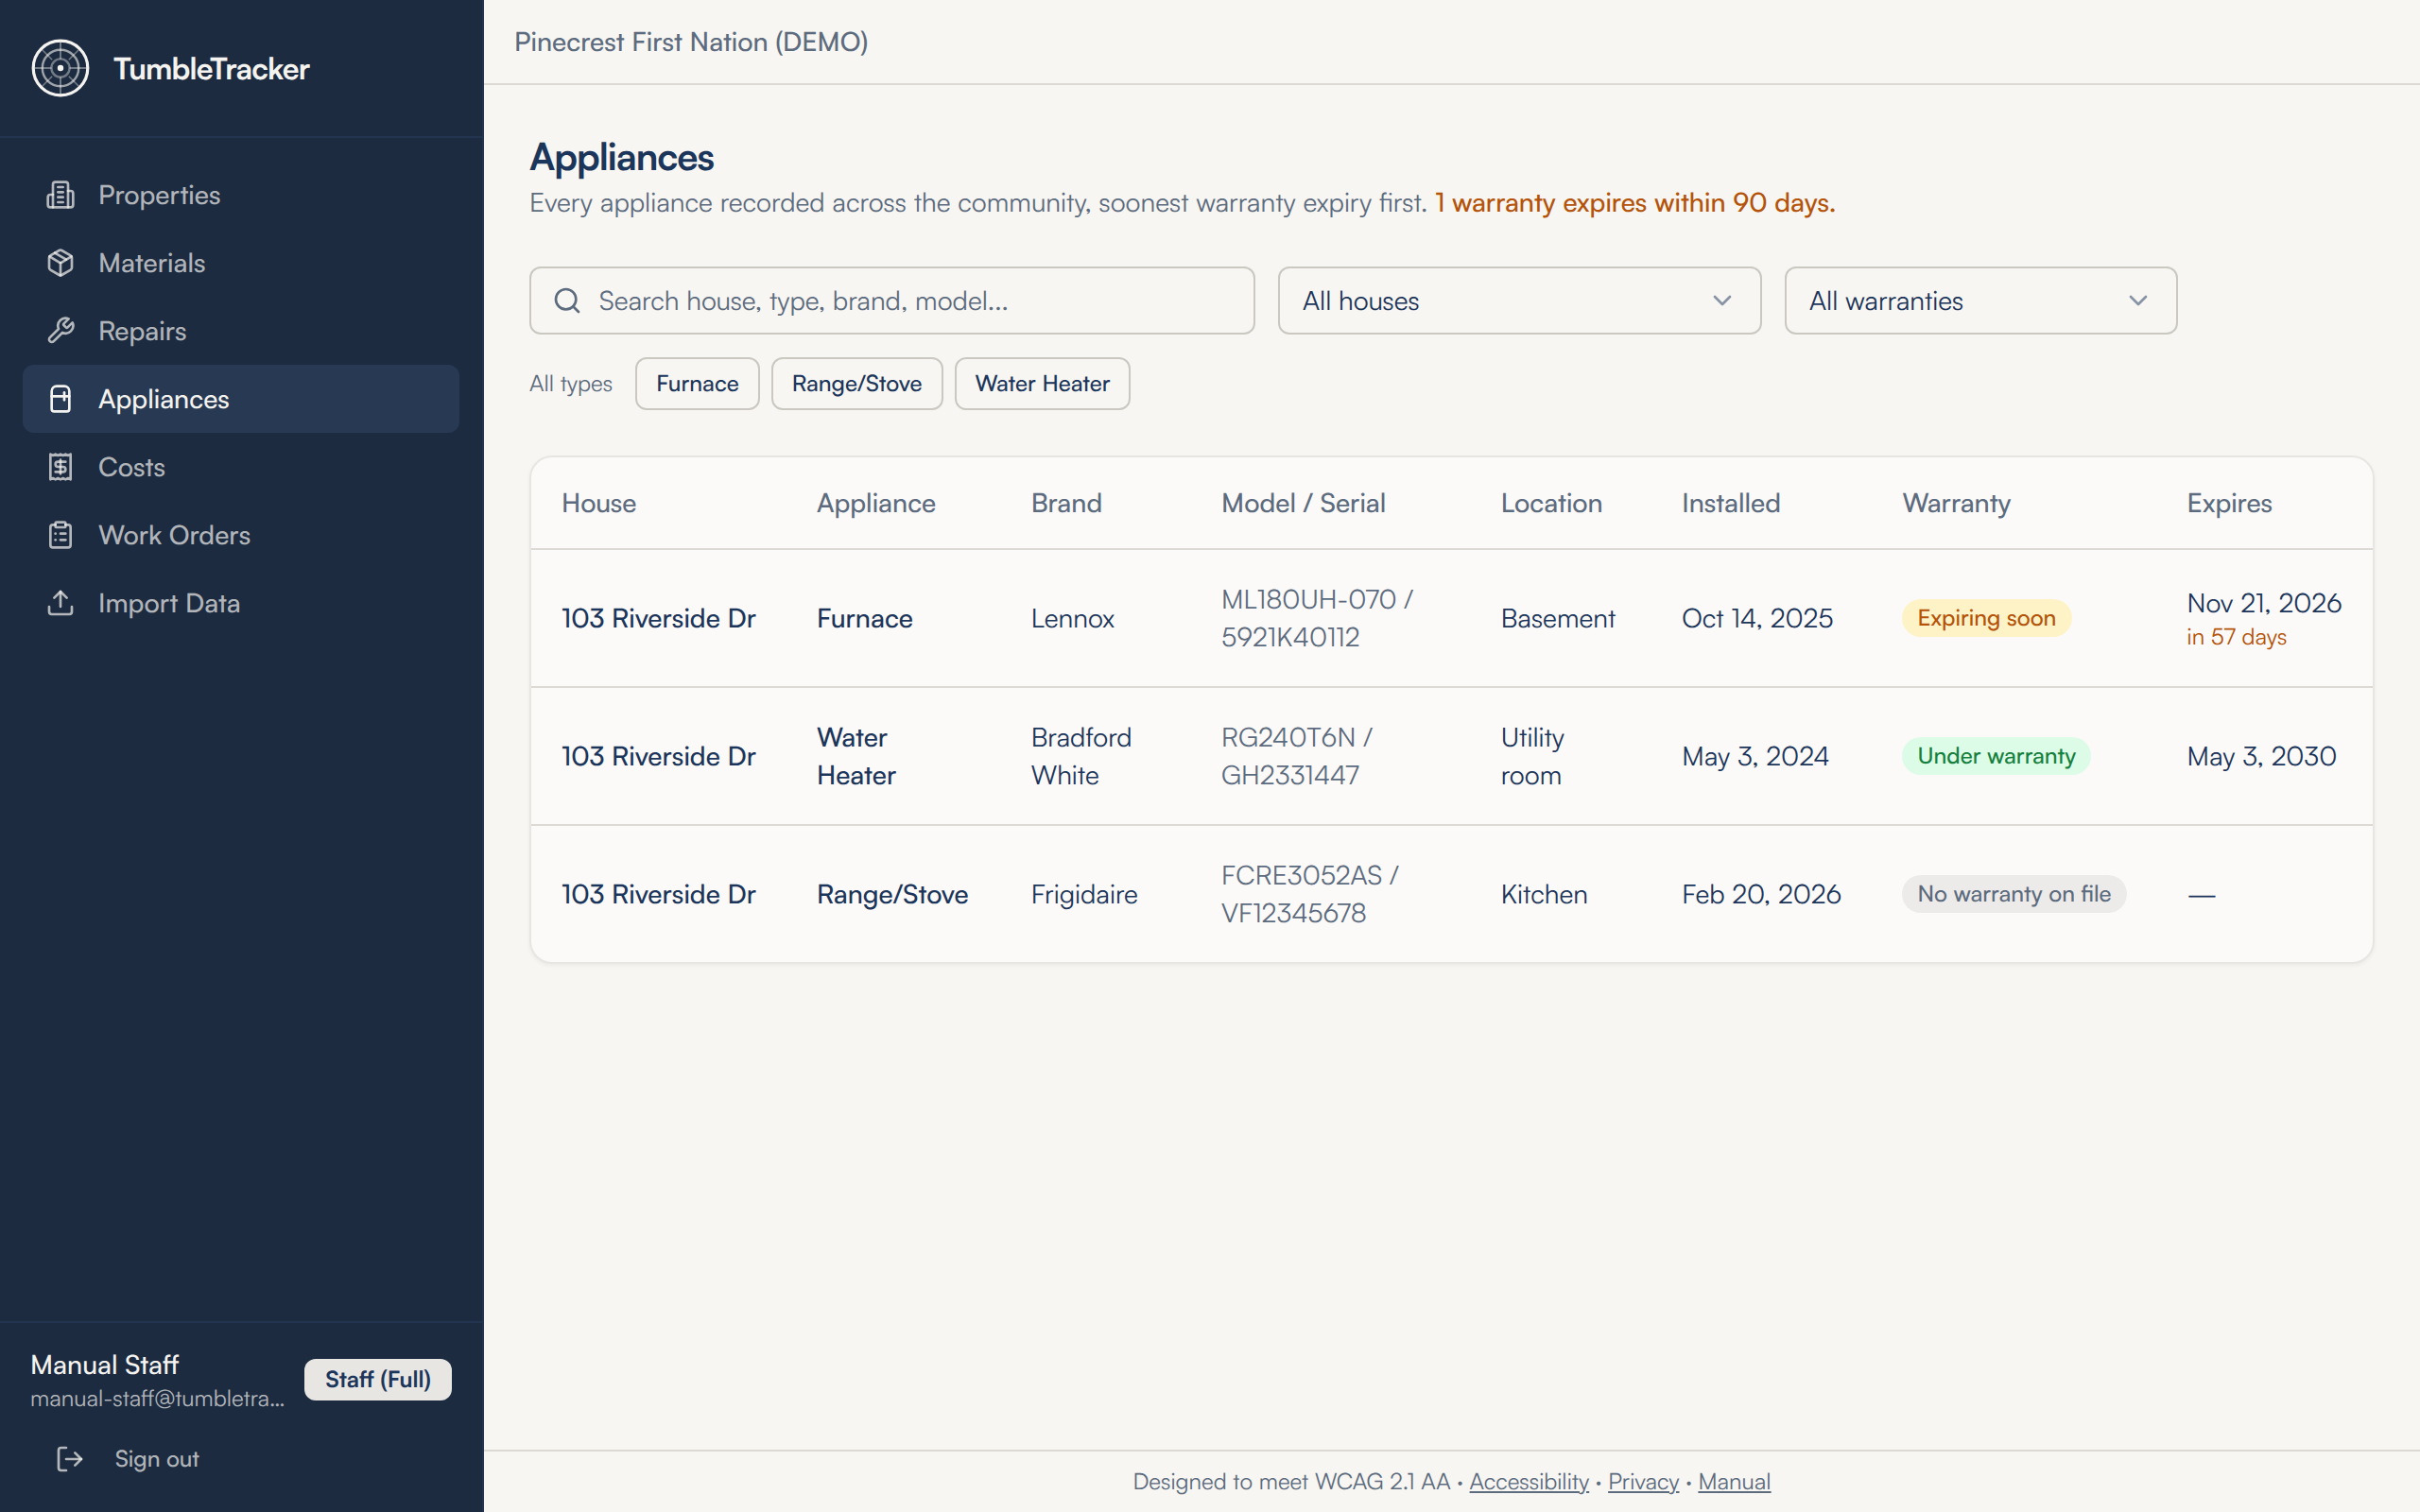
- Click Appliances in the menu. Every appliance across all of your houses is listed with its house, the soonest warranty expiry first. The line under the heading tells you how many warranties expire within 90 days, and an Expiring soon row shows how many days are left.
- Narrow the list with the search box, the house dropdown, the warranty dropdown (All warranties, Expiring soon, Expired, Under warranty, No warranty on file) and the type buttons under them.
- The Warranties Expiring card on Properties opens this screen with Expiring soon already chosen.
- This screen is for looking. To add, change or remove an appliance, click its house name to open the house and use its Appliances card.
Where to find it: Properties → a house → Appliances, or Appliances in the menu.
8.Seasonal maintenance
Some jobs come round on a clock: smoke detectors every month, the furnace filter every quarter, the gutters every year. Each house has a maintenance schedule that holds those jobs, works out when each is next due, and flags the ones that are late.
Opening the schedule
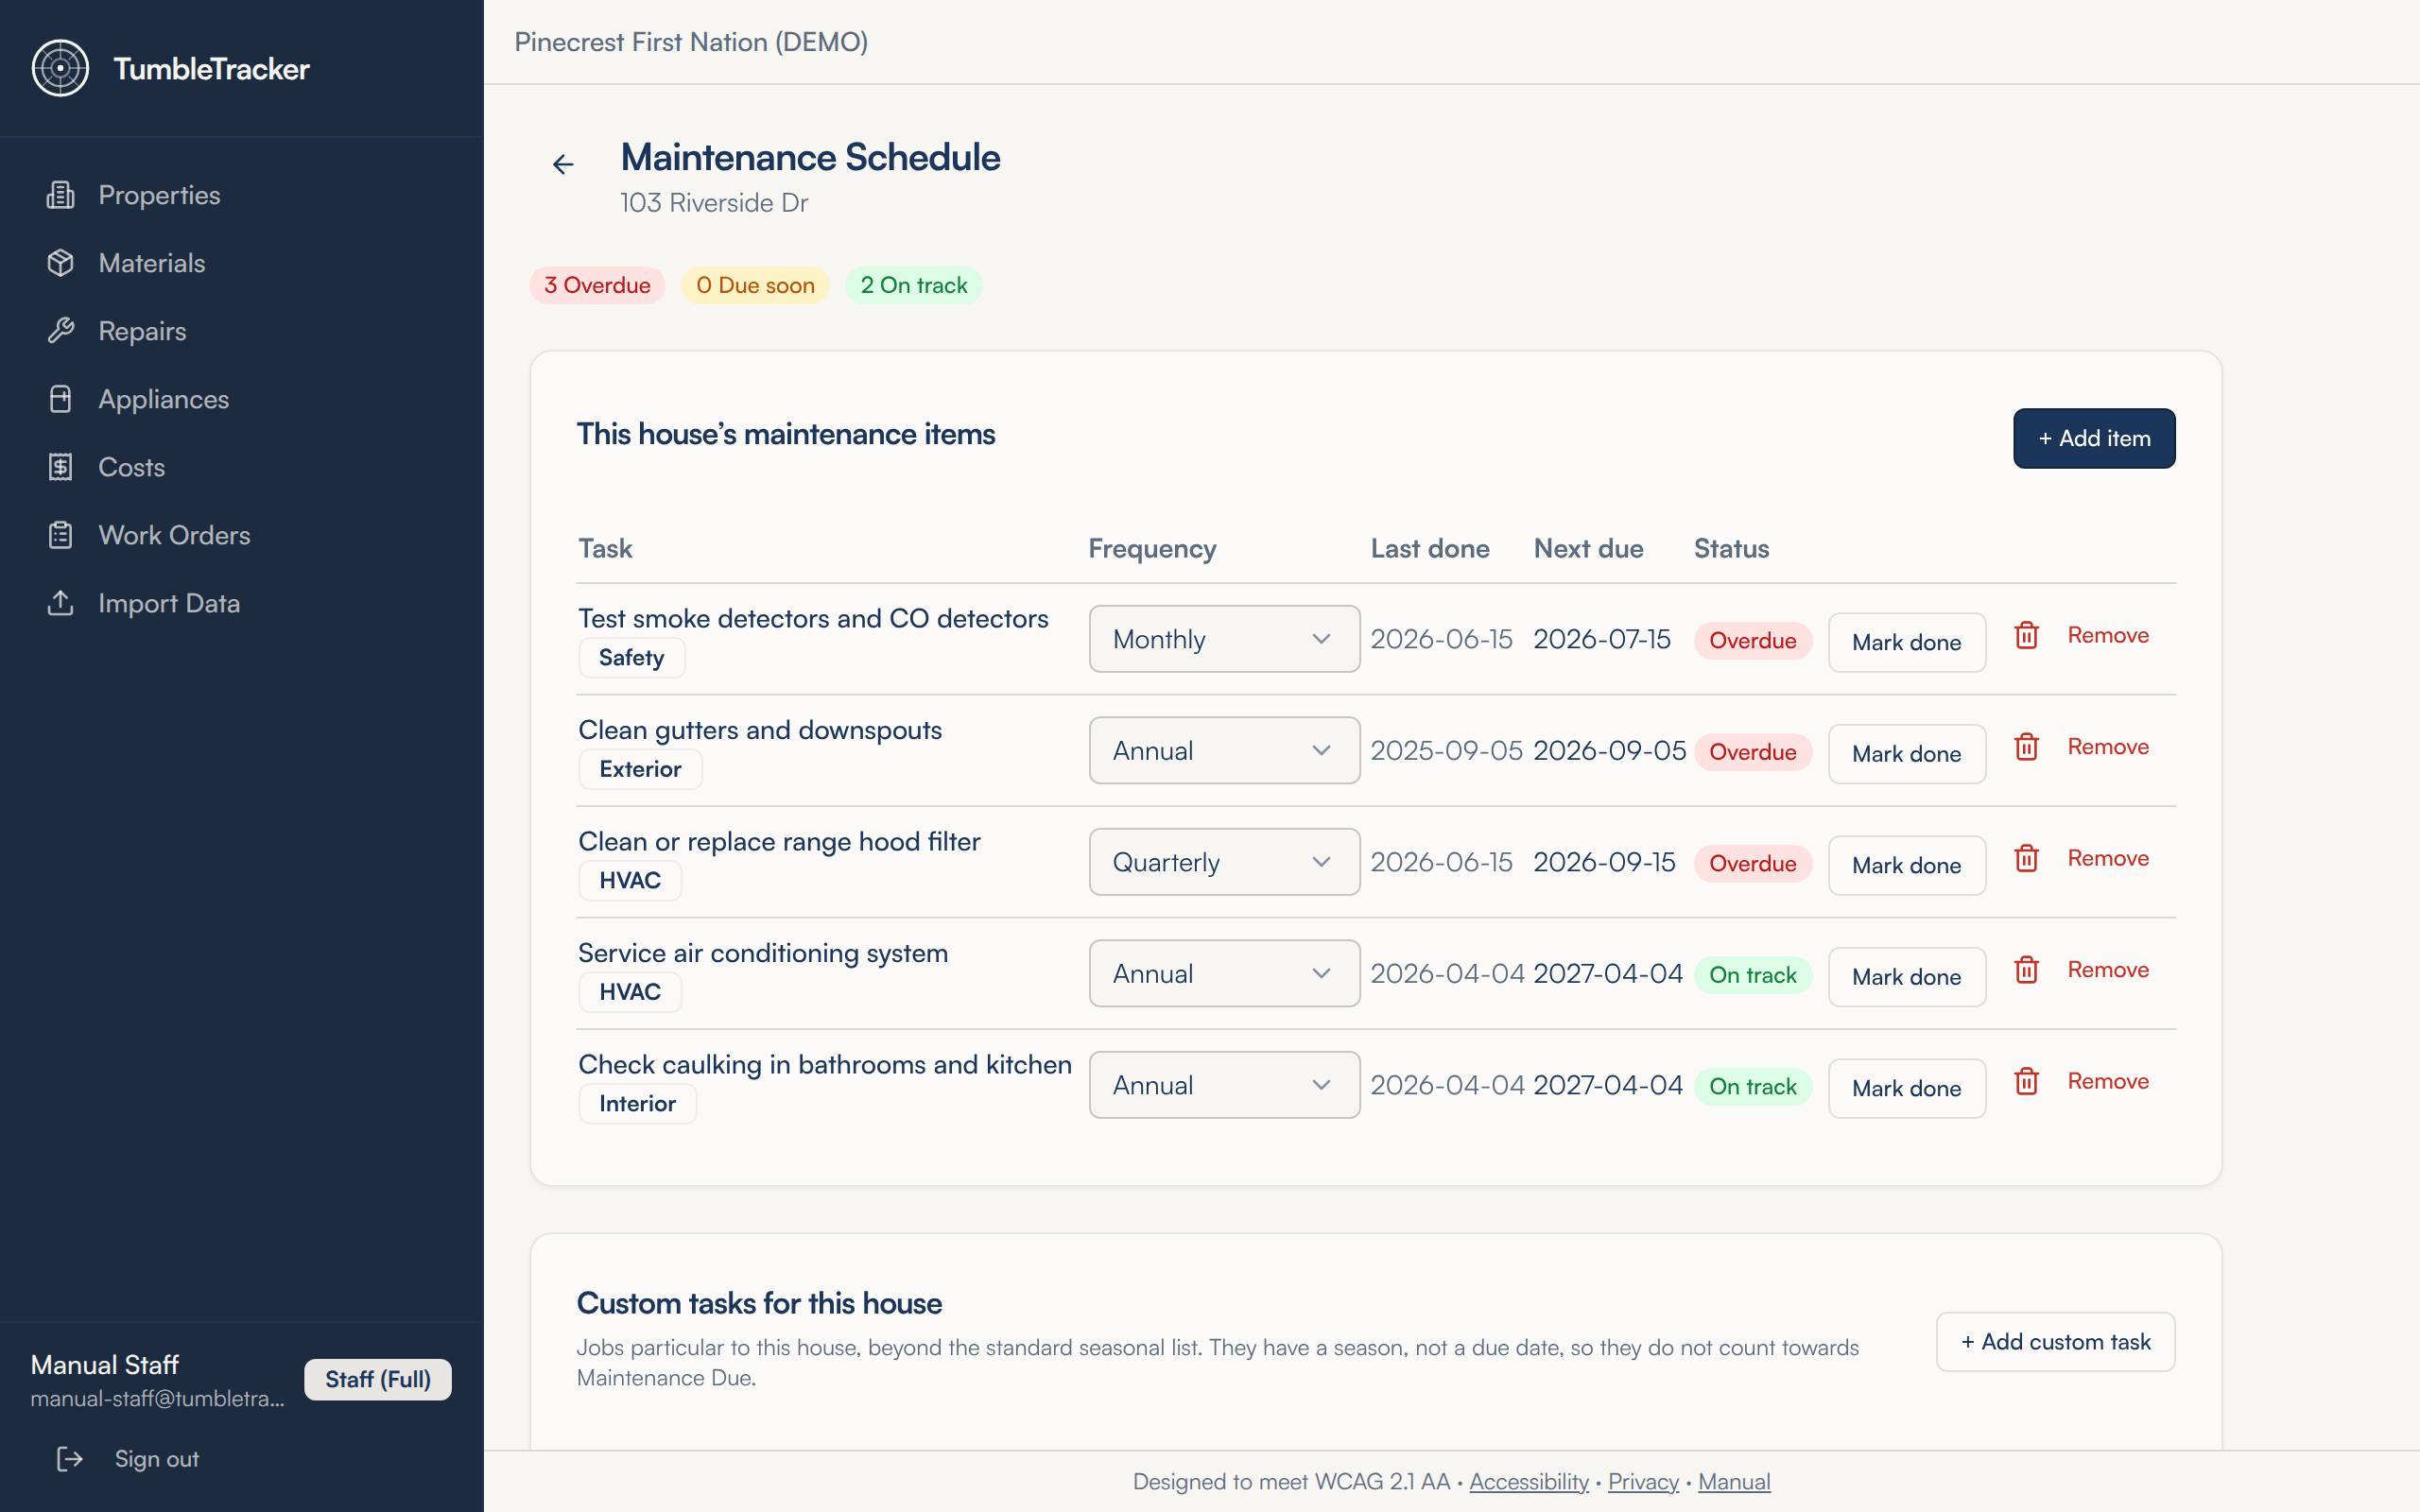
- Open the house and click Maintenance Schedule in the row of buttons at the top.
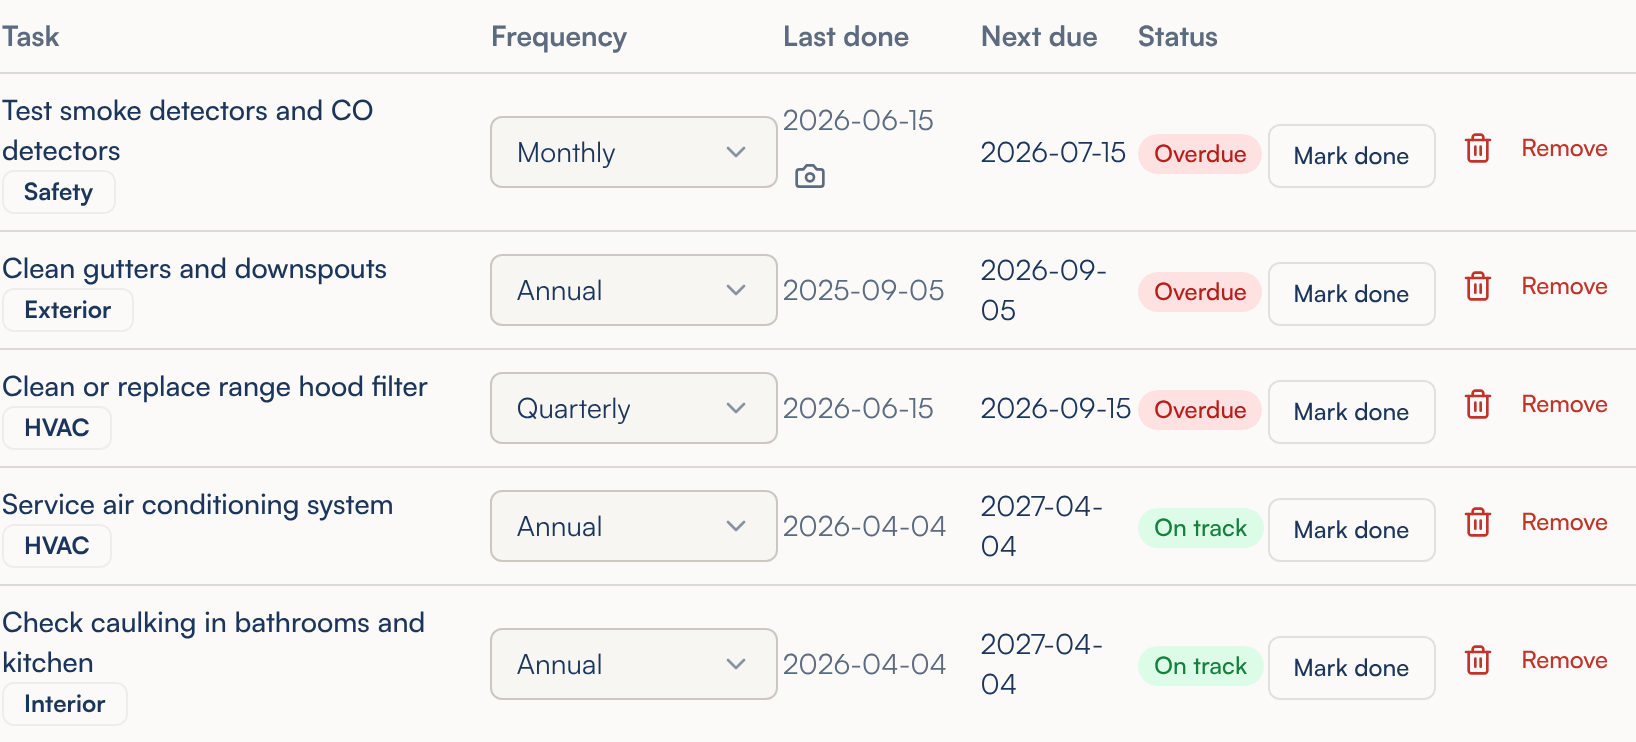
- The card This house's maintenance items lists each job with its Frequency, when it was Last done, when it is Next due, and its Status. The three counts above the card add up the statuses.
- Overdue (red) means the next due date has passed. Due soon (amber) means it falls within the next 14 days, or no due date is set. On track (green) is everything else.
Adding a task
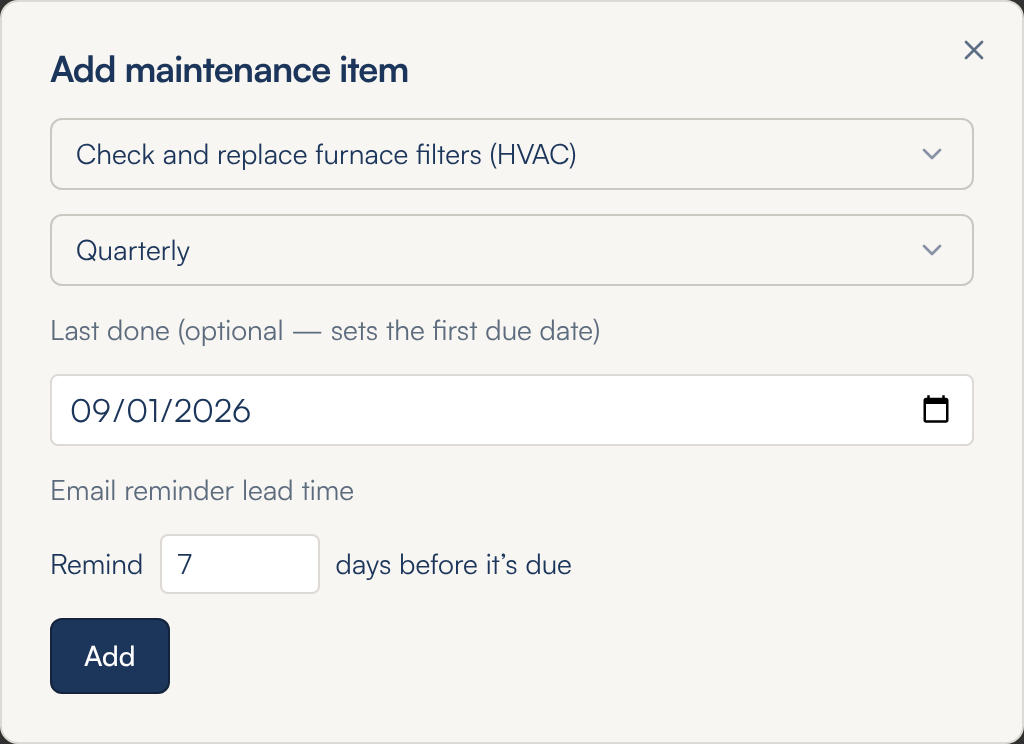
- Click + Add item. The Add maintenance item window opens.
- Pick the job from the first dropdown (it reads Choose a task until you do). The list is TumbleTracker's standard seasonal list, without the jobs this house already has. For a job that is not on it, use Custom tasks for this house below instead.
- Pick how often it comes round: Weekly, Monthly, Quarterly, Semi-annual, Annual or Every 2 years.
- If you know when it was last done, enter the date. TumbleTracker counts the first due date on from it. Leave it empty and the job is due today.
- Under Email reminder lead time, set how many days before it is due the reminder email goes. It starts at 7.
- Click Add. The × at the top right (or Esc) closes the window without saving.
Marking a task done
- Click Mark done on the task's row. There is no window and no Save button.
- TumbleTracker records the job as done today under your name. Last done becomes today, and Next due moves on by one round of the frequency — a Quarterly job marked done today is next due three months from today.
- The status and the counts at the top change to match.
Photos on a maintenance item
- Once a job has been marked done, a small camera button, Add photo, sits under the date in its Last done column.
- Click it and pick one image — a photo of the new filter, the cleaned gutter. It is sent as soon as you choose it; there is no separate upload step. It appears as a thumbnail beside the camera. Repeat for more.
- Click a thumbnail to see it full size; Esc closes it.
- To remove one, open it full size, click the red Delete photo button below the picture and confirm with Delete. If a photo cannot be added or removed, a red message says why.
Removing a task
- Click Remove on the task's row.
- Confirm with Delete. The job comes off this house's schedule.
Custom tasks for this house
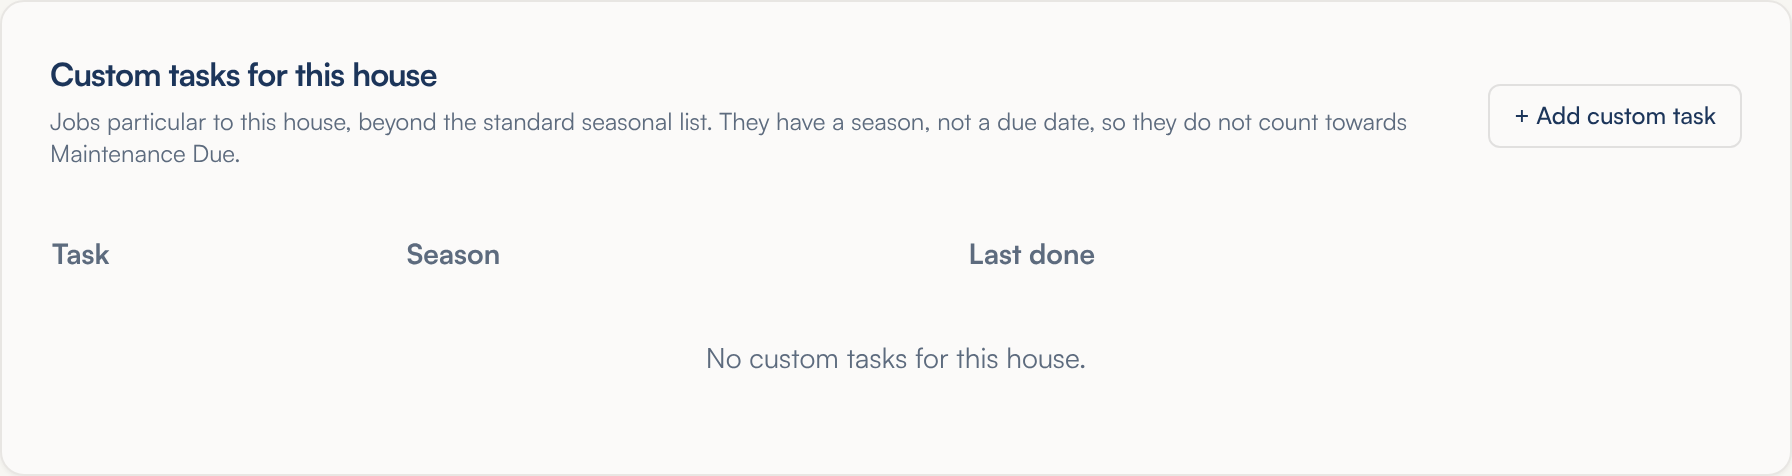
Some jobs belong to one house only — a pellet stove auger, an outside tap that freezes. The second card on the page, Custom tasks for this house, holds those. A custom task has a season, not a due date, so it never turns red and it does not count towards Maintenance Due.
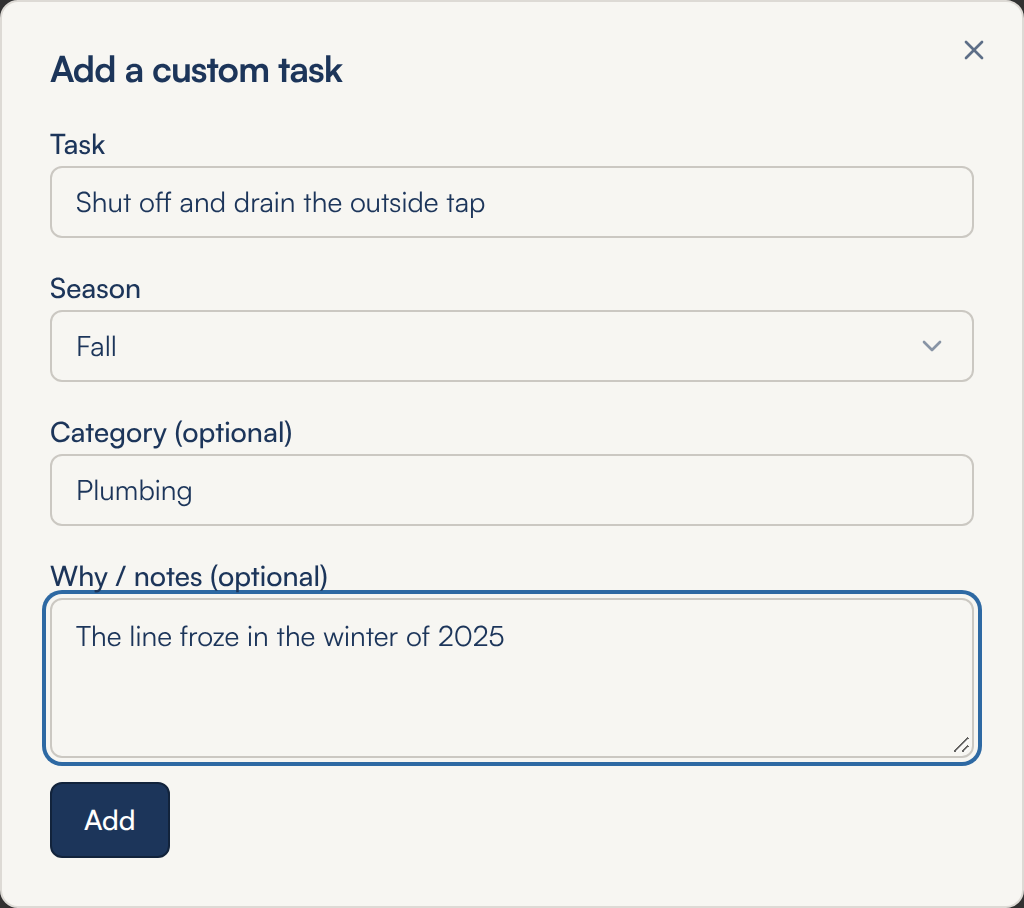
- Click + Add custom task. The Add a custom task window opens.
- Describe the job in Task. It is the only box you must fill in — the Add button stays grey until you do.
- Pick a Season: Spring, Fall, Winter, Monthly, Quarterly, Annual or General. It starts at General.
- Add a Category (optional) such as Plumbing — left empty, it is filed under General — and anything worth knowing in Why / notes (optional).
- Click Add. The task appears on the card.
- When the job is done, click Mark done on its row. Last done shows today's date and your name.
- To take a custom task off the house, click Remove and confirm with Delete. This removes its record of past Mark done dates too.
Reminder emails
TumbleTracker checks every schedule once a day. When a job comes within its reminder lead time — 7 days unless you changed it — it goes into one email listing every job that has just come due, with its house and due date. Each job is emailed once. It is emailed again only after it is marked done or its frequency is changed, which starts the next round. Custom tasks are not emailed.
The emails go to every active user with the Receive reminder emails (maintenance and warranties) box ticked — the same list as the warranty reminders in the last chapter.
Where to find it: Properties → a house → Maintenance Schedule.
9.Work orders
A work order is the sheet you hand to whoever is doing the work. You tick the repairs, maintenance jobs and materials you want done at one house, and TumbleTracker numbers the sheet, lays it out for printing, and keeps a copy. Each work order also carries a status, so you can see which ones are still out and close them when the work is done.
Starting a work order
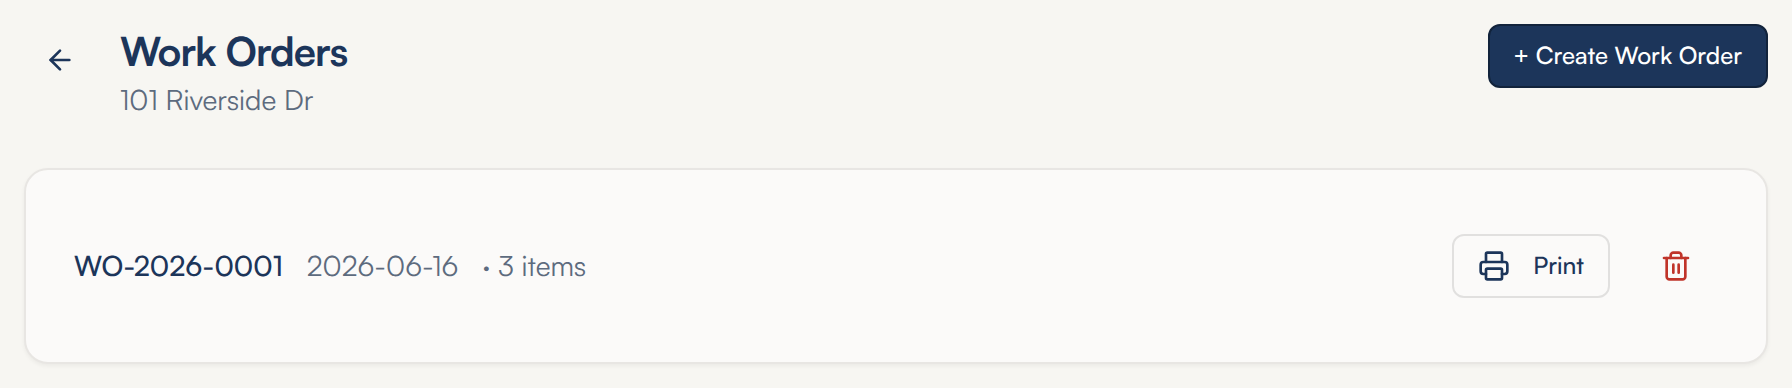
- Open the house and click Work Orders in the row of buttons at the top.
- The house's own work orders are listed with their number, the date issued and how many items each holds.
- Click + Create Work Order. The New Work Order window opens.
Choosing what goes on it
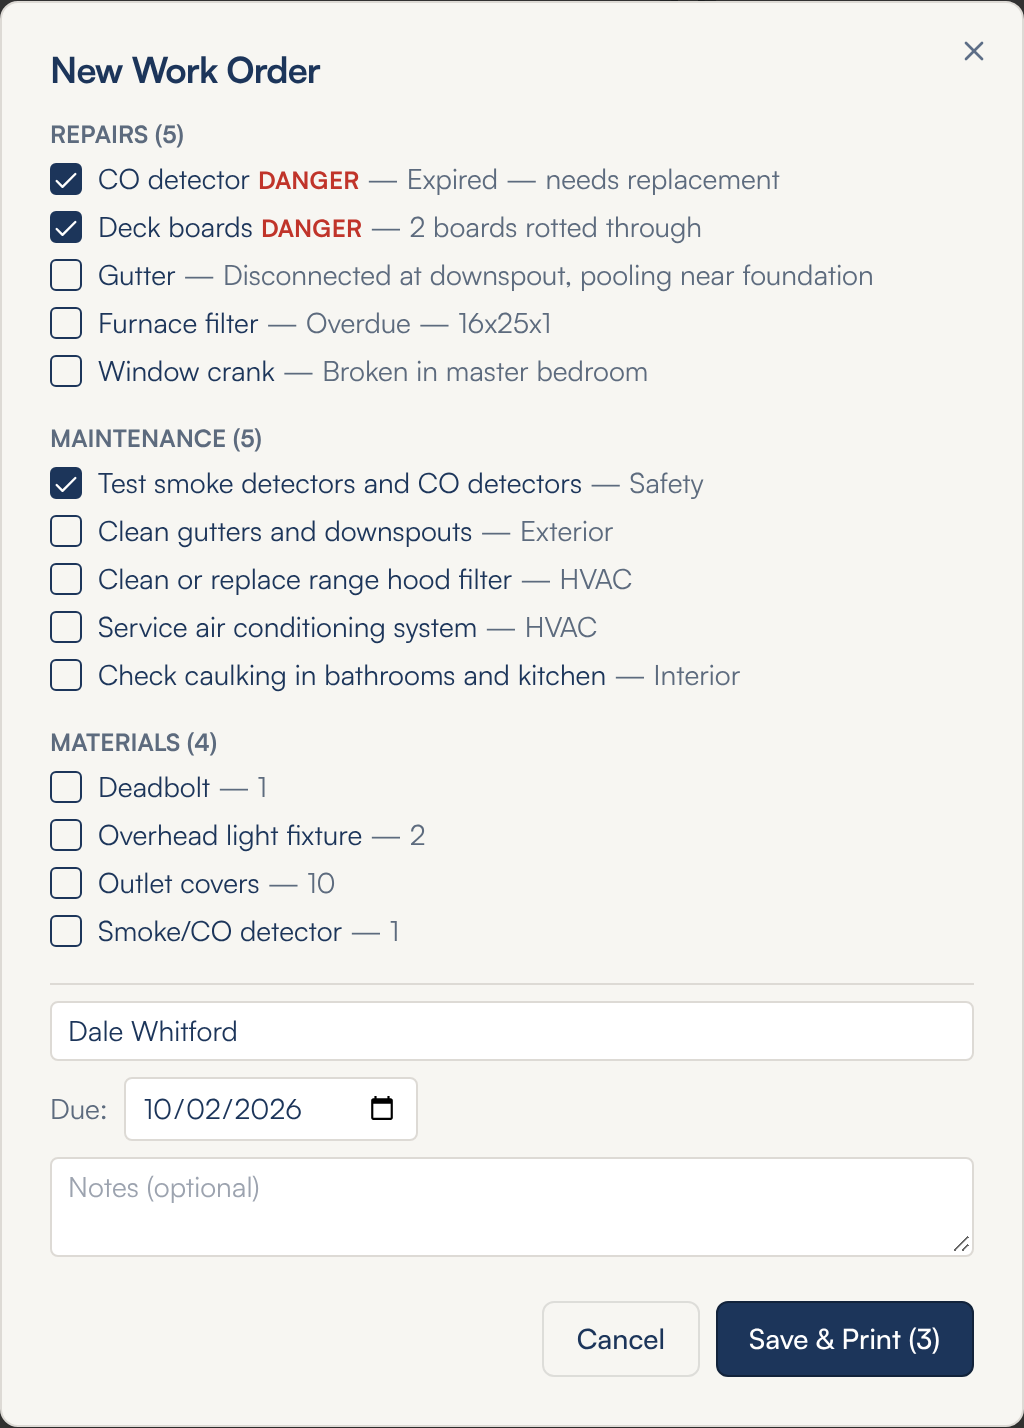
- The window lists the house in three groups, each with a count: Repairs, Maintenance and Materials. Tick every line you want on the sheet.
- Repairs shows every repair that is not yet Completed — Pending, In Progress and Deferred alike. Dangerous ones carry a red DANGER. A Completed repair is not offered.
- Maintenance shows every job on the house's schedule, due or not. Materials shows everything on the house's materials list.
- Type the worker's name in the first text box (it reads Assigned to (worker name) until you type), pick a Due date, and add anything they need to know in the Notes (optional) box. All three can be left empty.
- Click Save & Print. The number on the button is how many lines you ticked; it stays grey until you tick at least one. Cancel closes the window without saving.
Printing a work order
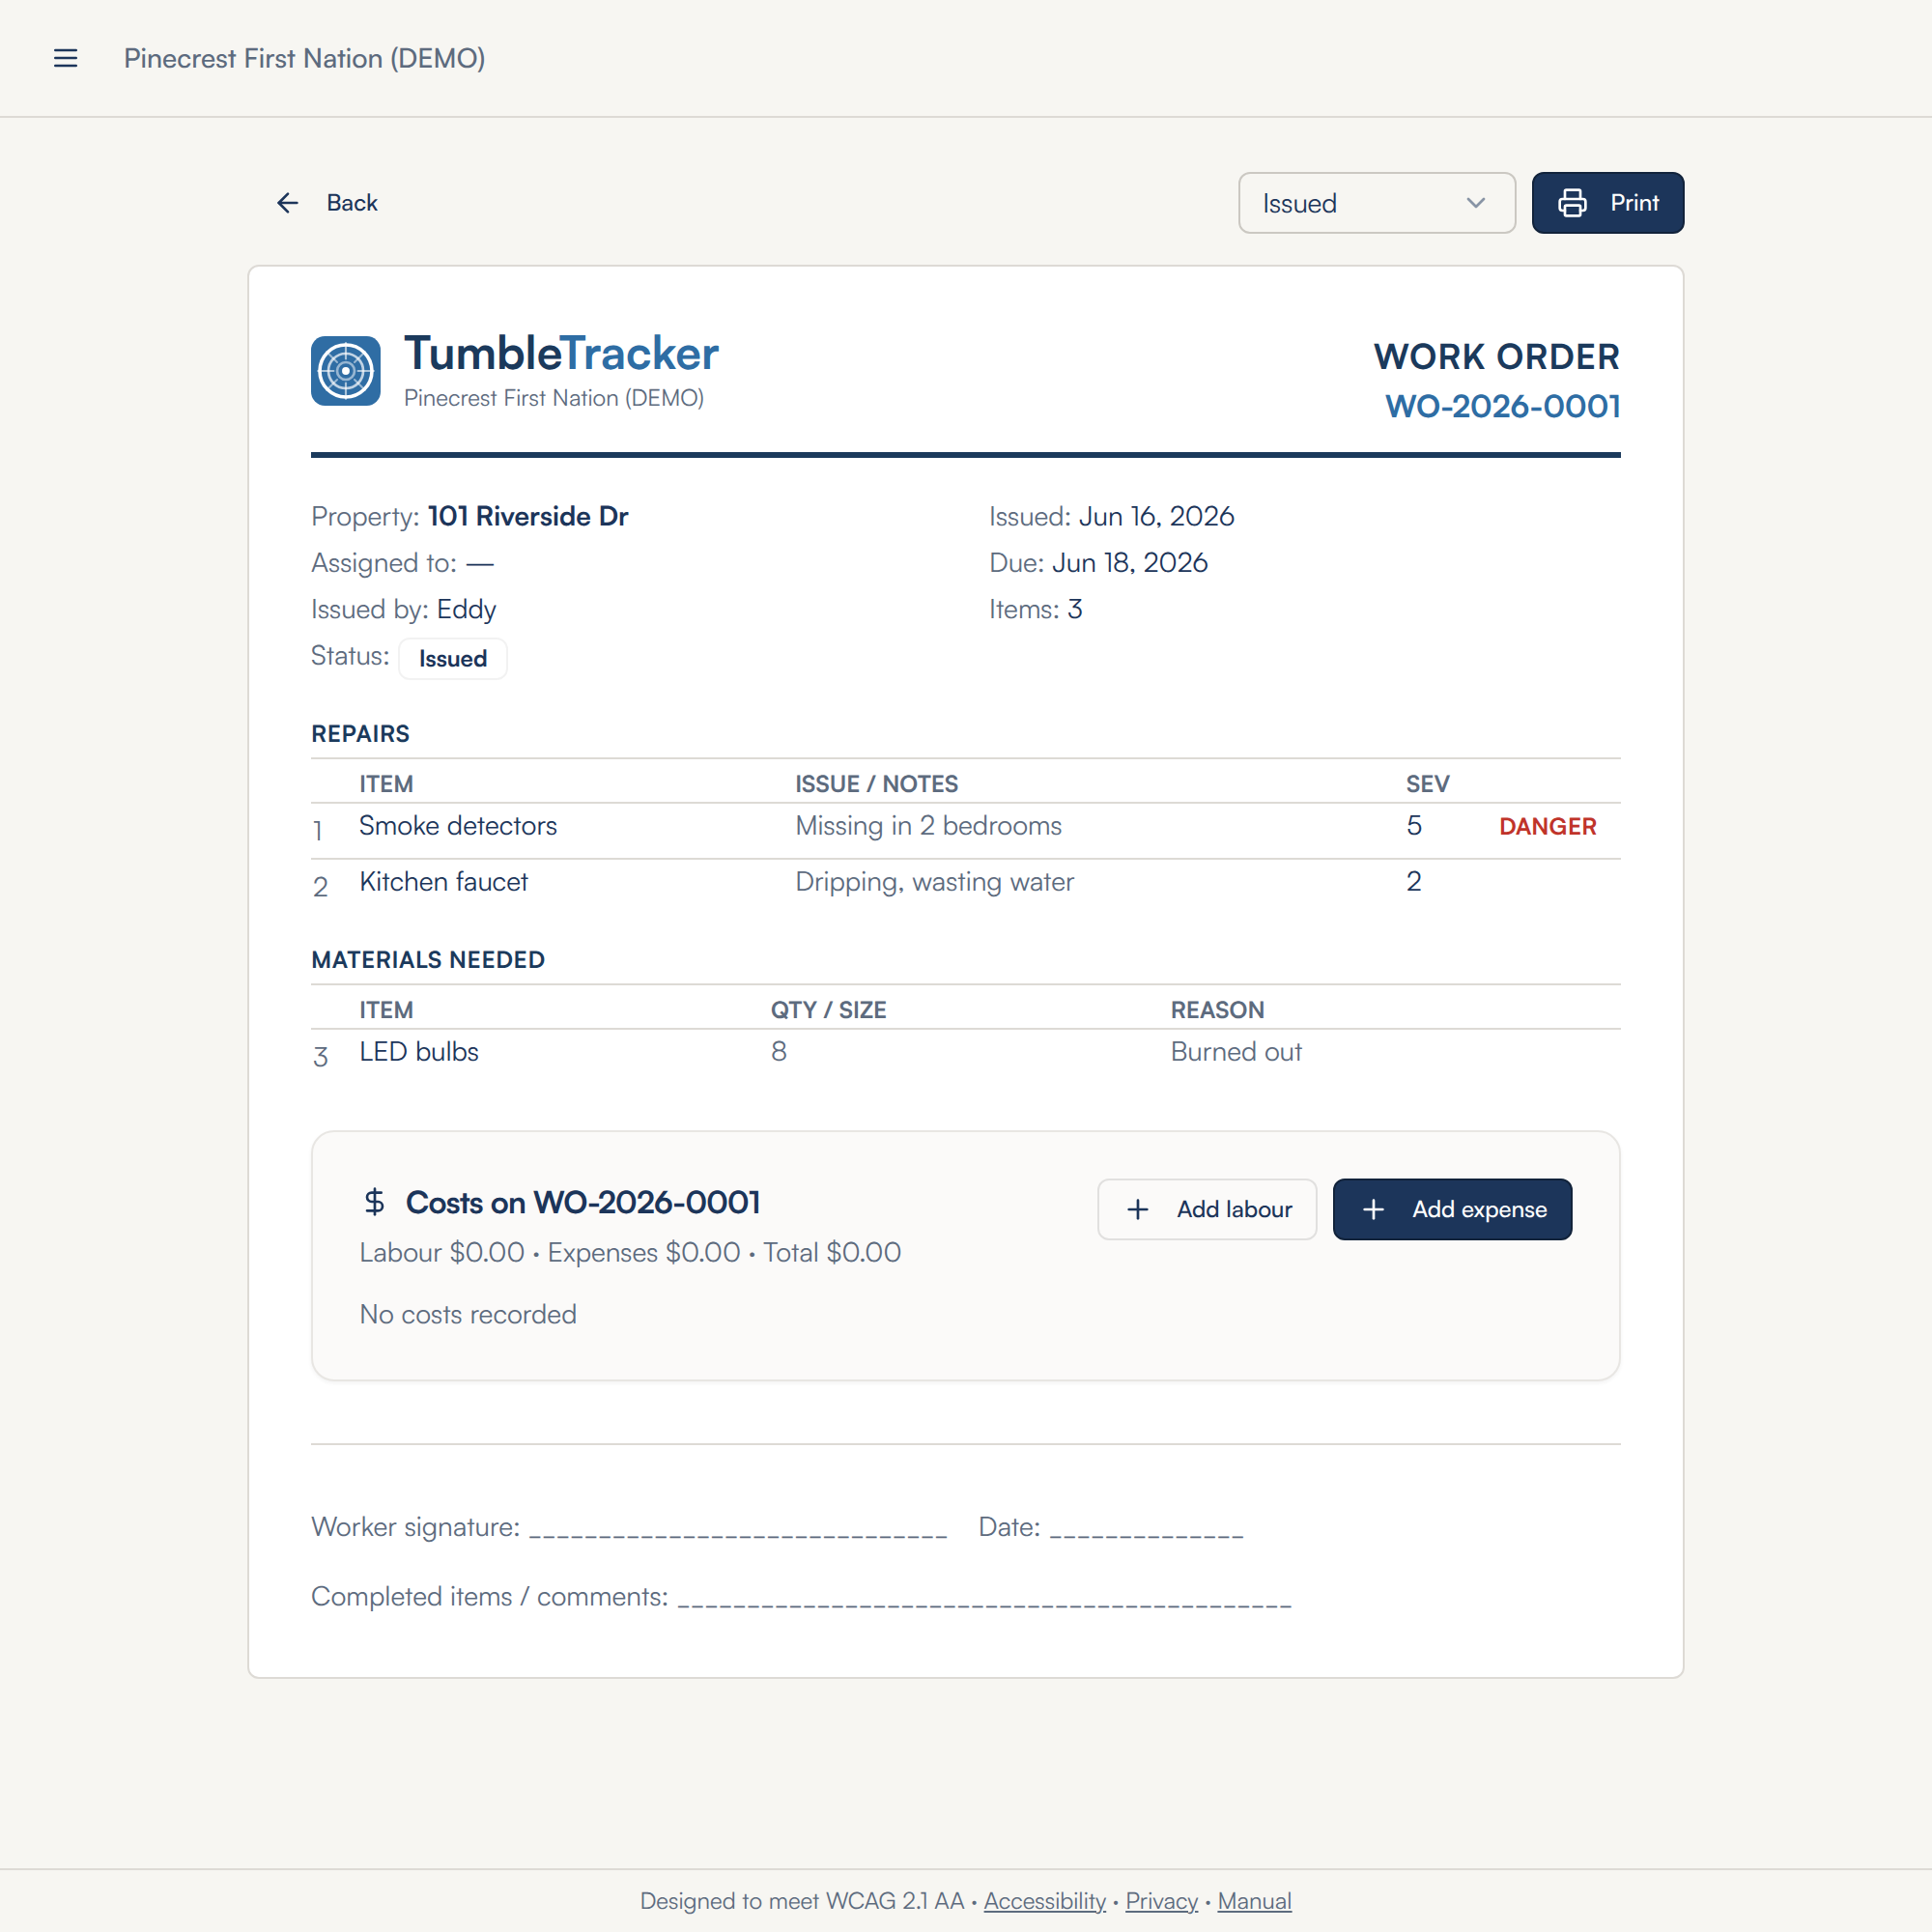
- Save & Print takes you straight to the finished sheet. To reach an older one, click Print beside it on the house's Work Orders screen or on the Work Orders list in the menu.
- The sheet is numbered WO-, the year it was issued, and a running number — WO-2026-0001 is the first one of 2026. It shows the house, who it is assigned to, who issued it, the dates, its Status, and the ticked lines in Repairs, Maintenance and Materials needed, with lines at the foot for the worker's signature and comments.
- Click Print at the top right. The buttons, the status dropdown beside Print and the costs card are left off the paper; the status itself prints in the header. Back returns you to the house.
Every work order in the community
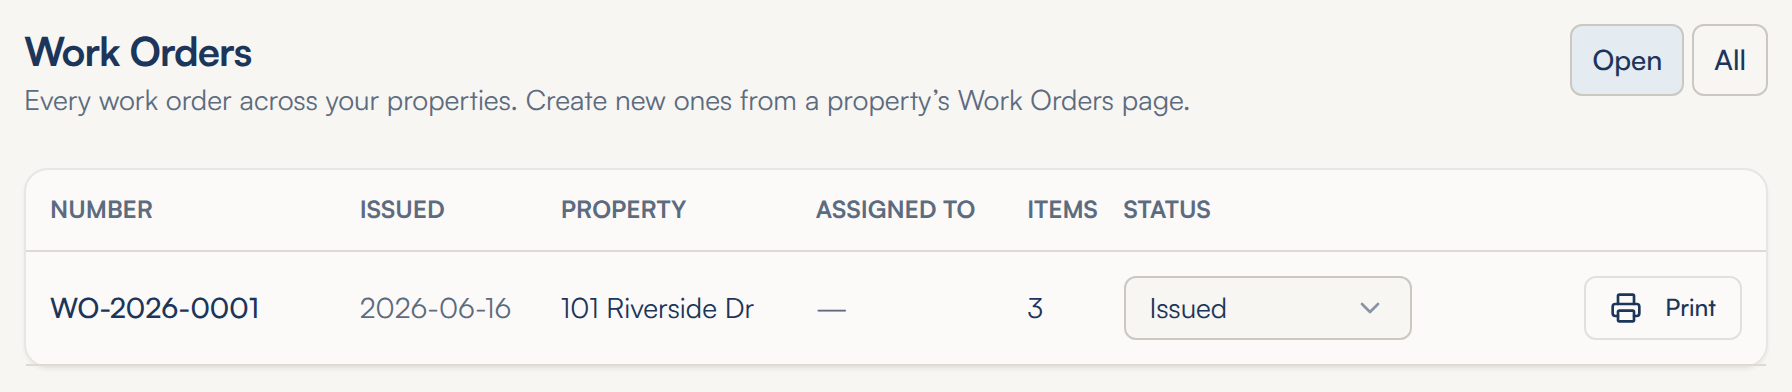
- Click Work Orders in the menu. Work orders across your houses are listed with their Number, the date Issued, the Property, who each is Assigned to, how many Items it holds, and its Status.
- The Open and All buttons at the top right choose which ones you see. The list opens on Open: the work orders still Issued or In Progress. Click All to include the Completed and Cancelled ones.
- Click Print on a row to open that sheet.
- New work orders are started from a house, not from this list — open the house and use its Work Orders button.
Moving a work order along, and closing it
A new work order starts as Issued. Its status goes Issued → In Progress → Completed, or Cancelled for one that will not happen.
- Open the status dropdown — beside Print at the top of the work order, or in the Status column of the Work Orders list in the menu.
- Pick In Progress when the worker starts, and Completed when the sheet comes back signed. Pick Cancelled for a work order that will not be done. There is no Save button — the change is stored the moment you pick it.
- A Completed or Cancelled work order is closed: the date it was closed prints beside its status, and it drops off the Open view of the list. Click All to see it again. Picking Issued or In Progress reopens it.
- To remove a work order issued by mistake, open the house's Work Orders screen, click the red bin on its row, and confirm with Delete.
Where to find it: Properties → a house → Work Orders, or Work Orders in the menu.
10.Costs
TumbleTracker keeps two kinds of cost against each house. Labour is what your own crew's time cost. An expense is money paid out — materials, a contractor, a permit, the dump. Log them as the money is spent, and the Costs screen adds them up for one house or the whole community, for any period you choose.
Where you can log costs
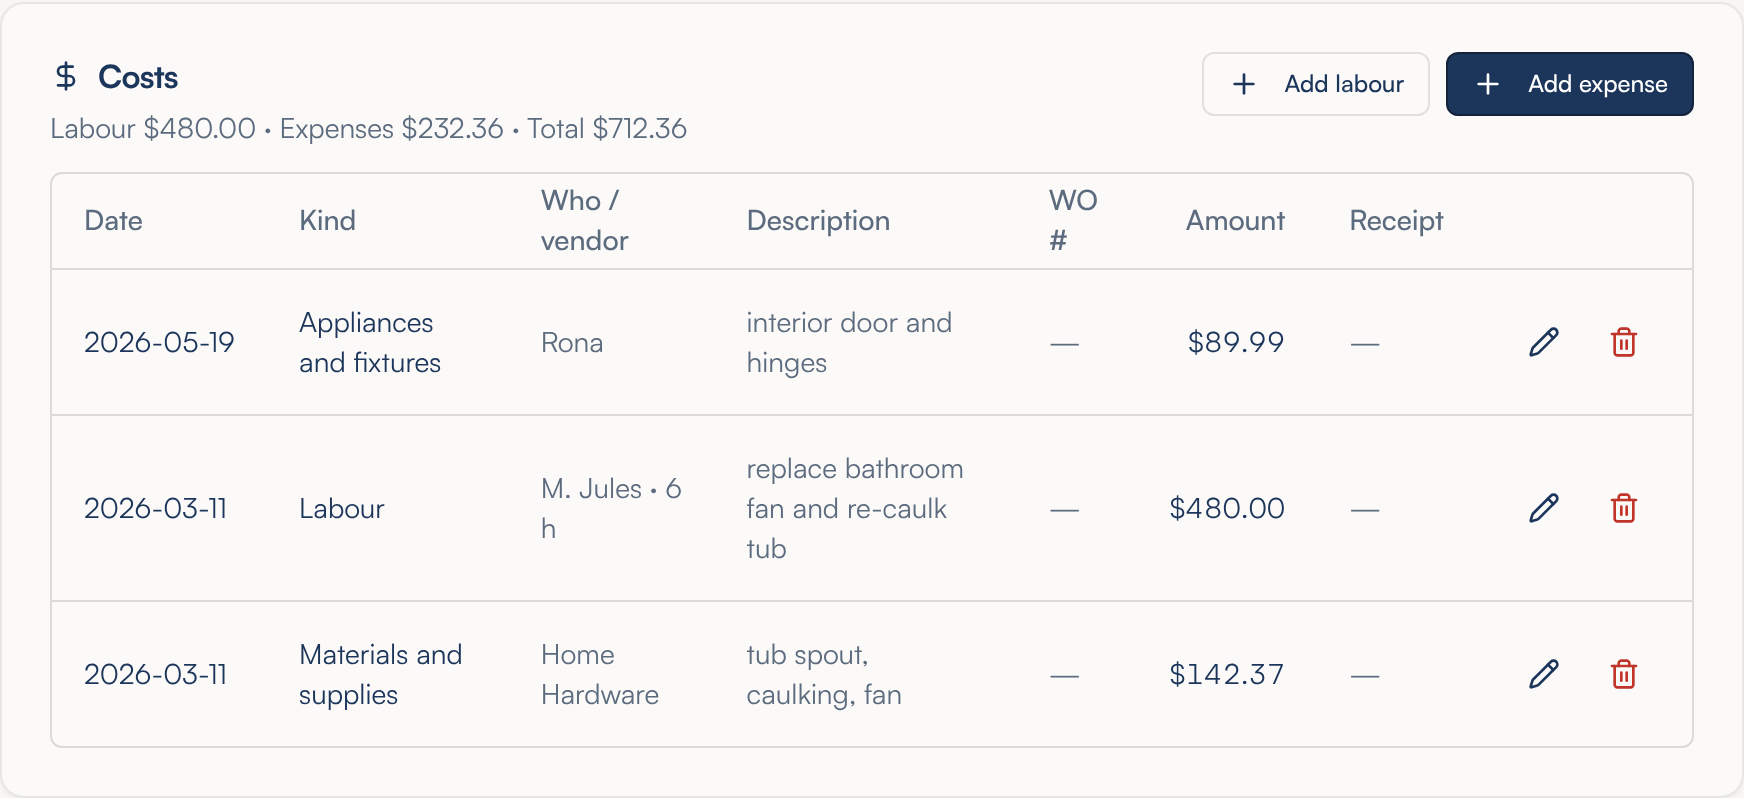
- Open the house. Further down the page is the Costs card. The line under its heading totals everything ever spent on the house: labour, expenses and the two together.
- Each entry is one row: the date, the kind (Labour or the expense category), who did the work or who was paid, the description, the work order number, the amount, and a paperclip if a receipt is attached. Newest entries come first. After ten rows a Show all button lists the rest.
- A work order has the same card, headed Costs on and the work order's number. It shows only the costs for that job, and anything you add there is tied to that work order for you.
Logging labour
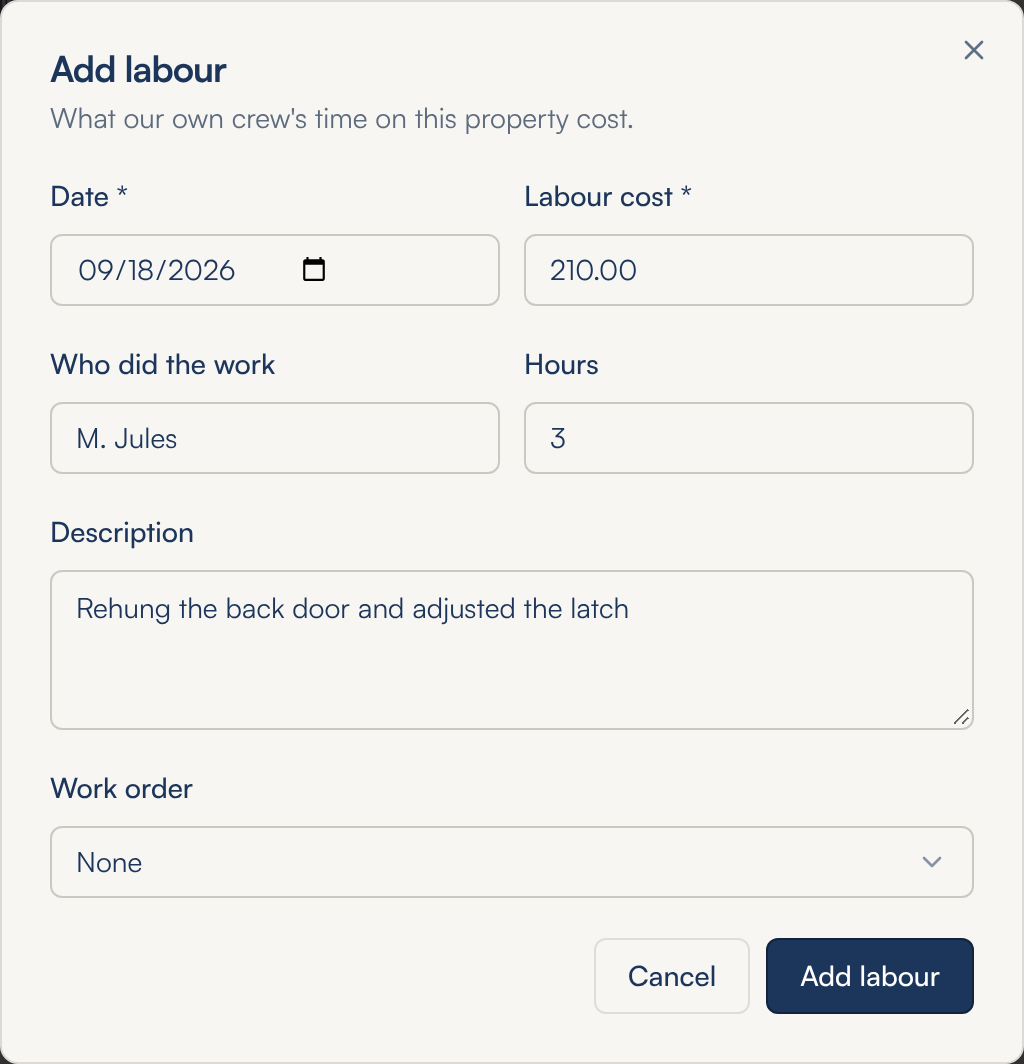
- On the Costs card, click Add labour.
- Date starts at today; change it to the day the work was done. Type what the work cost in dollars in Labour cost. These two are required.
- Who did the work and Hours are optional. Hours go in quarter-hour steps; leave the box empty if you only know the dollar figure.
- Say what was done in Description (optional). If the work was on a work order, pick it under Work order; otherwise leave it at None.
- Click Add labour. Cancel, the × or Esc closes the window without saving.
Logging an expense
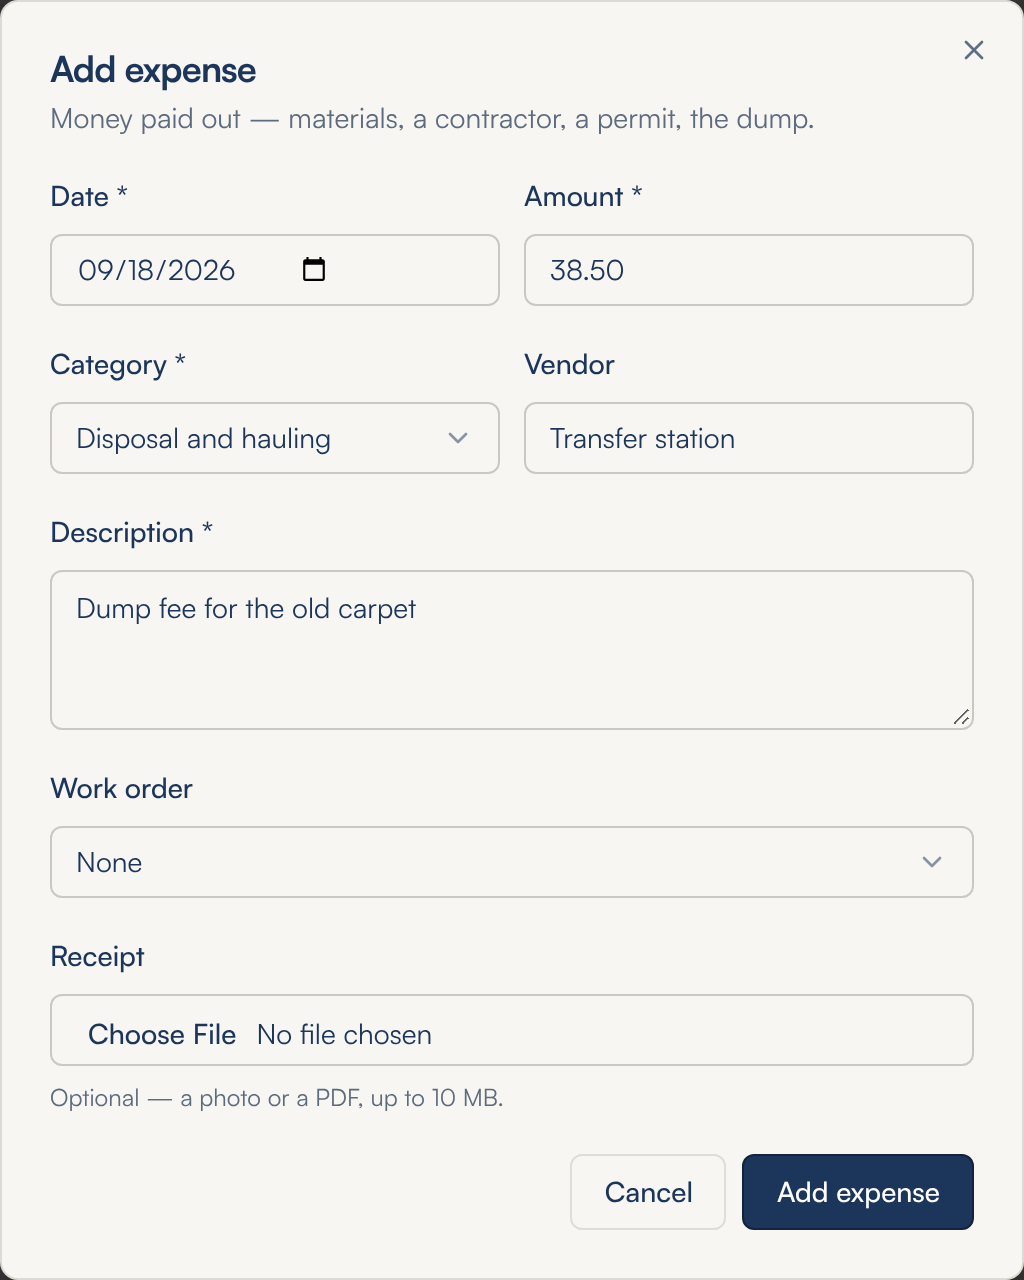
- On the Costs card, click Add expense.
- Set the Date and type the Amount in dollars.
- Pick a Category — it starts at Materials and supplies. The report adds up expenses by these categories, so pick the closest one.
- Type who was paid in Vendor (optional) and what the money was for in Description. The description is required on an expense.
- Pick the Work order if there is one.
- To attach the receipt, click Choose File under Receipt and pick a photo or a PDF of up to 10 MB. It is optional.
- Click Add expense. The expense is saved first and the receipt is sent straight after.
| Category | Use it for |
|---|---|
| Materials and supplies | Lumber, filters, caulking, hardware — anything used up on the job |
| Contractor services | An outside trade's invoice — a plumber, an electrician, a roofer |
| Appliances and fixtures | A new stove, a water heater, a door, a light fixture |
| Equipment rental | A rented tool or machine |
| Permits, inspections and fees | Building permits, inspection fees |
| Disposal and hauling | Dump fees, bin rental, hauling away |
| Travel and mileage | Getting the crew or the materials to the house |
| Other | Anything that fits none of the above |
Changing or removing an entry
- Click the pencil on the entry's row. The window opens with what was typed, headed Edit labour or Edit expense. Change it and click Save changes.
- On an expense with a receipt, View receipt opens it and Remove takes it off. Choosing a new file replaces it. You can also open a receipt from the paperclip on the row.
- To delete an entry, click the red bin on its row and confirm with Delete.
The Costs report
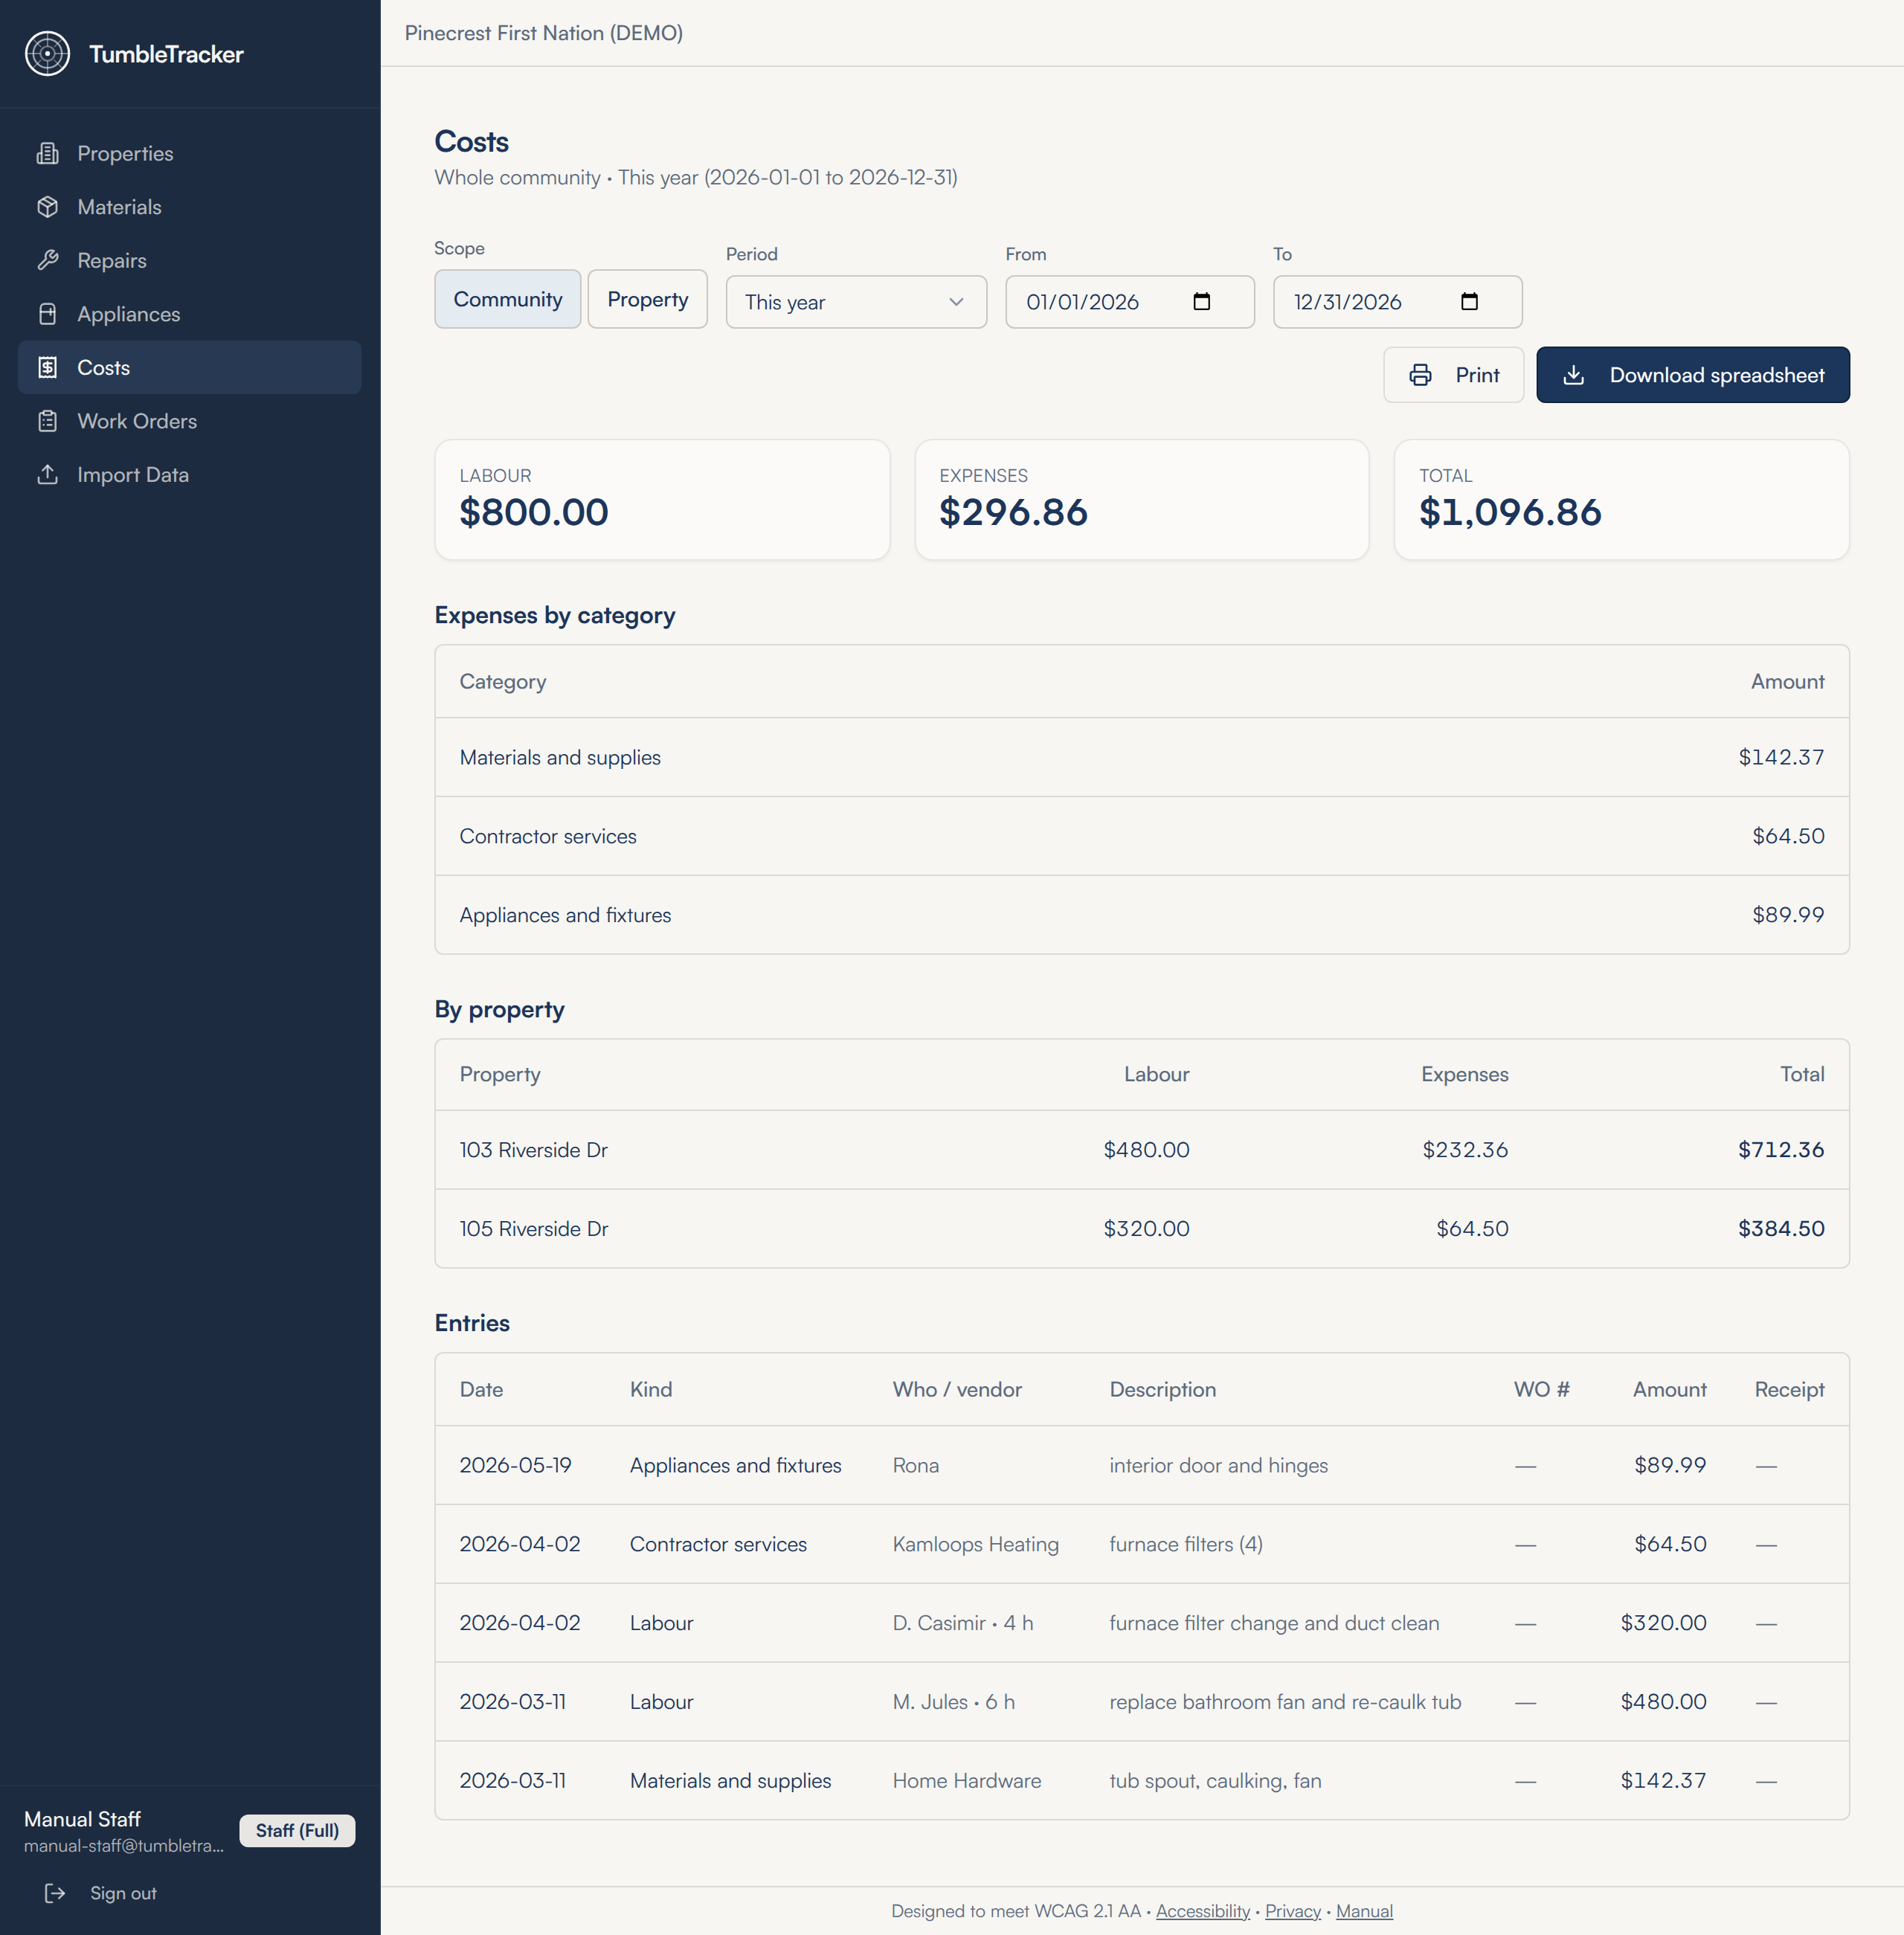
- Click Costs in the menu. The report opens on the whole community for This year.
- Under Scope, Community covers every house. Click Property and choose a house from the list to see just that one.
- Pick a Period: This month, Last month, This year, Last year or All time. The From and To dates fill in to match. To report on any other stretch, type your own dates in From and To; the period then reads Custom range. Both ends are included.
- The three tiles give Labour, Expenses and the Total for that scope and period. Under them, Expenses by category lists only the categories money was spent on, and By property (community scope only) splits the total house by house — click an address to open that house.
- Entries lists every labour entry and expense behind the numbers, with nothing left out.
Printing and downloading
- Click Print to print the report on the screen, or save it as a PDF from the print window. The paper copy carries a COST REPORT heading with your community's name and the date; the buttons and boxes are left off.
- Click Download spreadsheet for an Excel file of the same report. It is named for what it holds, such as costs-community-2026-01-01-2026-12-31.xlsx.
- The file has four sheets: Summary (the totals and the categories), By property (community scope only, so a one-house report has three sheets), Labour and Expenses. Money is formatted as dollars and adds up like any other number in Excel.
Costs on the property report
A house's printed report (next chapter) has a Costs section, ticked by default. It lists every entry ever recorded on the house under the heading Costs (all time), with the totals beside it. The year you pick for that report does not narrow the costs — use the Costs screen when you need one year's figures.
Where to find it: Properties → a house → Costs, a work order's page, or Costs in the menu.
11.Property reports
The property report is one house on paper: its repairs, appliances, costs, maintenance and tenants in a single printout. Use it for a site visit, a council meeting, or a file copy when the house changes hands. You choose which sections go in.
Printing a property report
- Open the house and click Print in the row of buttons at the top.
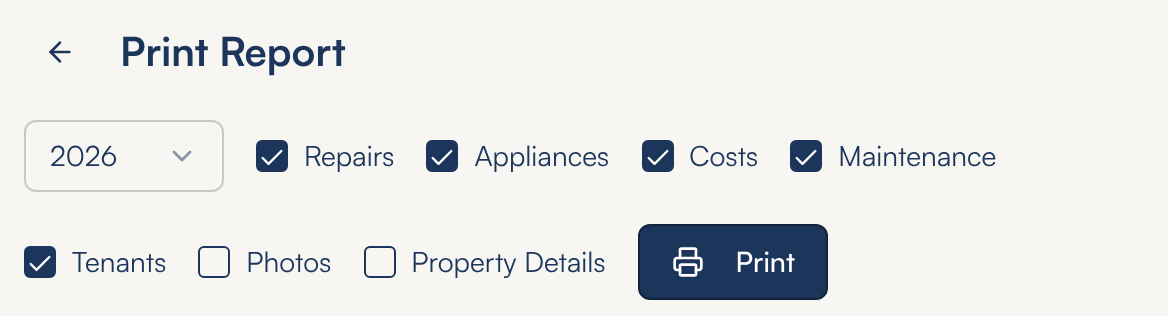
- The Print Report screen opens with the report laid out below a row of choices. Pick the year in the box on the left — it sets which year's maintenance checklist is shown.
- Tick the sections you want. Repairs, Appliances, Costs, Maintenance and Tenants start ticked; Photos and Property Details start unticked. The report below changes as you tick.
- Click Print on the right. Your browser's print window opens. Pick a printer, or choose Save as PDF as the destination to keep a file instead. Print stays grey until every ticked section has loaded, so a report is never printed half-filled.
- The arrow at the top left takes you back to the house.
What is in it
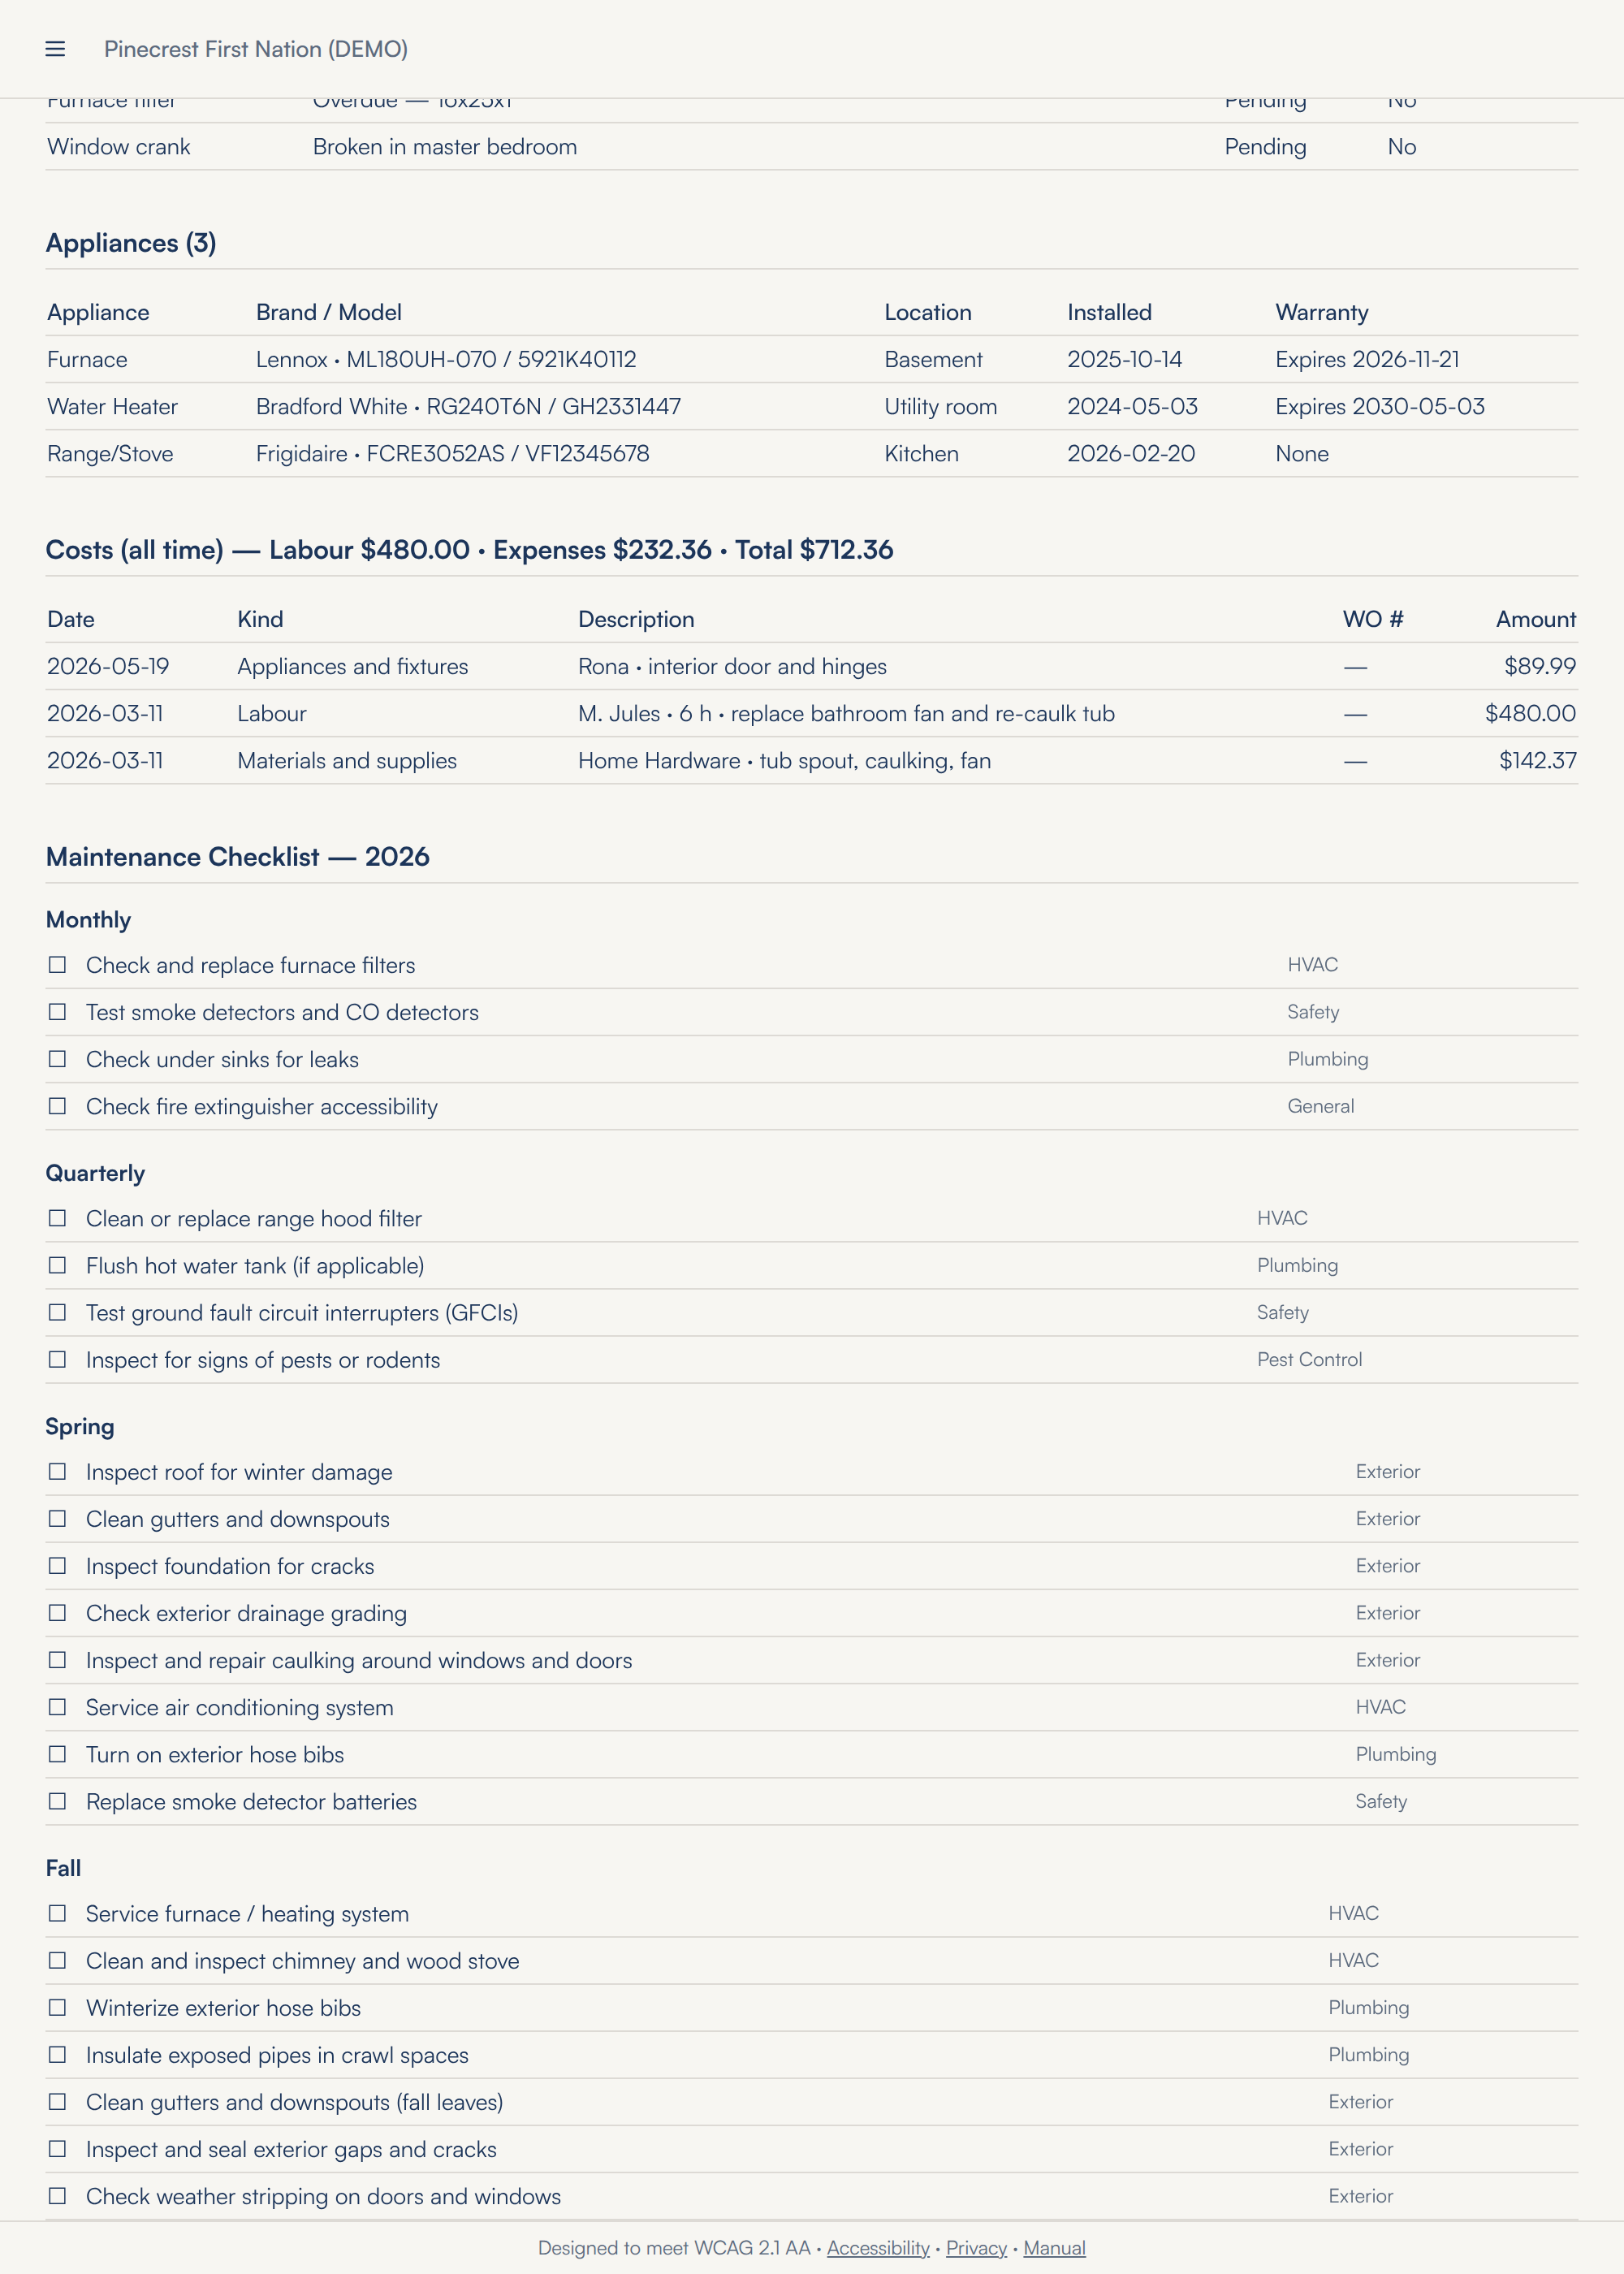
The report prints in this order. A section you unticked is simply left out.
| Section | What it shows |
|---|---|
| Heading | The TumbleTracker PROPERTY REPORT banner, the address, the date the report was made and the year you picked, and the heating type, filter size and wood stove if recorded |
| Property Details | Every detail filled in under the house's Property Details, section by section |
| Repair Items | Every repair on the house, with its issue, status and whether it is dangerous |
| Appliances | Each appliance with its brand and model, location, install date and warranty |
| Costs (all time) | Every labour entry and expense ever recorded on the house, with the labour, expense and total figures in the heading — not only the year you picked |
| Maintenance Checklist | The seasonal checklist for the year you picked, grouped Monthly, Quarterly, Spring, Fall, Winter, Annual and General. A job marked done that year is ticked, with who did it and when; the house's custom tasks follow |
| Tenants / Residents | Each tenant's name, phone, email and notes |
| Photos | The house's photos, grouped by category, with their captions |
If a section could not be loaded
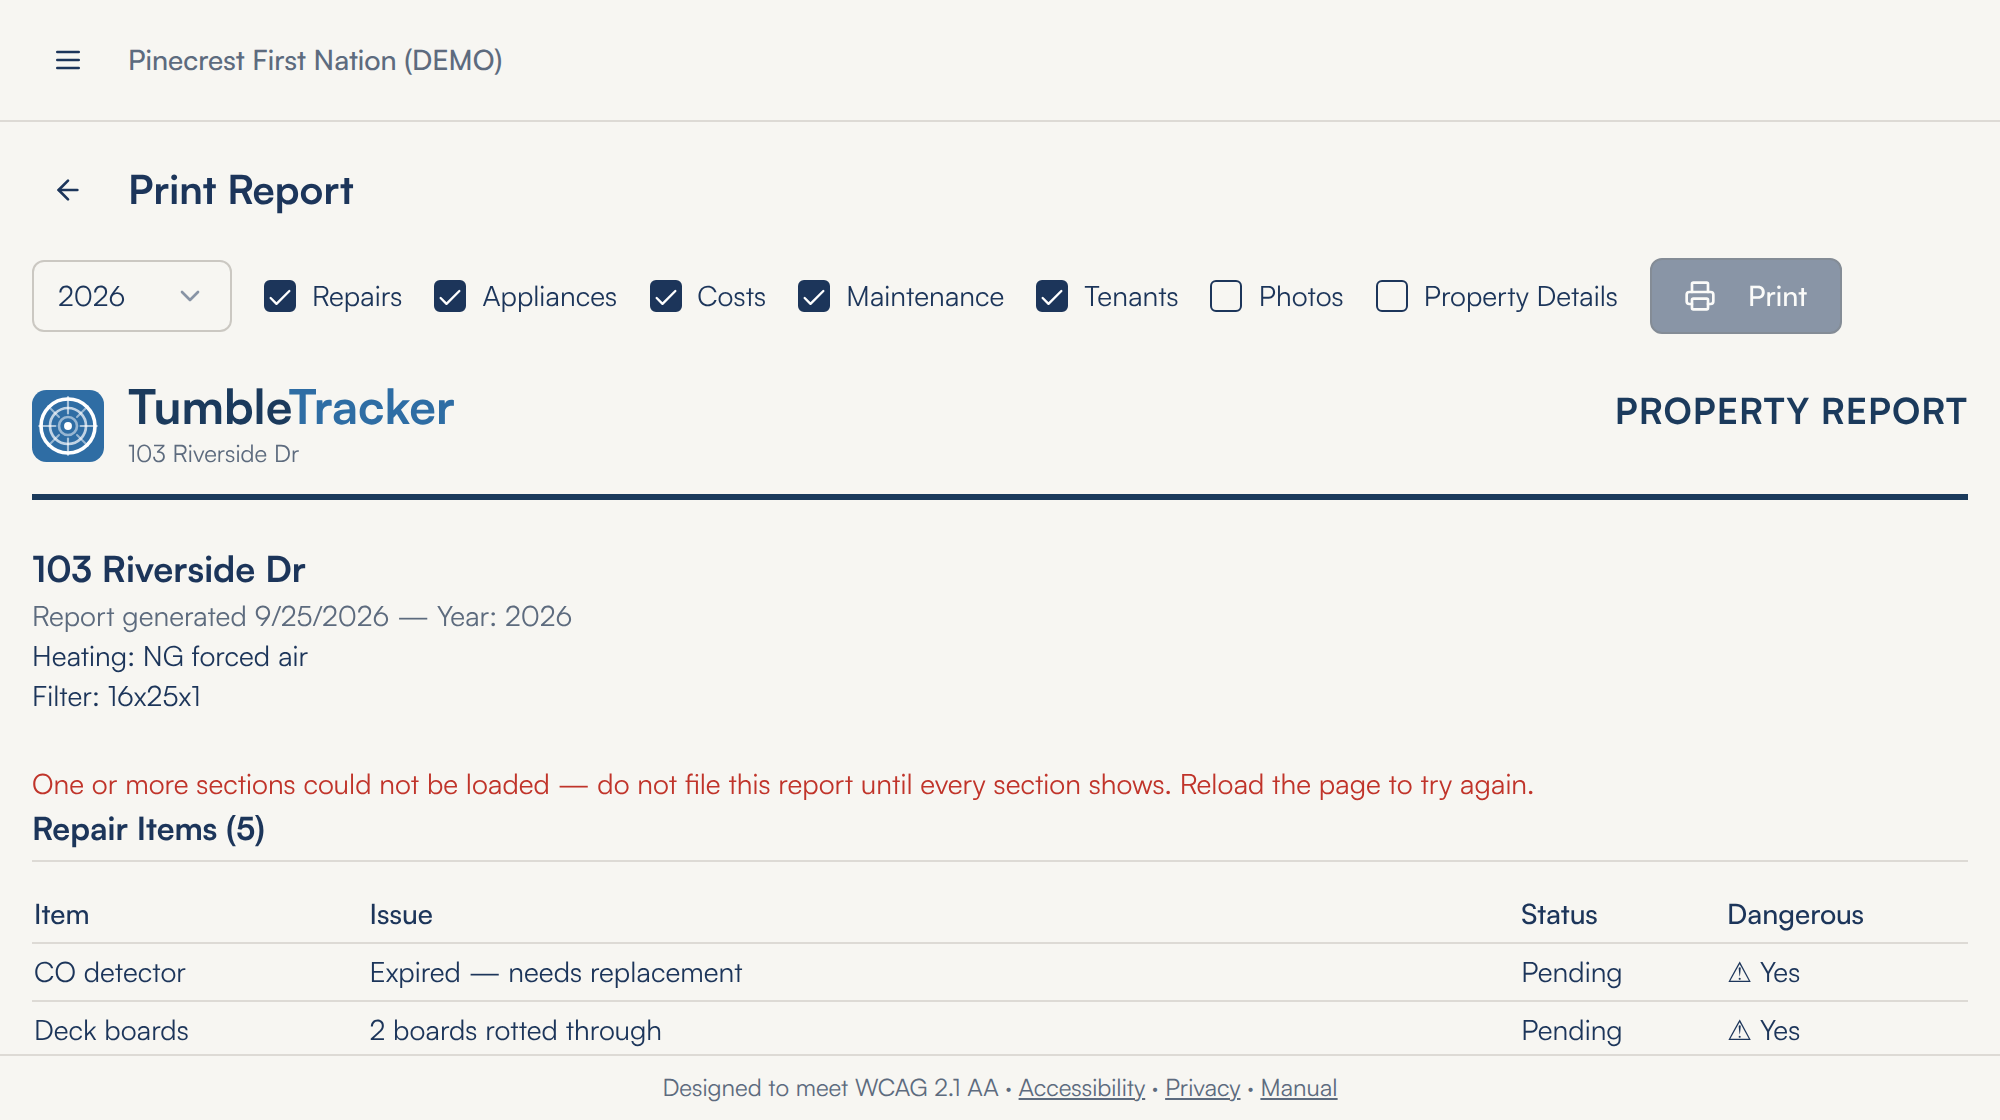
- When a ticked section cannot be fetched — a dropped connection, say — that section reads, for example, Tenants / Residents could not be loaded.
- A red line under the heading says One or more sections could not be loaded — do not file this report until every section shows. Reload the page to try again. and Print stays grey.
- Reload the page. If the section still will not load, untick it to print the rest, or try again later.
Where to find it: Properties → a house → Print.
12.Importing data
When you already have your houses in a spreadsheet, you do not have to type them in one by one. Download TumbleTracker's template, copy your records into it, and upload it. TumbleTracker checks every row and shows you what it found before anything is saved.
Downloading the template
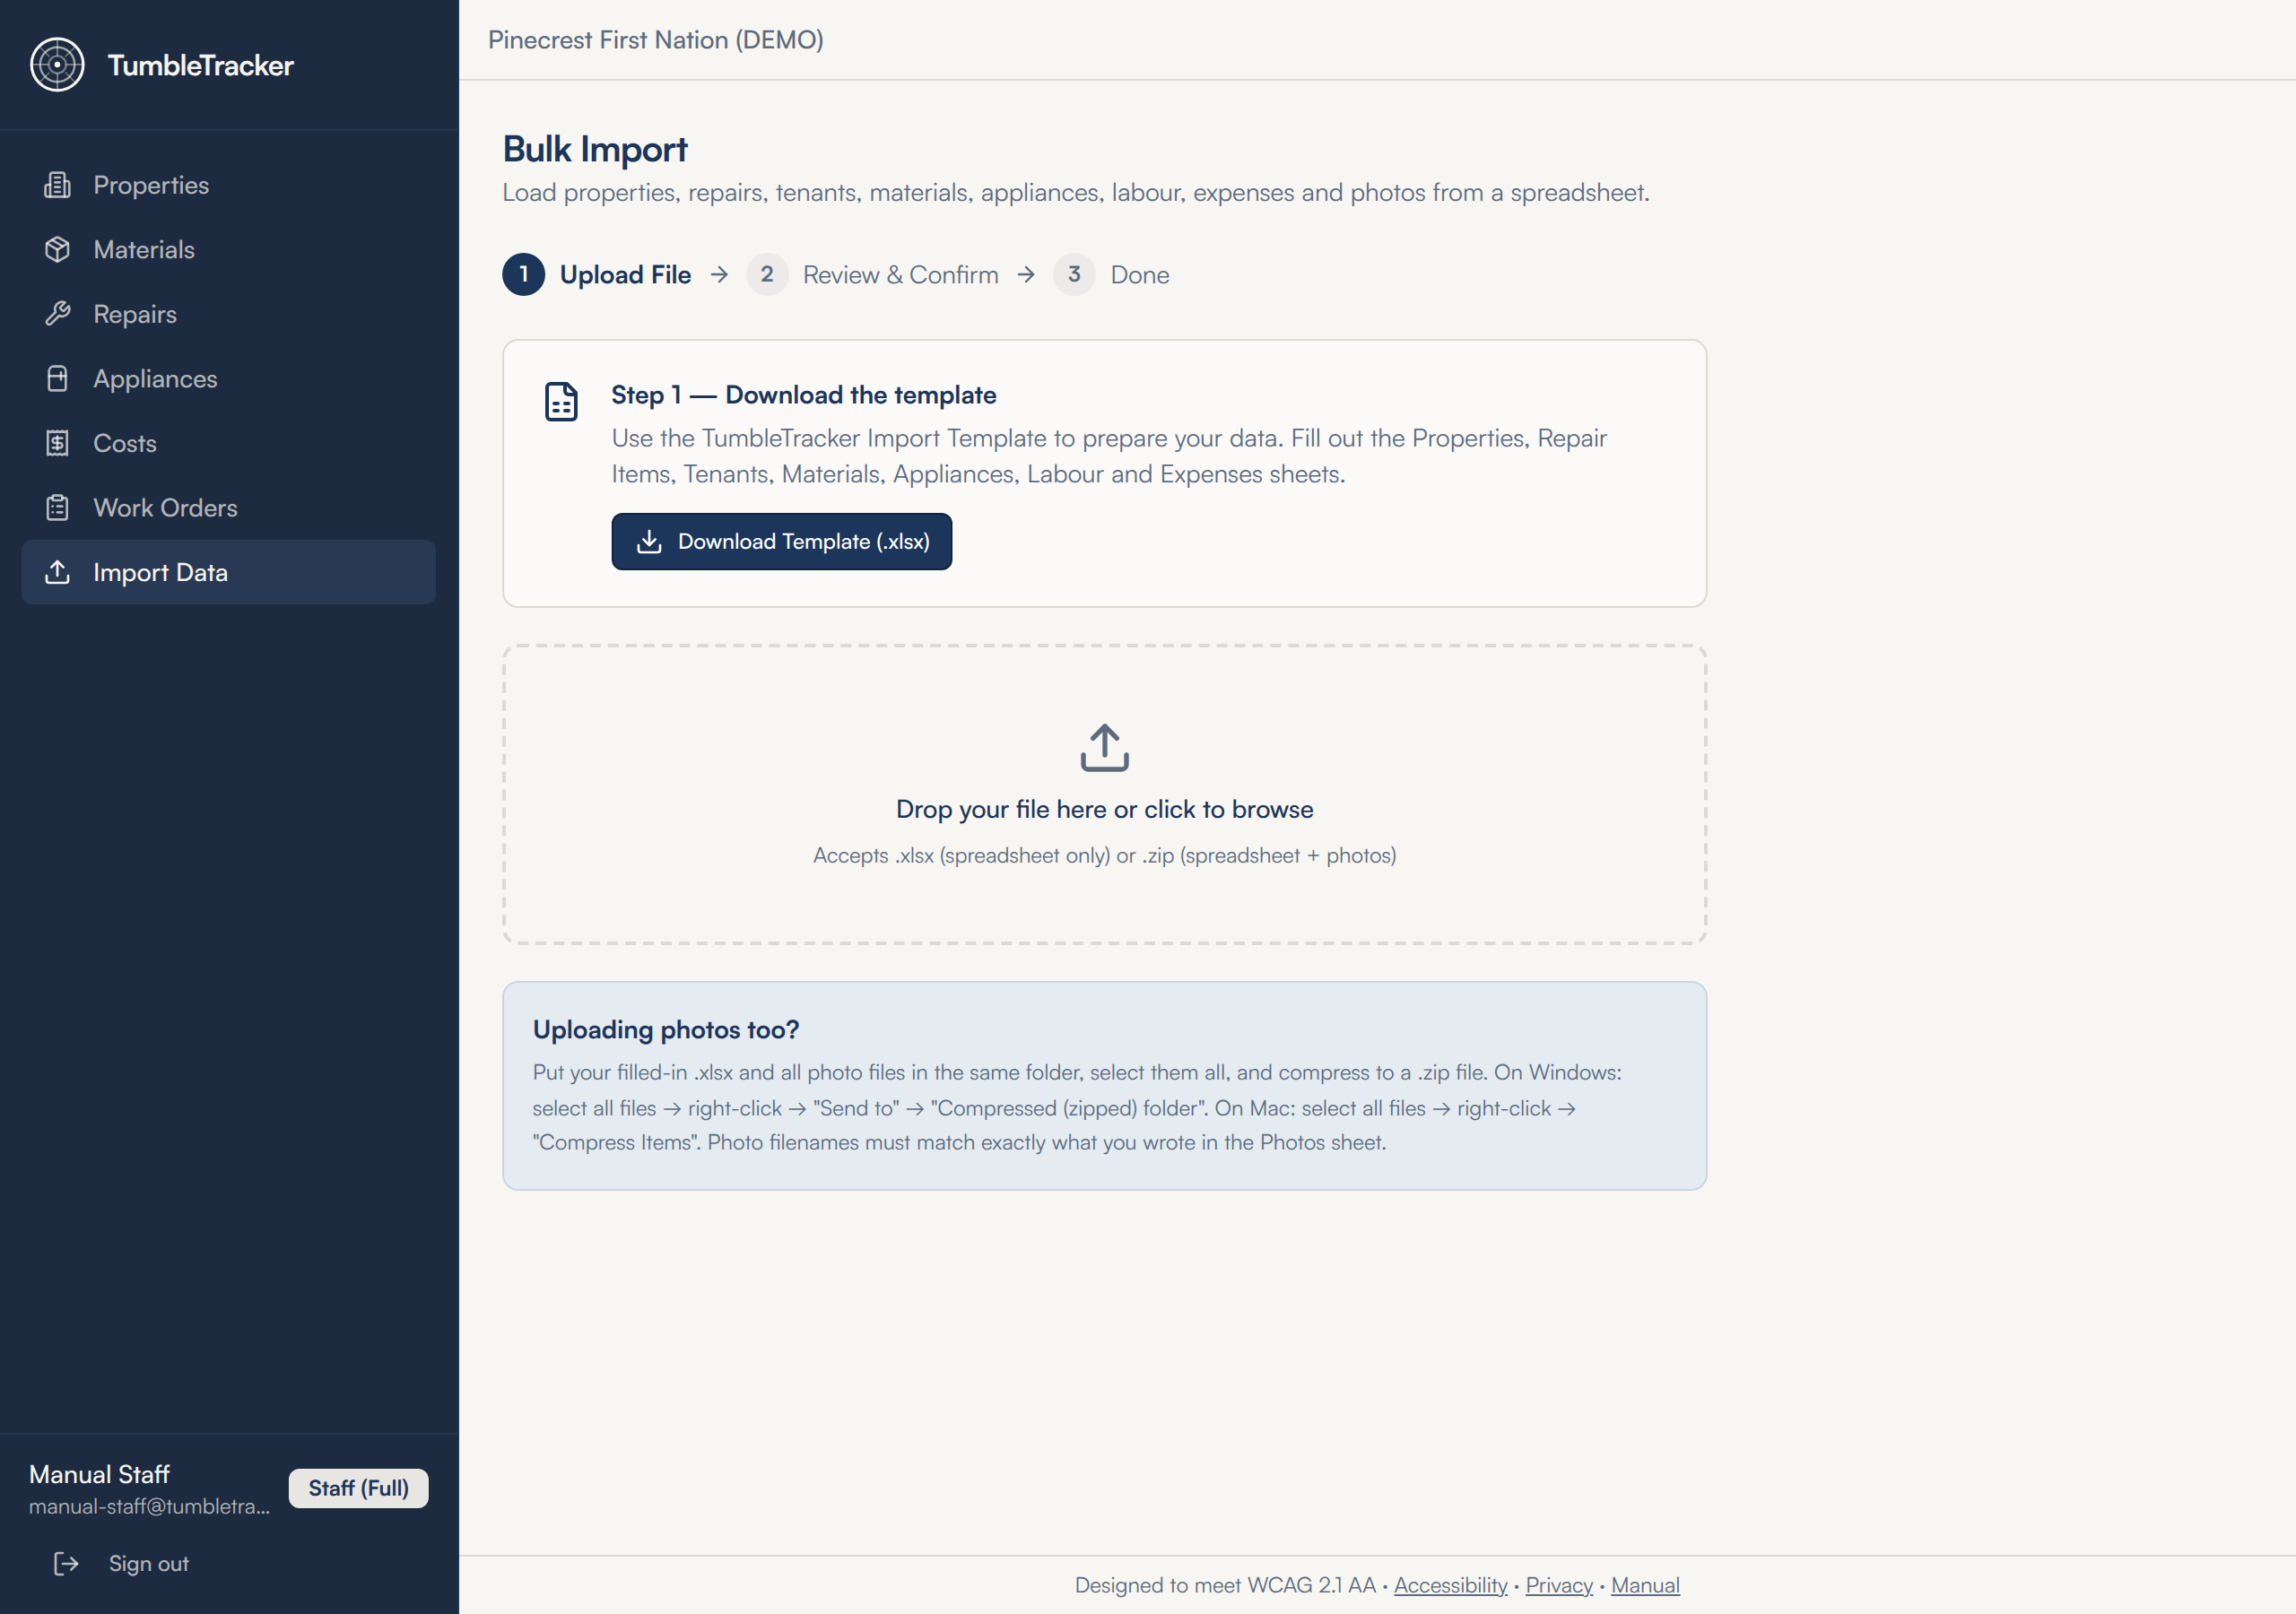
- Click Import Data in the menu. The Bulk Import screen opens.
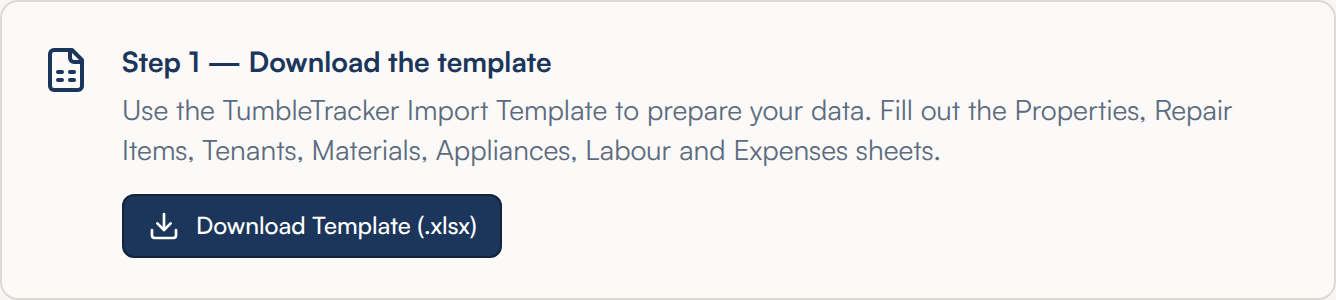
- Click Download Template (.xlsx). The file TumbleTracker_Import_Template.xlsx is saved to your computer. Open it in Excel or any spreadsheet program.
- The first sheet, Instructions, explains the file: how to use it, what each of the nine sheets is for, a COLUMNS list for every sheet saying what each column takes and what the import does with it, and the severity scale, 1 — Low to 5 — Critical. The nine sheets after it are the ones TumbleTracker reads. Do not rename them.
- On every sheet, row 1 says what the sheet is for, row 2 holds the column headings and row 3 marks each column ★ REQUIRED or optional. Your data starts on row 4.
- Keep the headings in row 2 as they are: TumbleTracker finds each column by its heading. A column with a heading it does not know is ignored. If one of its own columns has been renamed, the preview warns, for example Column 'Notes' was not found on the Properties sheet — its values will be left blank.
What goes on each sheet
Required columns are in bold. Fill in only the sheets you need; an empty sheet is skipped. Every sheet also ends with an optional Row Ref column — see Updating what you imported before below.
| Sheet | One row per | Columns |
|---|---|---|
| Properties | house | Property Address, Heating Type, Furnace Filter Size, Has Wood Stove, Notes |
| Repair Items | repair | Property Address, Item, Issue Description, Dangerous? (Yes or No), Severity (1 to 5), Status, Assigned To, Date Completed, Notes |
| Tenants | tenant | Property Address, Tenant Name, Phone, Email, Notes |
| Photos | photo | Photo Filename, Property Address, Linked To, Item Name, Caption / Notes |
| Custom Maintenance Items | custom task | Property Address, Task Description, Season, Category, Why / Notes |
| Materials | material | Property Address, Category, Item, Size / Qty, Reason, Notes |
| Appliances | appliance | Property Address, Appliance Type, Brand, Model / Serial, Location, Installed, Has Warranty, Where Purchased, Warranty Through, Warranty Expires, Notes |
| Labour | labour entry | Property Address, Date (YYYY-MM-DD), Cost ($), Hours, Employee, Description, WO Number |
| Expenses | expense | Property Address, Date (YYYY-MM-DD), Category, Amount ($), Description, Vendor, WO Number |
Filling it in
- The address is what links the sheets. Type it the same way, letter for letter, on every sheet. 103 Riverside Dr and 103 Riverside Drive are two different houses to TumbleTracker.
- Repair Items, Tenants, Photos and Custom Maintenance Items must name a house on the Properties sheet of the same file. Materials, Appliances, Labour and Expenses may also name a house that is already in TumbleTracker.
- Status is Pending, In Progress, Deferred or Completed. Left blank it is Pending. An older sheet that says Complete still imports as Completed; any other word becomes Pending, and the preview warns.
- Severity is a number from 1 to 5 — the same scale as the Repairs chapter, where 5 is Critical.
- Season on a custom task is Monthly, Quarterly, Spring, Fall, Winter, Annual or General. Left blank it is General.
- Write dates as YYYY-MM-DD, such as 2026-04-14. Write money as a plain number such as 162.75; a dollar sign or a comma is fine too. A year on its own, such as 2019, is not a date: an appliance's Installed is then left blank with a warning, and any other date column stops the row with an error.
- Date Completed on a repair is read like every other date, and it is kept only when the repair's Status is Completed — on any other status it is left blank, and the preview warns. A row that moves a repair back from Completed (with its Row Ref) clears the date it had.
- A tenant's Email that is not an email address is left blank, and the preview warns.
- Many columns have a dropdown in the template — heating type, status, severity, season, material category, appliance type, warranty and expense category among them. A value that is not on the list is not refused: the preview warns and the COLUMNS list on the Instructions sheet says what happens to it. Dangerous? and Severity are the exceptions — anything else there is an error.
- An expense Category is one of the eight in the Costs chapter. Short words such as materials, contractor, permit or dump are understood; anything else is imported as Other.
- WO Number is optional. It must be a work order already on that house; if it is not, the cost is still imported, just without the work order.
Uploading and previewing
- On the Bulk Import screen, drop your file on the dashed box, or click the box and pick it. It takes a .xlsx file, or a .zip of the spreadsheet with its photos, up to 90 MB.
- TumbleTracker reads the file and moves to Review & Confirm. Nothing has been saved yet.
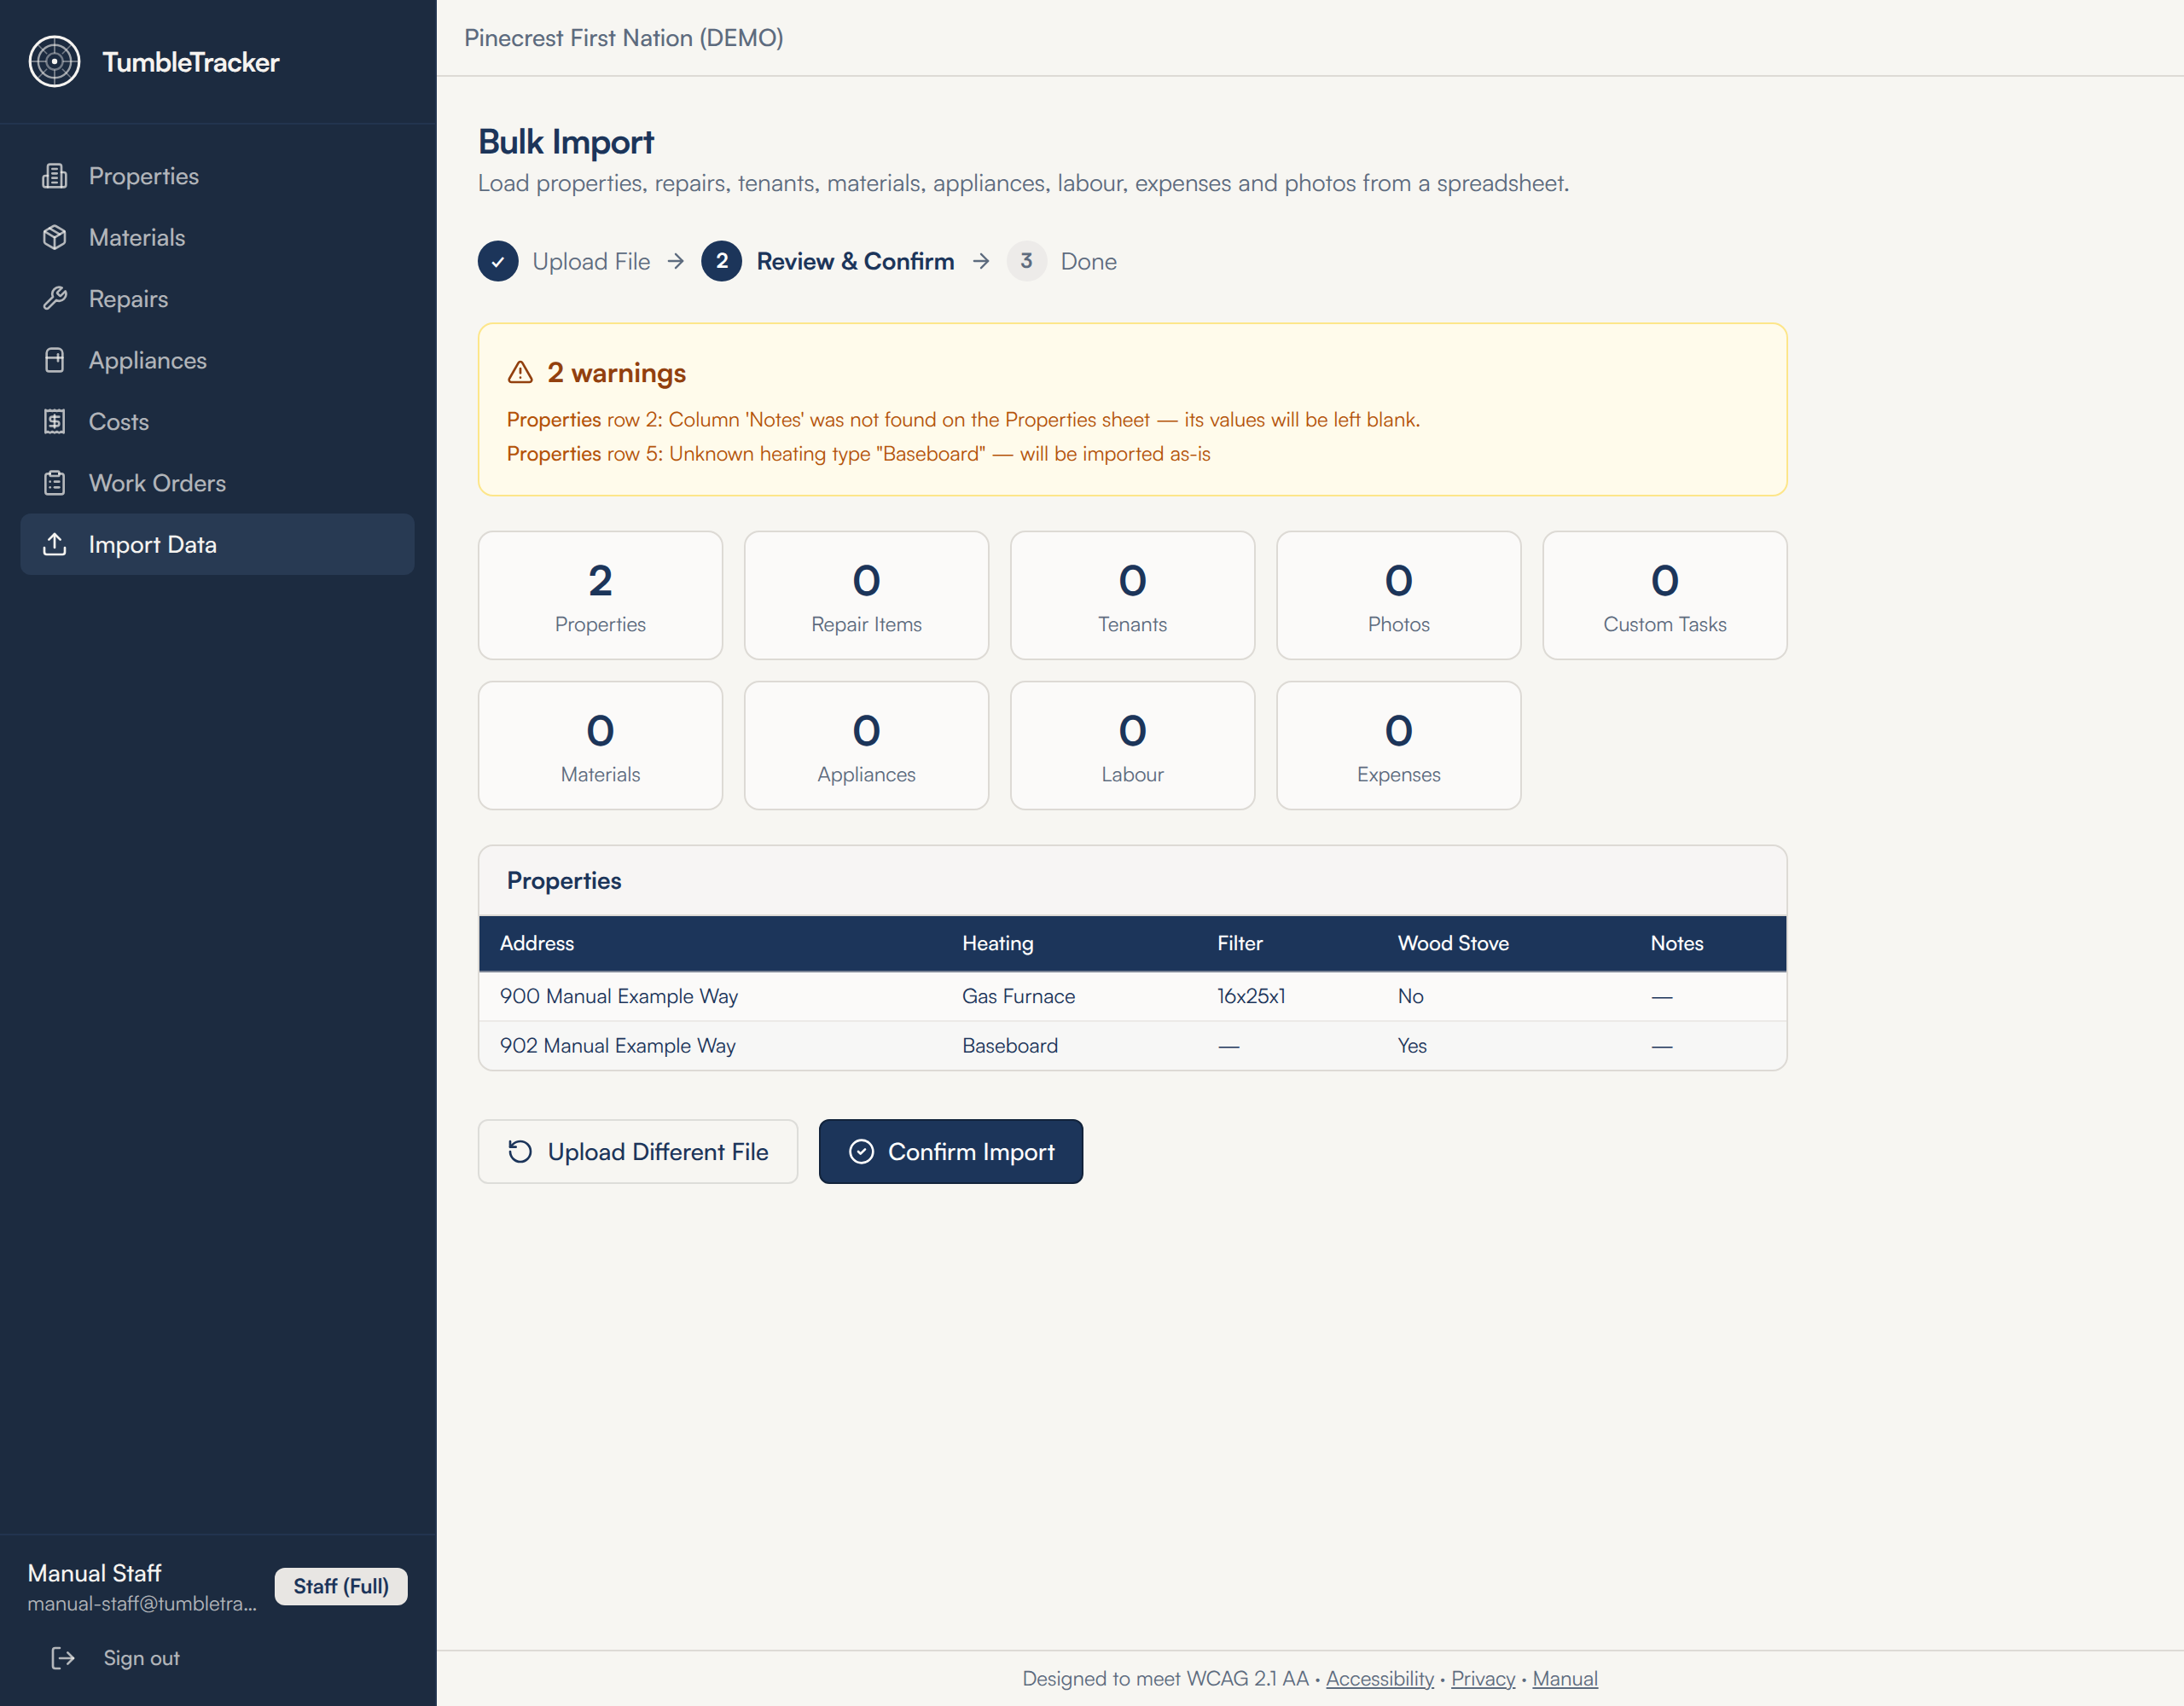
- The count boxes say how many rows of each kind will be added. A row the import will leave alone is not counted — a repair or custom task already on that house, an appliance, labour entry or expense that repeats one, or a row that repeats an earlier row of the file — and a warning names each one. Below the boxes are tables of the Properties, and the first ten Repair Items and Materials, as they will be imported.
- A red box lists errors. While there is even one, there is no Confirm Import button — see Fixing rejected rows below.
- A yellow box lists warnings: rows that will import, but not quite as written — an unknown heating type imported as typed, a status that becomes Pending, a work order number that is dropped, a maintenance-task photo that is skipped, a column whose heading was not found. The template's example rows being ignored shows here too. Read them, then decide whether to fix the file first.
Addresses that did not match
- When a Materials, Appliances, Labour or Expenses row names an address that is neither on the Properties sheet nor already in TumbleTracker, the preview lists it in a yellow box headed didn't match a property, with how many rows use it.
- Choose what to do with each one. Use existing puts the rows on a house you already have — TumbleTracker offers up to three close spellings and pre-picks the closest. When nothing is close, it pre-picks Create new property. Create new property adds a new house with that address. Skip these rows leaves them out.

When the file has materials, the preview also asks how to bring them in. Add keeps each house's current materials list and adds these rows to it. Replace clears the materials list of every house on the sheet first, then adds these — use it when the sheet is the complete list. An item on the sheet that was already on the house's list and ticked Purchased (same item and size) keeps its tick. What Replace removed is kept in the account's records.
Updating what you imported before
The Row Ref column at the end of every sheet is your own reference for the row — a code from your old spreadsheet, or something like H-12 or T-12-1. It is optional. Left blank, the row is added as usual. Give a row a Row Ref when you expect to send the same record again later with changes.
- A Row Ref is used once per sheet, up to 100 characters. The same one twice on a sheet is an error.
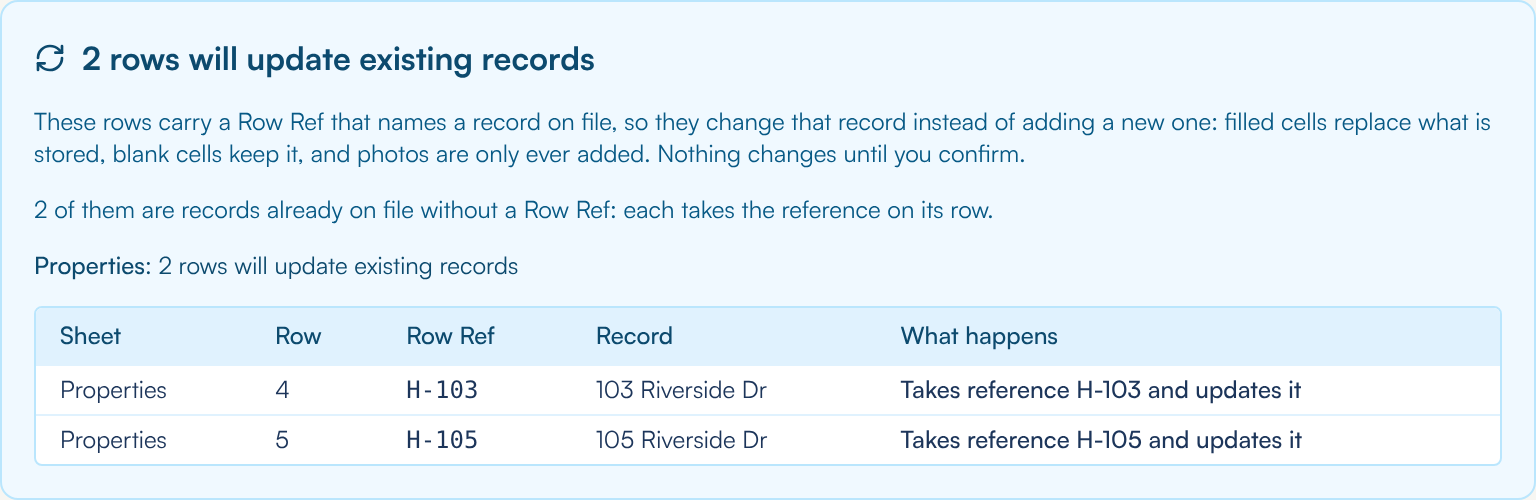
- When a later file carries a Row Ref your community already has, that row updates the record instead of adding another: filled cells replace what is stored, blank cells keep it, and photos are only ever added. A new address on a Properties row renames the house.
- A row that matches a record already on file that has no Row Ref yet — the same house, repair, tenant and so on — gives that record its Row Ref and updates it the same way. This is how records imported before Row Refs existed, or typed in by hand, pick one up.
- Before you confirm, a blue box headed, for example, 2 rows will update existing records counts them, sheet by sheet, and lists each one: its Sheet, Row, Row Ref, the Record it changes (shown as what is on file → what the row makes it when the name changes) and What happens — Updates it, or Takes reference H-103 and updates it for a record taking its first Row Ref.
Fixing rejected rows
- Each error names the sheet and the row, then the problem — for example Repair Items row 7: "Deck Railing": Severity must be 1–5 (got: "6"). The row number is the row number in your spreadsheet, counting the heading rows and any blank or example rows.
- The usual causes: a required column left empty (the template's Instructions sheet says the same — a missing required field stops the import until it is fixed), Dangerous? not exactly Yes or No, a Severity outside 1 to 5, a date or an amount that is not one, or an address on Repair Items, Tenants, Photos or Custom Maintenance Items that is not on the Properties sheet.
- Fix the rows in your spreadsheet and save it. Click Upload Different File and upload it again. The preview is checked afresh.
Import Complete
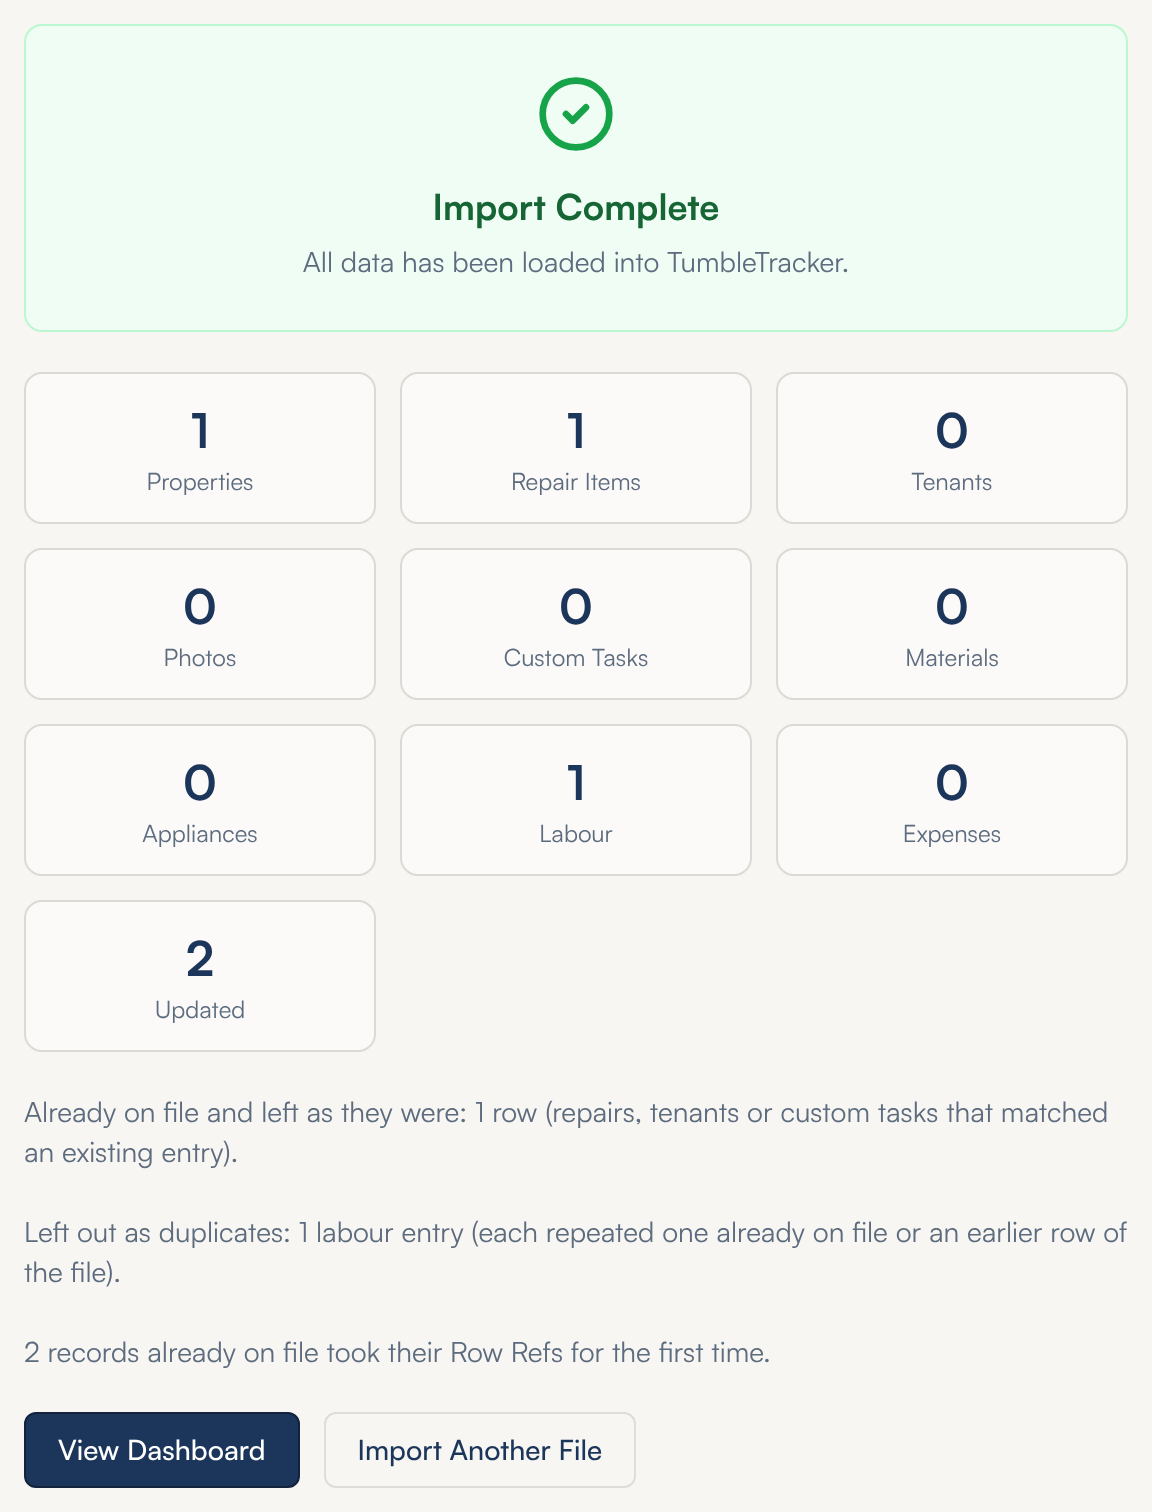
- When the preview looks right, click Confirm Import. The screen shows Import Complete and a tile for how many of each kind were added. Updated counts the records a Row Ref changed.
- Sentences under the tiles say what was left alone: Already on file and left as they were (repairs, tenants or custom tasks that matched one already there), Left out as duplicates (appliances, labour entries and expenses), how many records took their Row Refs for the first time, rows whose Row Ref matched a record that already held those values — nothing needed to change, and photos that were skipped.
- Click View Dashboard to see your houses, or Import Another File to start again.
Where to find it: Import Data in the menu.
13.If you are read-only
You may need to see the houses without changing them — as a manager, a council member or an inspector. For that, your administrator gives you Staff (Read Only) access. This chapter is for you: what the screens look like, and what to do when you need to change something.
How to tell
Look at the bottom of the menu. Beside your name is a badge with your role: Staff (Full) for full access, Staff (Read Only) for read-only access.
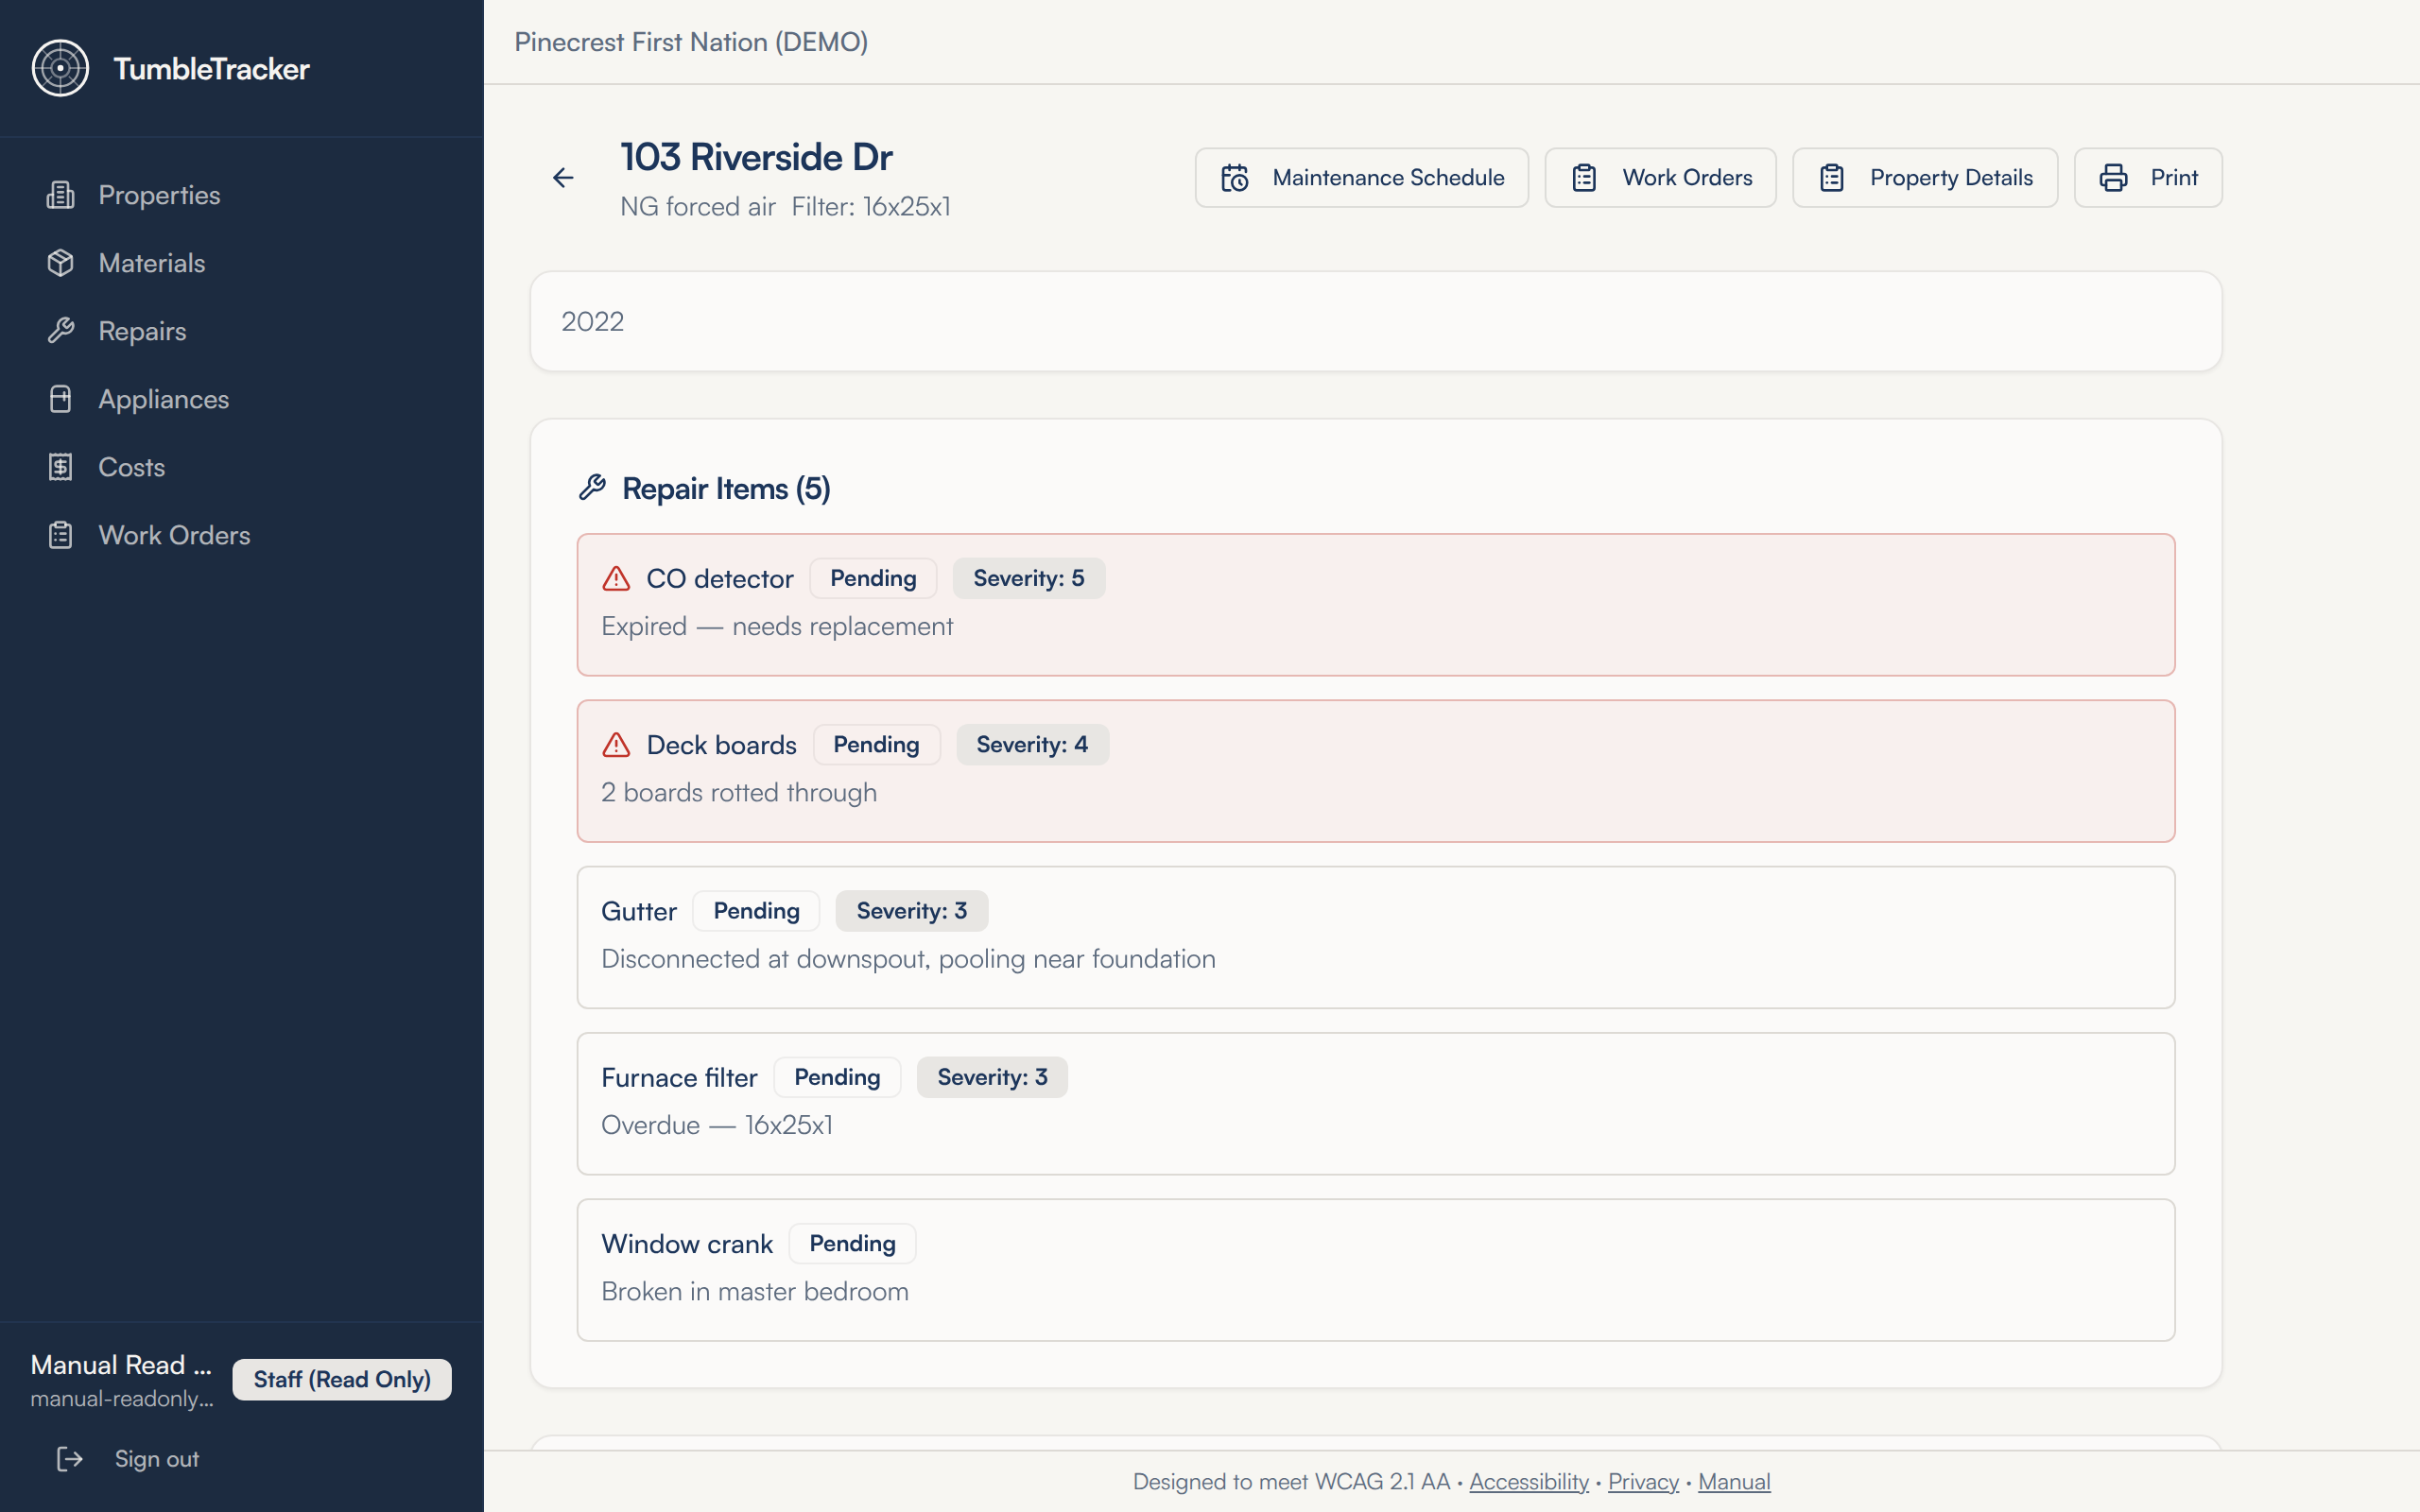
What you can see
Everything. Every house, repair, material, appliance, maintenance schedule, work order, photo, tenant and cost is on your screen, the same as for anyone else in your community. The Repairs, Materials, Appliances, Costs and Work Orders screens in the menu work in full, with every search and filter.
You can print too: the property report, a work order, the materials sheets, and the costs report and its spreadsheet download.
What you cannot do
The buttons that add, change or delete are not on your screen. There is no Add Property, and on a house there is no Edit, Add Photos, Add Repair, Add Material, Add Appliance, Add labour, Add expense or Add Tenant. A repair shows its status as a label instead of a dropdown, and the Purchased tick on a material is greyed out. Property Details opens for reading, with a Close button instead of Save.
On the Maintenance Schedule there is no + Add item, Mark done or Remove, and no Add photo camera button. On Work Orders there is no + Create Work Order or delete bin, and a work order's status is a label, not a dropdown.
Import Data is not in your menu. If you open the import screen by its address, it says Your account is read-only, so it cannot import data. Ask your community administrator to run the import, or to change your role.
Getting more access
Your community's administrator decides who has which role, and can change yours in Manage Users. It takes effect the next time your screen loads. If you do not know who your administrator is, email [email protected] and we will put you in touch with them.
Where to find it: your role badge is at the bottom of the menu, beside your name.
14.Screen reference
Every screen in TumbleTracker, in the order of the menu, with every button on it: what it does and who sees it. All means Admin, Staff (Full) and Staff (Read Only) alike; Staff in the Who column means Staff (Full). The chapter that explains a screen in full is named under its heading.
Properties
The first screen after you sign in. Properties in the menu. Chapter 3.
| Button | What it does | Who |
|---|---|---|
| Add Property | Opens Add New Property | Admin · Staff |
| Properties card | Counts the houses on your list (not a link) | All |
| Dangerous card | Opens Repairs showing open dangerous items | All |
| Pending Repairs card | Opens Repairs showing Pending items | All |
| Total Repairs card | Opens Repairs showing every item | All |
| Maintenance Due card | Counts jobs overdue or due in the next 14 days (not a link) | All |
| Warranties Expiring card | Opens Appliances showing warranties expiring soon | All |
| A line under Maintenance Due | Opens that house's Maintenance Schedule | All |
| Search properties... | Filters the list by address as you type | All |
| A house | Opens the house's page | All |
| Photo count on a house | Opens the house straight at its photo gallery | All |
Add New Property
Properties → Add Property. Chapter 3.
| Button | What it does | Who |
|---|---|---|
| Back arrow | Returns to Properties without saving | Admin · Staff |
| Save Property | Saves the house and opens its page | Admin · Staff |
| Cancel | Returns to Properties without saving | Admin · Staff |
A house's page
Properties → a house. Chapters 3 to 7 and 10.
| Button | What it does | Who |
|---|---|---|
| Back arrow | Returns to Properties | All |
| Maintenance Schedule | Opens the house's maintenance schedule | All |
| Work Orders | Opens the house's work orders | All |
| Property Details | Opens the building record (read-only users get Close, not Save) | All |
| Edit | Changes the address, heating, filter size, wood stove and notes | Admin · Staff |
| Add Photos | Uploads photos to the house gallery | Admin · Staff |
| Opens Print Report for the house | All | |
| Repair Items: Add Repair | Logs a new repair | Admin · Staff |
| Repair: status dropdown | Sets Pending, In Progress, Deferred or Completed, saved at once | Admin · Staff |
| Repair: Photo | Attaches a photo to that repair | Admin · Staff |
| Repair: red bin | Deletes the repair after Delete | Admin · Staff |
| Materials: Print this house's materials | Opens Print Materials for this house | All |
| Materials: Add Material | Adds a material to the list | Admin · Staff |
| Material: Purchased tick | Marks it bought, saved at once | Admin · Staff |
| Material: wrench / red bin | Edits / deletes the row | Admin · Staff |
| Appliances: Add Appliance | Records an appliance and its warranty | Admin · Staff |
| An appliance row | Opens its details | All |
| Appliance: Edit (or + Are there warranties?) / red bin | Edits / deletes the appliance | Admin · Staff |
| Appliance: Upload receipt / remove | Attaches / removes the warranty receipt | Admin · Staff |
| Appliance: View receipt | Opens the receipt | All |
| Costs: Add labour / Add expense | Logs a cost on the house | Admin · Staff |
| Cost: pencil / red bin | Edits / deletes the entry | Admin · Staff |
| Cost: paperclip / Show all | Opens the receipt / lists every entry past ten | All |
| Photos: Add Photos | Same as the button beside the address | Admin · Staff |
| A photo | Opens it full size | All |
| Photo viewer: red Delete photo | Deletes the open photo after Delete | Admin · Staff |
| Tenants / Residents: Add Tenant | Adds a tenant | Admin · Staff |
| Tenant: pencil / red bin | Edits / removes the tenant | Admin · Staff |
| Delete Property (foot of the page) | Deletes the house and everything under it | Admin |
Maintenance Schedule
A house → Maintenance Schedule. Chapter 8.
| Button | What it does | Who |
|---|---|---|
| Back arrow | Returns to the house | All |
| + Add item | Adds a job from the standard list | Admin · Staff |
| Frequency dropdown on a row | Changes how often the job comes round, saved at once; Next due moves to match, counted from Last done | Admin · Staff |
| Mark done | Records the job done today and moves Next due on | Admin · Staff |
| Add photo (camera, under Last done) | Adds a photo to the latest Mark done; shown once a job has been marked done | Admin · Staff |
| Maintenance photo thumbnail / Delete photo in the viewer | Opens it full size / deletes it after Delete | All / Admin · Staff |
| Remove | Takes the job off the schedule after Delete | Admin · Staff |
| Custom tasks for this house: + Add custom task | Adds a job for this house only | Admin · Staff |
| Custom task: Mark done / Remove | Records it done today / removes it and its history | Admin · Staff |
Work Orders (one house)
A house → Work Orders. Chapter 9.
| Button | What it does | Who |
|---|---|---|
| Back arrow | Returns to the house | All |
| + Create Work Order | Opens New Work Order; Save & Print saves it | Admin · Staff |
| Print on a row | Opens the work order sheet | All |
| Red bin on a row | Deletes the work order after Delete | Admin · Staff |
Print Report
A house → Print. Chapter 11.
| Button | What it does | Who |
|---|---|---|
| Back arrow | Returns to the house | All |
| Year box | Picks the year of the maintenance checklist | All |
| Section ticks | Put Repairs, Appliances, Costs, Maintenance, Tenants, Photos, Property Details in or out | All |
| Opens your browser's print window; grey until every ticked section has loaded | All |
Materials
Materials in the menu. Chapter 6.
| Button | What it does | Who |
|---|---|---|
| Search item, type, or house... | Filters as you type | All |
| All houses | Narrows to one house | All |
| All / Outstanding / Purchased | Filters by whether it has been bought | All |
| Item type chips | Switch single item types on and off | All |
| By item / By house | Groups the list as a shopping list / a drop-off list | All |
| Print (Print shopping list with types chosen) | Opens Print Materials with the same filters | All |
Print Materials
Materials → Print, or a house → Print this house's materials. Chapter 6.
| Button | What it does | Who |
|---|---|---|
| Back arrow | Returns to Materials | All |
| Opens your browser's print window | All |
Repairs
Repairs in the menu. Chapter 5. For looking only; changes are made on the house.
| Button | What it does | Who |
|---|---|---|
| Search house, item, issue, who... | Filters as you type | All |
| All houses | Narrows to one house | All |
| Status dropdown | All statuses, Open (not Completed), Pending, In Progress, Deferred, Completed | All |
| Dangerous only | Shows only dangerous items; click again to switch off | All |
| A house name | Opens that house | All |
Appliances
Appliances in the menu. Chapter 7. For looking only; changes are made on the house.
| Button | What it does | Who |
|---|---|---|
| Search house, type, brand, model... | Filters as you type | All |
| All houses | Narrows to one house | All |
| Warranty dropdown | All warranties, Expiring soon, Expired, Under warranty, No warranty on file | All |
| Type chips | Switch single appliance types on and off | All |
| A house name | Opens that house | All |
Costs
Costs in the menu. Chapter 10.
| Button | What it does | Who |
|---|---|---|
| Community / Property | Reports on every house / on the house you choose | All |
| Period | This month, Last month, This year, Last year, All time | All |
| From / To | Your own dates (Custom range) | All |
| Prints the report | All | |
| Download spreadsheet | Saves the report as an Excel file | All |
| An address under By property | Opens that house | All |
Work Orders (every house)
Work Orders in the menu. Chapter 9. New work orders start from a house.
| Button | What it does | Who |
|---|---|---|
| Open / All | Shows only work orders still Issued or In Progress / every work order, Completed and Cancelled too | All |
| Status dropdown on a row | Sets Issued, In Progress, Completed or Cancelled, saved at once (read-only users see a label) | Admin · Staff |
| Print on a row | Opens the work order sheet | All |
A work order sheet
Print on any work order, or Save & Print. Chapters 9 and 10.
| Button | What it does | Who |
|---|---|---|
| Back | Returns to the house | All |
| Status dropdown beside Print | Sets Issued, In Progress, Completed or Cancelled, saved at once; the status and closed date print in the header (read-only users see a label) | Admin · Staff |
| Prints the sheet (the buttons and costs card are left off) | All | |
| Costs on: Add labour / Add expense | Logs a cost against this work order | Admin · Staff |
| Cost: pencil / red bin | Edits / deletes the entry | Admin · Staff |
Import Data
Import Data in the menu. Chapter 12. Not in a read-only user's menu; opened by its address, the screen says the account is read-only and cannot import.
| Button | What it does | Who |
|---|---|---|
| Download Template (.xlsx) | Saves the import template | Admin · Staff |
| Dashed drop box | Uploads a .xlsx or .zip and shows the preview | Admin · Staff |
| Blue rows will update existing records box | Lists the rows whose Row Ref changes a record on file (nothing to click) | Admin · Staff |
| Unmatched address choice | Use existing, Create new property or Skip these rows | Admin · Staff |
| Add / Replace | How imported materials meet each house's list | Admin · Staff |
| Upload Different File | Back to step 1; nothing is saved | Admin · Staff |
| Confirm Import | Saves everything in the preview | Admin · Staff |
| View Dashboard / Import Another File | After the import: to Properties / start again | Admin · Staff |
On every screen
| Button | What it does | Who |
|---|---|---|
| Skip to main content | Keyboard only: the first thing Tab reaches; jumps past the menu to the page | All |
| Open menu / Close menu | In a window narrower than 1024 pixels (a phone or tablet): the three-line button at the top left opens the menu; the × in it, a tap outside it or picking a screen closes it | All |
| Sign out | Signs you out (bottom of the menu) | All |
| Accessibility / Privacy | Open the accessibility statement / the privacy policy (foot of the screen) | All |
| Manual | Opens this manual in a new tab (foot of the screen) | All |
When something cannot load
If a list or a page cannot be read from TumbleTracker — a dropped connection, say — it never shows up empty. In its place is a box saying Couldn’t load and what, with a Try again button; a count on the Properties screen that could not be read shows a dash (—) instead of 0. Not found appears only when the thing really is gone. If Try again keeps failing, wait a minute or reload the page.
Need help? Email [email protected].